这篇博客主要是我学习 Nodejs 过程中记录的笔记整理而成,主要围绕基础概念及进阶应用进行阐述及举例说明。
This post will cover fundamentals, practical coding examples, and advanced techniques learned through building a Node.js backend.
- Code Tree
- 基础概念 Fundamentals
- JavaScript
- 中间件 Middleware
- Mongoose 与 MongoDB 数 据建模
- CRUD 操作与 API 设计
- 安全与用户认证 Security and Authentication
- 项目管理 MVC
- 调试、错误处理与性能优化
- 常见报错及解决
Code Tree
源码在这里 Github: Natours-BackEnd,可以结合代码注释,搜索查看文章,结合 API 文档 使用 Postman 进行调试,会理解更加深刻
官方课程:Node.js, Express, MongoDB & More: The Complete Bootcamp
B 站链接:【Udemy 付费课程】Node.js, Express, MongoDB & More: The Complete Bootcamp 2022(中英文字幕)
1 | Natours |
1 | npm i express # Express 框架 |
基础概念 Fundamentals
Core Concepts
什么是 Synchronous/Asynchronous?
Reference Link: 常常讓人搞混的 Synchronous Programming 和 Asynchronous Programming
- sync 同步是按顺序执行,等待返回响应后才继续执行,也叫做
blocking code,执行慢 - async 异步是请求后立刻返回响应,不等他返回结果,向下执行,也叫
non-blocking code,推荐,执行快 - async 的理解有点像小学数学题:最短时间完成几件事,不用等着,可以利用这段时间去做其他事情
- 为什么要使用 async 而不是 sync:因为 node 是单线程,如果用 sync,一个堵塞会导致整个程序变慢,其他人需要等待,非常影响用户体验
什么是 callback?
Reference Link:什麼是 Callback 函式 一次搞懂同步與非同步的一切
- 一个函数成为另一个函数的参数,让函数可以控制参数函数的执行时机
- Callback function 的用途就在于可以让我们的程序在无论同步还是不同步执行的情况下都可以按顺序执行程序。
- Callback != Async
什么是 Promise 与 async/await?
Reference Link:详解 JavaScript Promise 和 Async/Await
什么是 middleware?
Reference Link: 何謂 Middleware?如何幫助我們建立 Express 的應用程式
Video Link: Middleware and the Request and Response cycle
说说我自己的理解:
middleware 分为全局和局部,如果作用在 app.js,那么他就是全局的,如果作用在单独的 route 文件或者特定的 route,那么他就是局部的。全局 middleware 会影响所有请求,而局部 middleware 仅在特定 route 中生效。
middleware 常用于使用
app.use()来注册。也可以在定义 route 时,将 middleware 作为参数传入,如:1
app.get('/path', middlewareFunction, (req, res) => { ... });
middleware 有相关的库可以直接调用,也可以自定义,自定义 middleware 通常需要遵循
(req, res, next)的函数签名。middleware 与书写顺序强相关,执行顺序是严格按照它们注册的顺序进行的
Middleware 必须调用
next()来传递控制权,否则请求会停在当前 middleware,最终导致请求超时或挂起。调用next()时也可以传递错误对象 (err),从而触发错误处理中间件 (Error Handler)。middleware 执行于 req 与 res 之间,在请求 (
req) 到达路由处理器和响应 (res) 返回客户端之间发挥作用,负责诸如请求解析、身份验证、日志记录、安全控制等工作。
其他
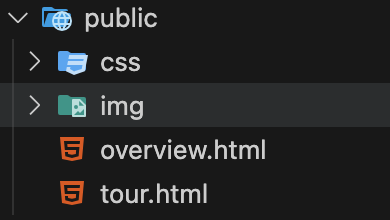
静态文件通过 public 文件夹获取而不是 route,详见middleware板块
查看 nodejs 环境变量
1
console.log(process.env);
命令行新增环境变量:在 terminal 中,执行 node server.js 前,加上想新增的环境变量,如下面的例子
1
NODE_ENV=development node server.js
文件新增环境变量:.env,搭配 dotenv.config() 库一起使用。想要使用.env 文件写环境变量,需要安装 dotenv 库并在最开始引入,可以不用调用
1
dotenv = require("dotenv").config();
如果不使用.env 而是使用 config.env 或者其他名称的 env 文件,配置时输入 path,这里的 path 相对于程序执行目录(也就是 server.js 所在的目录),而不是当前目录。
1
dotenv.config({ path: "./config.env" });
Config.env 和.env 的区别是什么?什么情况下选择用哪一个?
感觉都可以,就是配置 config() 时有点区别。.env 是广泛使用的标准文件名,dotenv 会默认加载根目录下的.env 文件,而 config.env 需要额外配置 path
morgan 用于打印日志,设置为仅在开发环境下运行

1
2
3if (process.env.NODE_ENV === "development") {
app.use(morgan("dev"));
}使用 eslint、prettier 更好地检测错误,可以结合
.eslintrc.json和.prettierrc文件使用Offical Link: https://prettier.io/docs/options
1
npm i eslint prettier eslint-config-prettier eslint-plugin-prettier eslint-config-airbnb eslint-plugin-node eslint-plugin-import eslint-plugin-jsx-a11y eslint-plugin-react --save-dev
fs 模块
Offical Link: https://nodejs.org/api/fs.html
fs 是文件库,可以读写文件
fs.readFileSync: (path, option),path 可以用相对路径,引号包裹;option 可以写 encoding,比如’utf-8’,否则会返回一个 buffer 而不是字符串
fs.writeFileSync: (path, data, option),path 相对路径,data 写入的内容,option 可以不写,默认 utf8,比如fs.writeFileSync('./outtext.txt', textOut)fs.readfile: (path, option, callback),path 相对路径,option 写 utf-8,默认是 none, buffer,callback 回调函数fs.writeFile: (path, data, option, callback),path 相对路径,data 需要写入的内容,option 默认是 utf-8,callback
JavaScript
字符串中写 js,用
``包裹内容并加上${}写 js 变量1
const textOut = `This is what we know about avocado: ${textIn}`;
Object.assign:将两个 object 合并在一起
JSON.parse:将 json 转换为 object
JSON.stringify:将 object 转换为 json
__dirname:获取当前路径
Array.push():将当前数据加入到列表
Array.find() : 返回第一个 callback 函数名中的数据
1
2
3
4
5
6
7
8const inventory = [
{ name: "apples", quantity: 2 },
{ name: "bananas", quantity: 0 },
{ name: "cherries", quantity: 5 },
];
const result = inventory.find(({ name }) => name === "cherries");
console.log(result); // { name: 'cherries', quantity: 5 }字符串转数字:
1
id = req.params.id * 1;
浅拷贝,深拷贝
以下四种方式的区别与使用,待补充…
Object.assign
JSON.parse(JSON.stringify())
{…req.query}
Object.getOwnPropertyNames - 最后用的是这种,其他三种都试过,都不能拷贝不可枚举的信息
中间件 Middleware
原理
Offical Link: Express Middleware
Middleware functions are functions that have access to the request object (
req), the response object (res), and the next middleware function in the application’s request-response cycle. The next middleware function is commonly denoted by a variable namednext.
常用中间件
获取当前时间,加入到请求体中
1
2
3
4app.use((req, res, next) => {
req.requestTime = new Date().toISOString();
next();
});打印日志
1
const morgan = require("morgan");
访问 public 文件夹下的静态文件,如 css、html、图片等
前提:根目录下有一个
public文件夹,文件夹中存放了 css、html、图片等文件,如 tour.html在
app.js中使用下面的中间件,程序运行后,打开浏览器 http://localhost:4001/tour.html 就能看到 html 页面了,链接不需要包含/public链接不包含
/public的原因,当我们打开一个 url,在任何 route 都找不到的情况下,express 会去 public 文件夹下找,此时 public 文件夹被设为根目录,所以不用包含它1
app.use(express.static(`${__dirname}/public`));
检测/:id 是否存在,getOne, updateOne, deleteOne 时使用
1
2
3
4
5
6
7
8
9
10
11// val 通过路由参数传入的值,这里其实就是 req.params.id
exports.checkID = (req, res, next, val) => {
console.log(`check ID ${val}`);
if (req.params.id * 1 > tours.length) {
return res.status(404).json({
status: "fail",
message: "Invalid ID",
});
}
next();
};1
2
3const router = express.Router();
// 使用 param 解析做中间件,对于路由中含有 :id 参数的所有请求,都先执行一次 checkID 中间件。
router.param("id", tourController.checkID);验证请求体 req.body 是否包含特有字段
1
2
3
4
5
6
7
8
9
10
11exports.checkBody = (req, res, next) => {
if (!req.body.name || !req.body.price) {
return res.status(400).json({
status: "fail",
message: "need name or price",
});
}
next();
};
// 下面中间件的使用说明先 check Body,无误后执行 create 操作
router.route("/").post(tourController.checkBody, tourController.createTour);
其他中间件库
检查输入符不符合要求 validation,使用
JoiJWT 验证
express-jwt权限验证
express-jwt-authz
Mongoose 与 MongoDB 数 据建模
Official Link: Model SchemaTypes
Reference Link: 開始使用數據庫(Mongoose)
Object Data Modeling (ODM),可以直接用 JavaScript 在 mongoose 上操作 mongoDB
mongoose.schema:定义每个字段的数据类型,设定默认值、必填项、数据范围、正则表达式匹配等验证规则,定义 pre 和 post 钩子,用于在执行 save、remove 等操作前后执行自定义逻辑。mongoose.model:Model 是基于这个 Schema 创建的一个类,它既提供了操作数据的方法(比如查询、保存、更新等),也负责和数据库中的集合进行交互。通过mongoose.model('ModelName', schema),我们将 Schema 编译成一个 Model。下面的 Schema 仅作为示例,查看对应注释学习使用:
1
2
3
4
5
6
7
8
9
10
11
12
13
14
15
16
17
18
19
20
21
22
23
24
25
26
27
28
29
30
31
32
33
34
35
36
37
38
39
40
41
42
43
44
45
46
47
48
49
50
51const hotelSchema = mongoose.Schema({
name: {
type: String, // 定义数据类型
require: [true, "A tour must have a name"], // 指定该字段是必填字段,Array 可以在保证必填字段的同时显示错误信息
unique: true // 指定字段唯一,不能有两个重名 name
trim: true, // 用于删除字符串开头和结尾的多余空格
maxlength: [40, 'A tour name must have less or equal than 40 characters'],
minlength: [10, 'A tour name must have more or equal than 10 characters'],
},
email: {
type: String,
required: [true, 'Please tell us your email!'],
unique: true,
lowercase: true, // 自动转小写
validate: [validator.isEmail, 'Please provide a valid email'], // validator 库,验证 email 格式
},
images: [String], // 代表 image 是 string,但是是一个数组合集
createdAt: {
type: Date,
default: Date.now(), // 获取当前日期,毫秒级别,自动解析为可读形式
},
difficulty: {
type: String,
required: [true, 'A tour must have difficulty'],
enum: { // 验证字符串与 values 一致,否则报错 message 内容
values: ['easy', 'medium', 'difficult'],
message: 'Difficulty is either: easy, medium and difficult',
},
},
ratingAverage: {
type: Number,
default: 4.5, // 设置默认值
max: [5, 'A rating must less than 5'],
min: [1, 'A rating must more than 1'],
set: (val) => Math.round(val * 10) / 10, // 设置数值四舍五入保留 1 位小数
},
passwordConfirm: {
type: String,
minlength: 8, // 最小长度为 8
required: [true, 'Please confirm your password'],
validate: { // 自定义 validator,这里是验证密码是否一致
validator: function (el) {
return el === this.password;
},
message: 'passwords are not the same',
},
select: false, // 表示查询时不返回该字段
},
})
module.exports = mongoose.model('tour', tourSchema);
数据模型设计
Data Modeling 数据建模
Question:
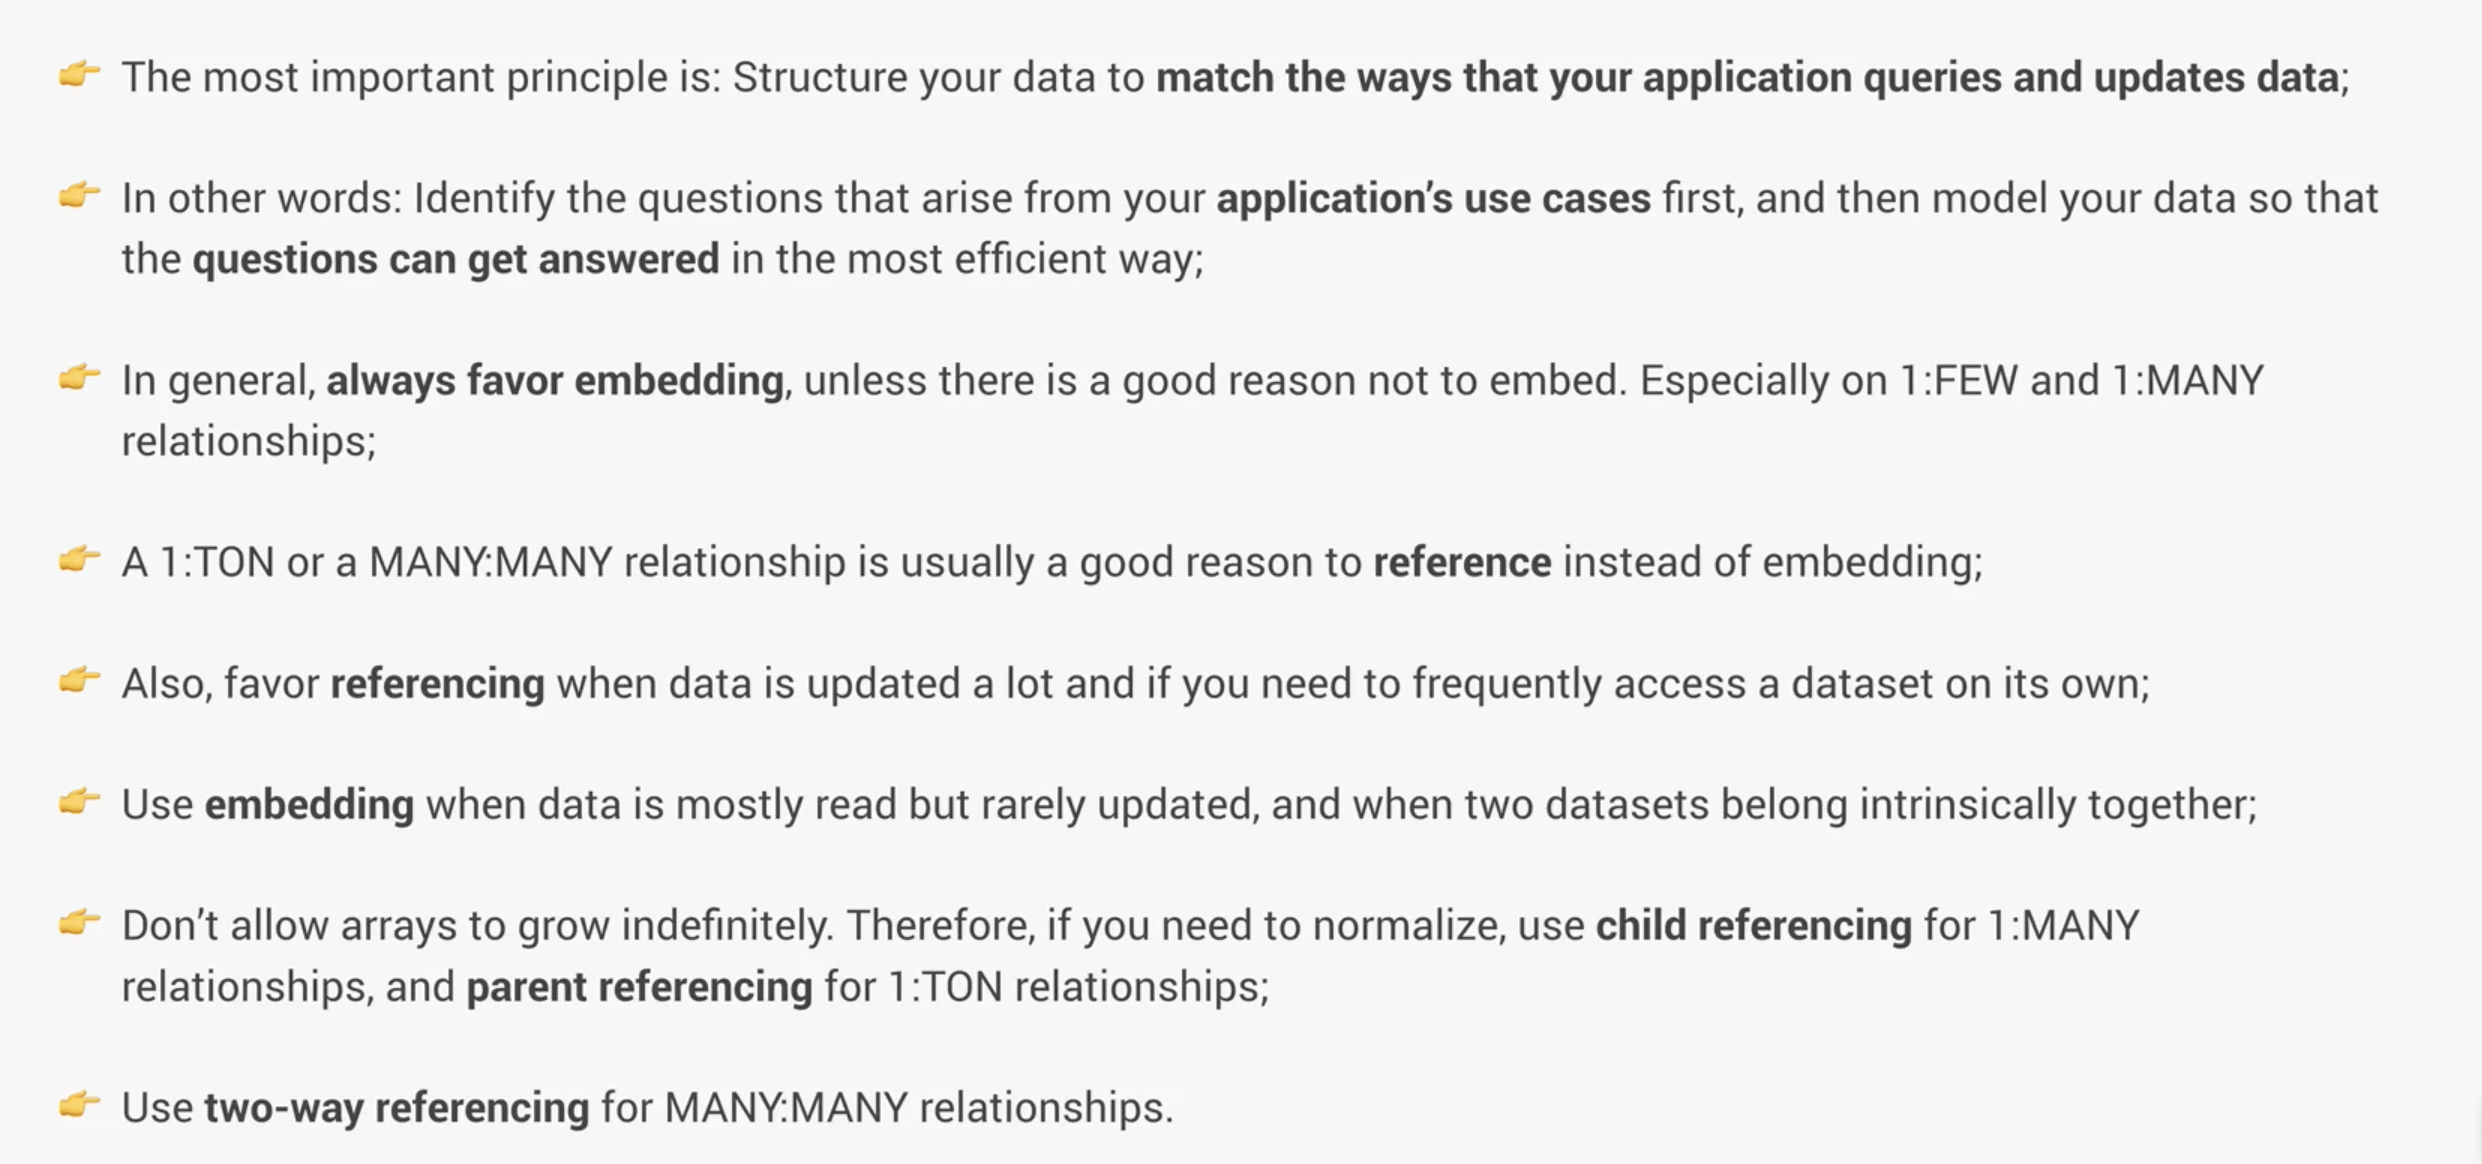
- 考虑不同类型数据之间的关系,如何识别
- Referencing/normalization vs embedding/denormalization 引用 vs 嵌入式之间的区别
- 什么情况下使用 embedding/referencing documents
- type of referencing 不同类型的引用
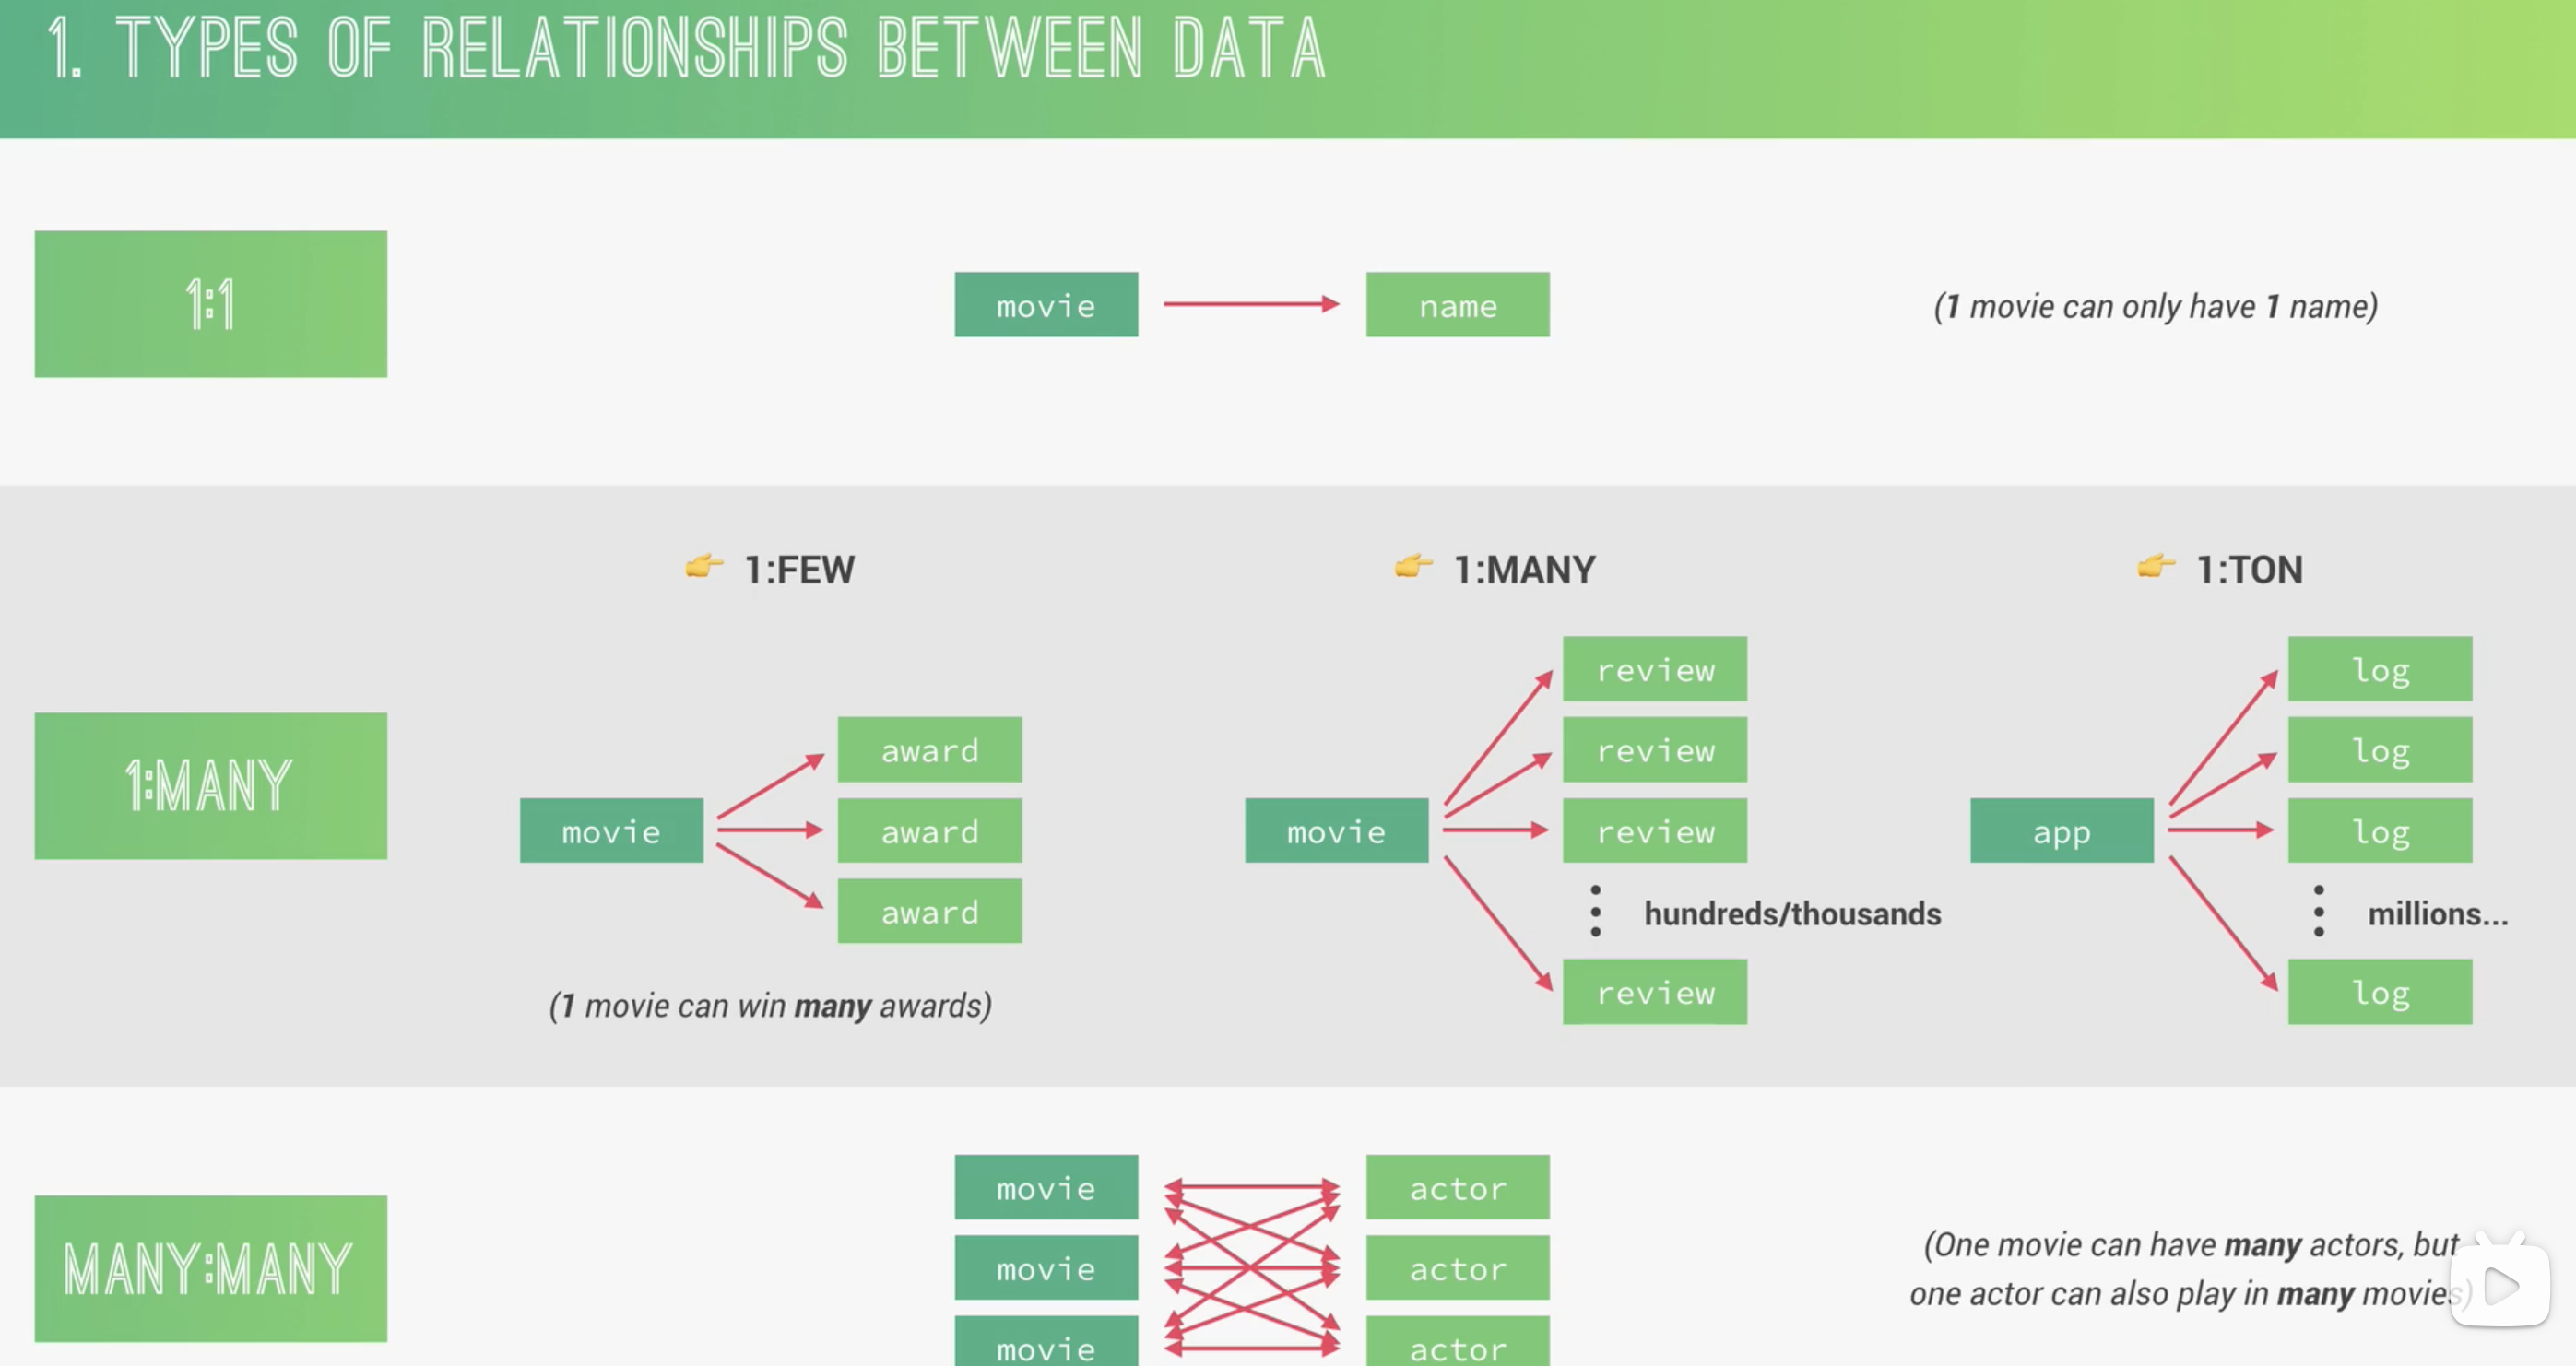
不同类型数据关系
1:1
1 个 field 对应 1 个 value,比如 movie: name
1:many(最重要)
1:few -> move: award 电影的奖项不会很多
1:many -> movie: reviews 电影的评论可能在成百上千
1:ton -> app: logs app 的日志可能上万
Many: many
Movies: actors 电影有不同的演员,演员也会演不同的电影
Referencing/normalization vs embedding/denormalization
Referencing 通过主键与外键进行链接映射,一个 movie 有自己的 document,不同的 actors 也有各自的 documents,通过 ID 映射在一起
embedding 将 actors 嵌入到 movie 的 document 中,好处是减少对数据库的查询,提高性能,坏处是不能单独对 actor 进行查询

什么情况下使用 embedding/referencing documents
数据集之间的类型关系 how two dataset are related to each other
数据访问模式 how often data is read and writen
如何从数据库中查询 How much data is related? how we want to query?
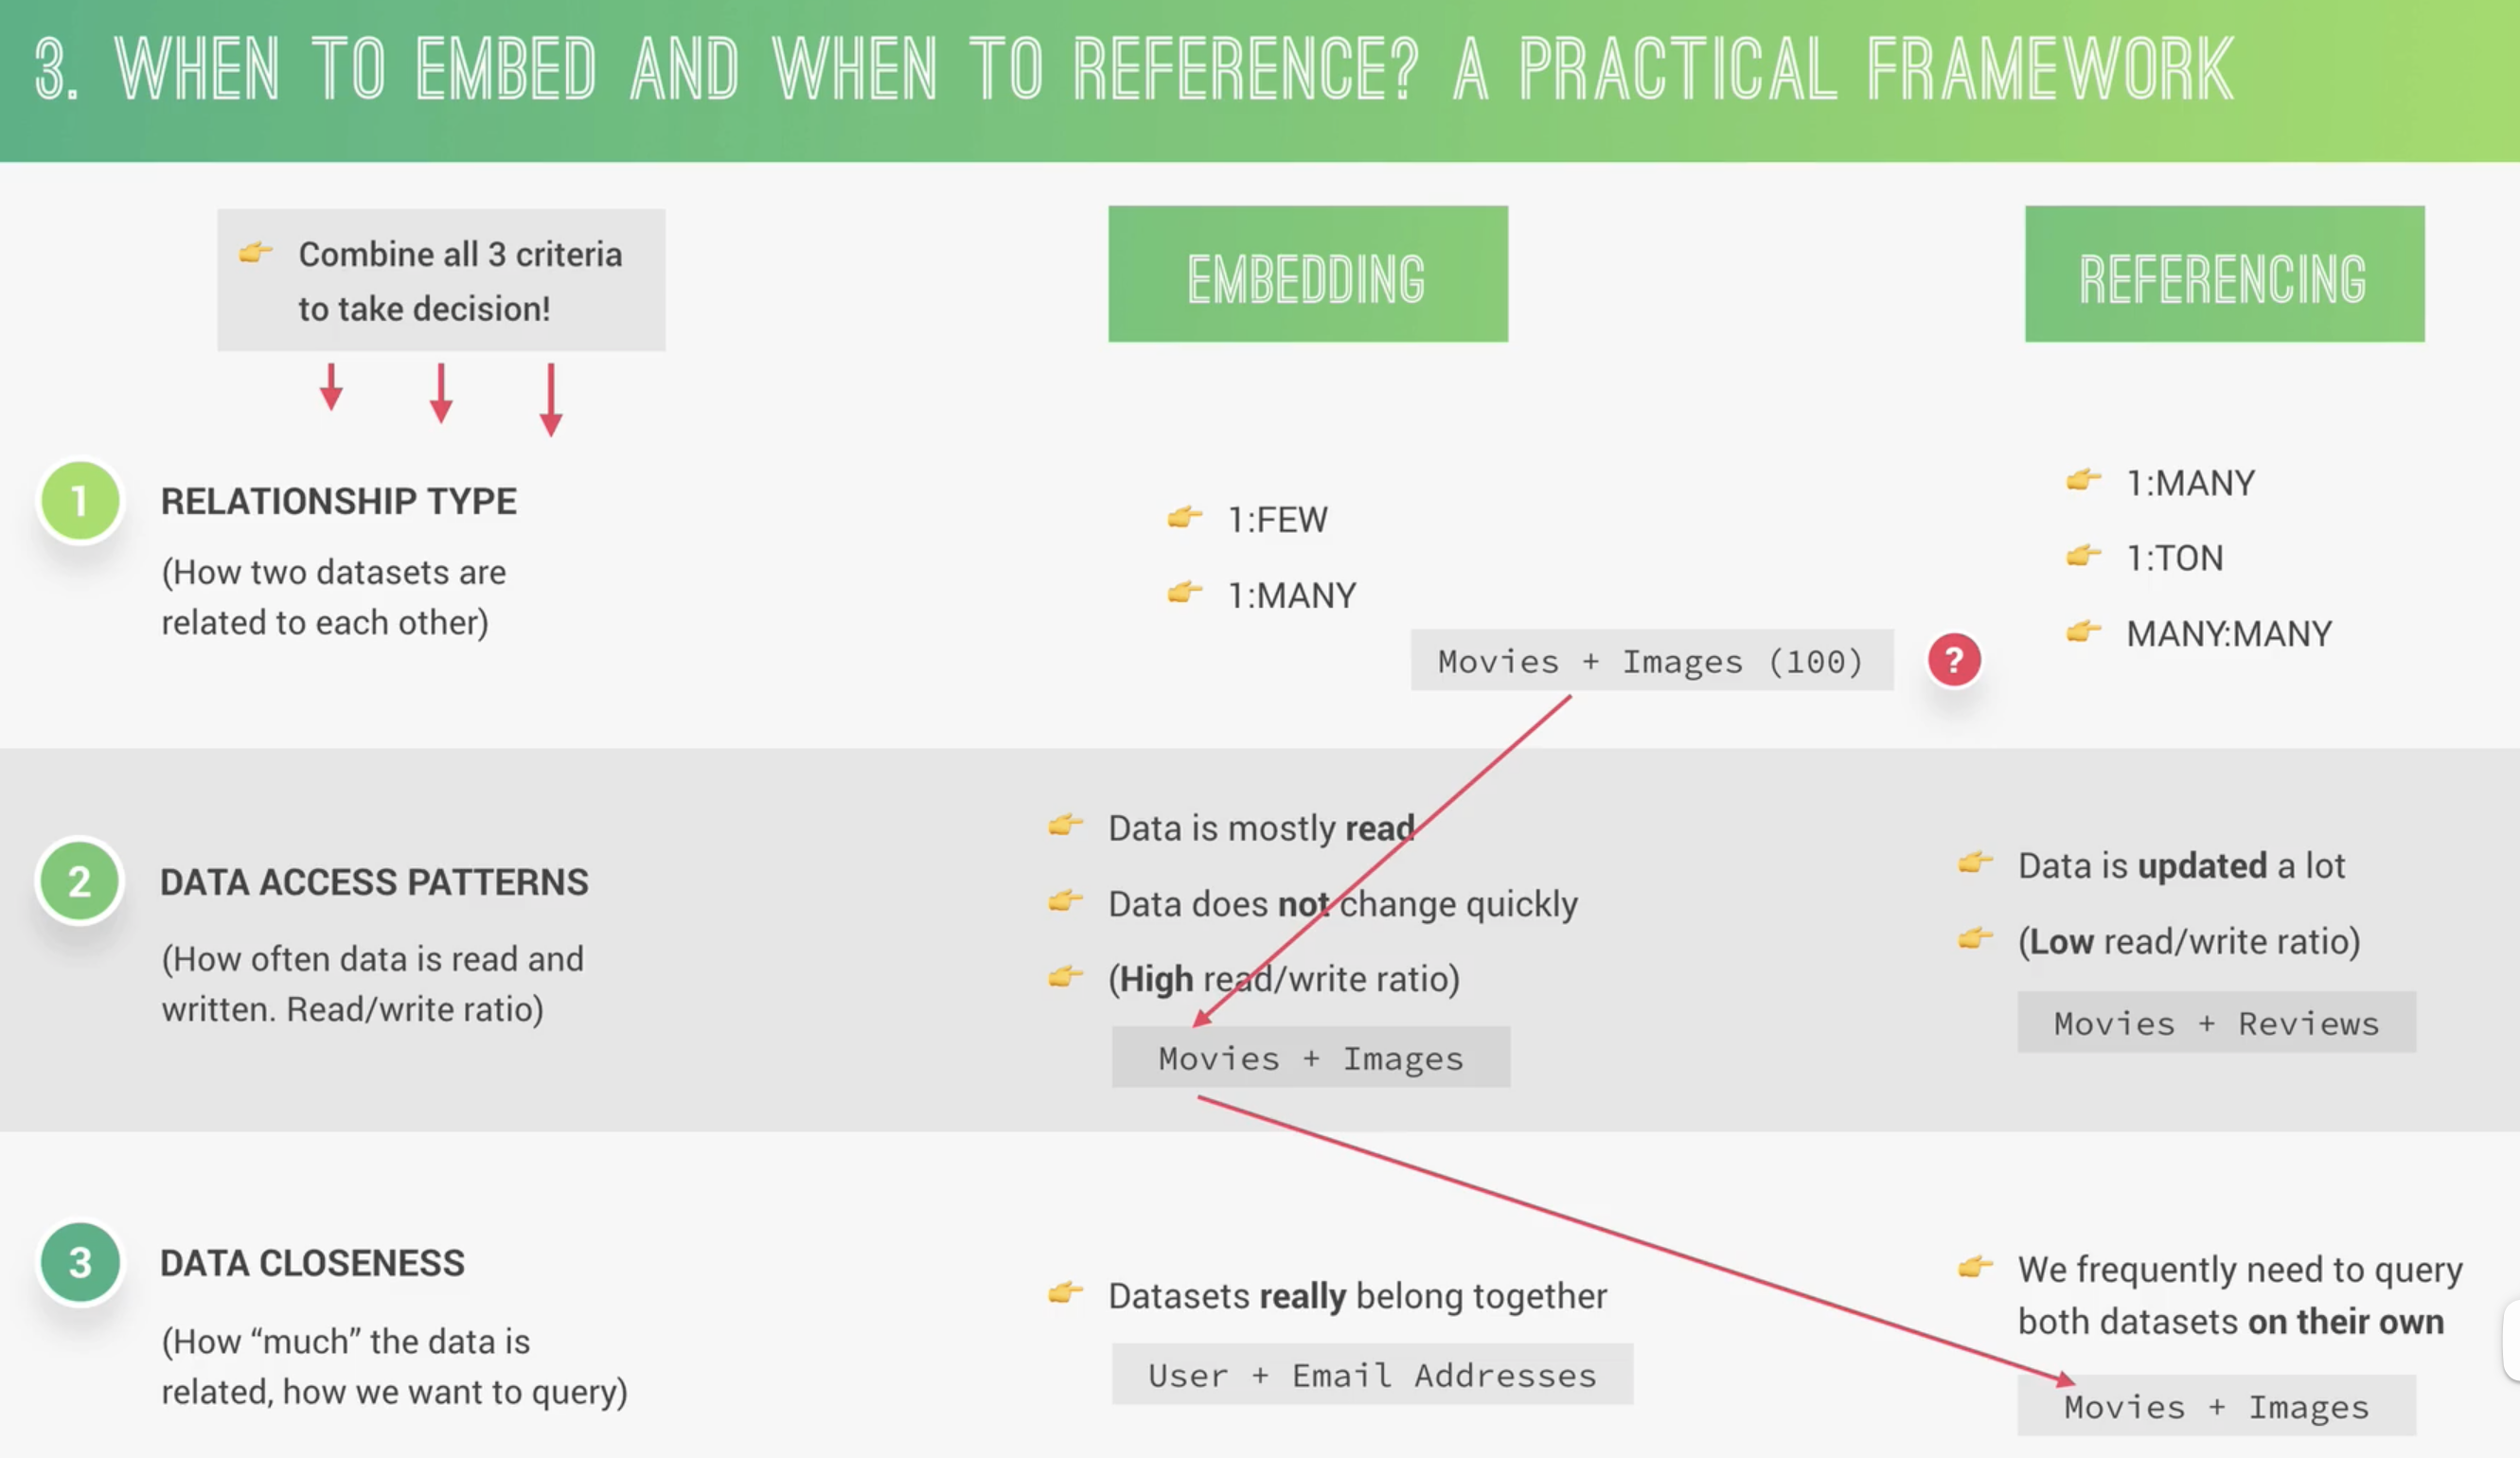
不同类型的引用
Mongodb 中不应该允许 array 无限增长,每个 bson 有 16M 字节的限制
总结
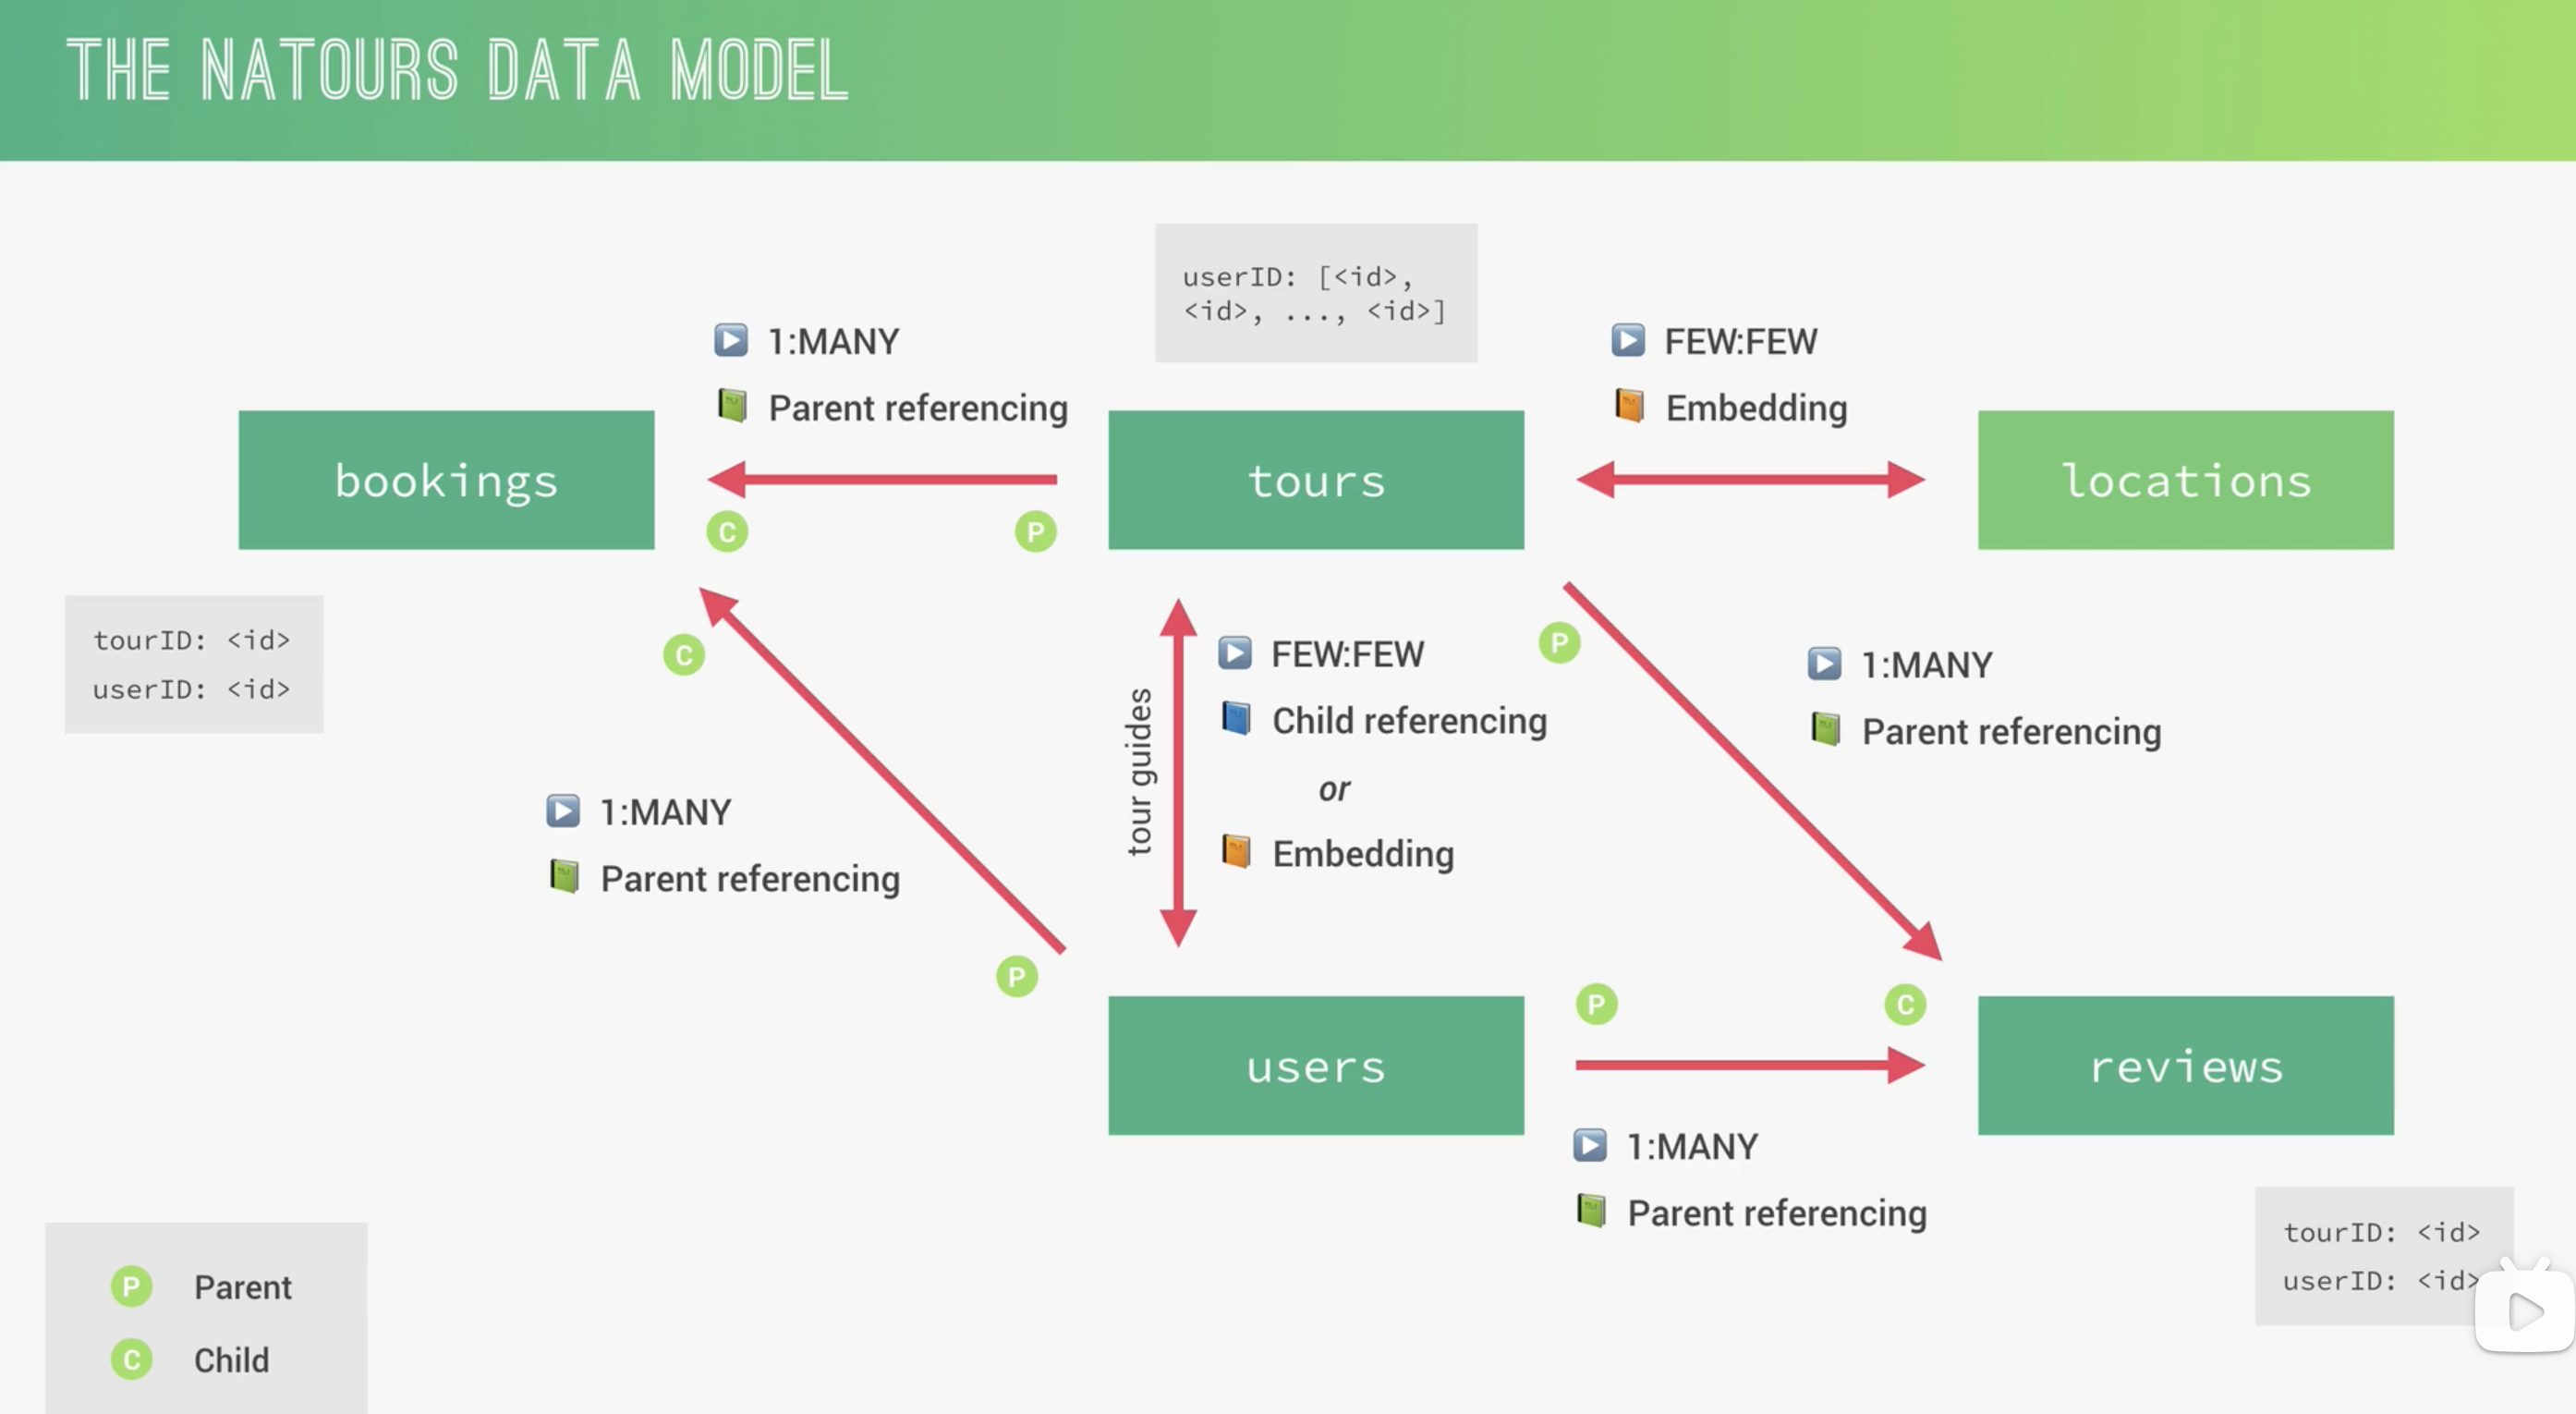
Natours Data model
高级特性
Modeling Tour guides
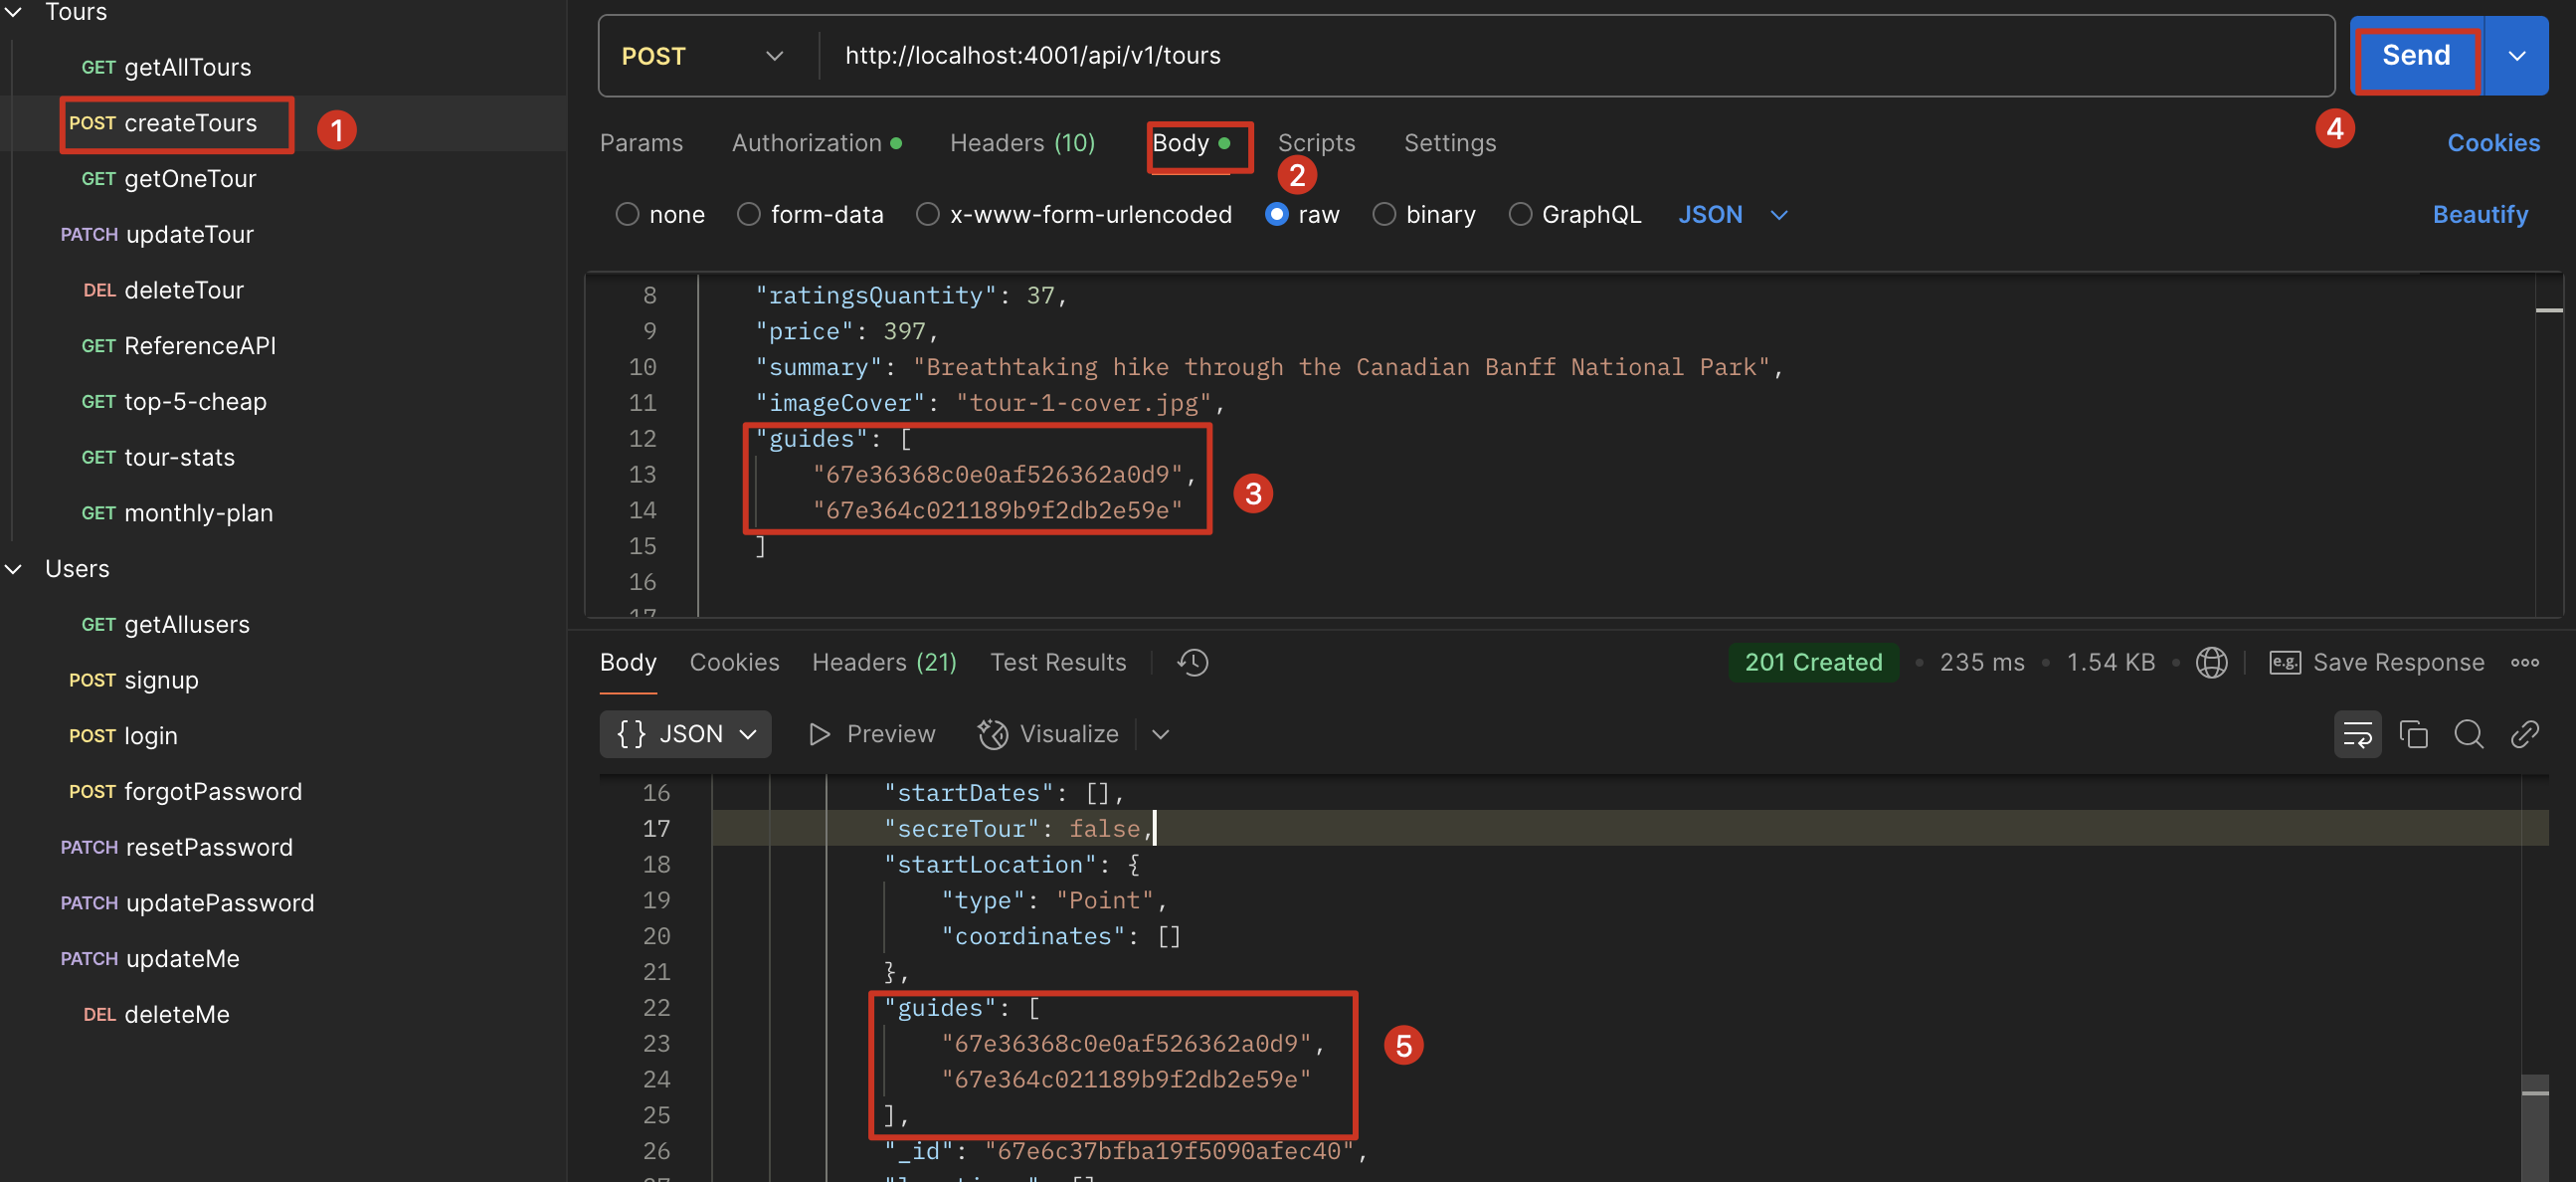
将 user documents 嵌入到 tour documents
embeding
通过 user.id,在生成 new tour 时,在 save 之前使用 query middleware 查询每一个 guide id 获取 user 信息,将查到的数据放在 tour.guides 下,就得到了嵌入 user 数据的 tour document
1 | // 先新增 schema |
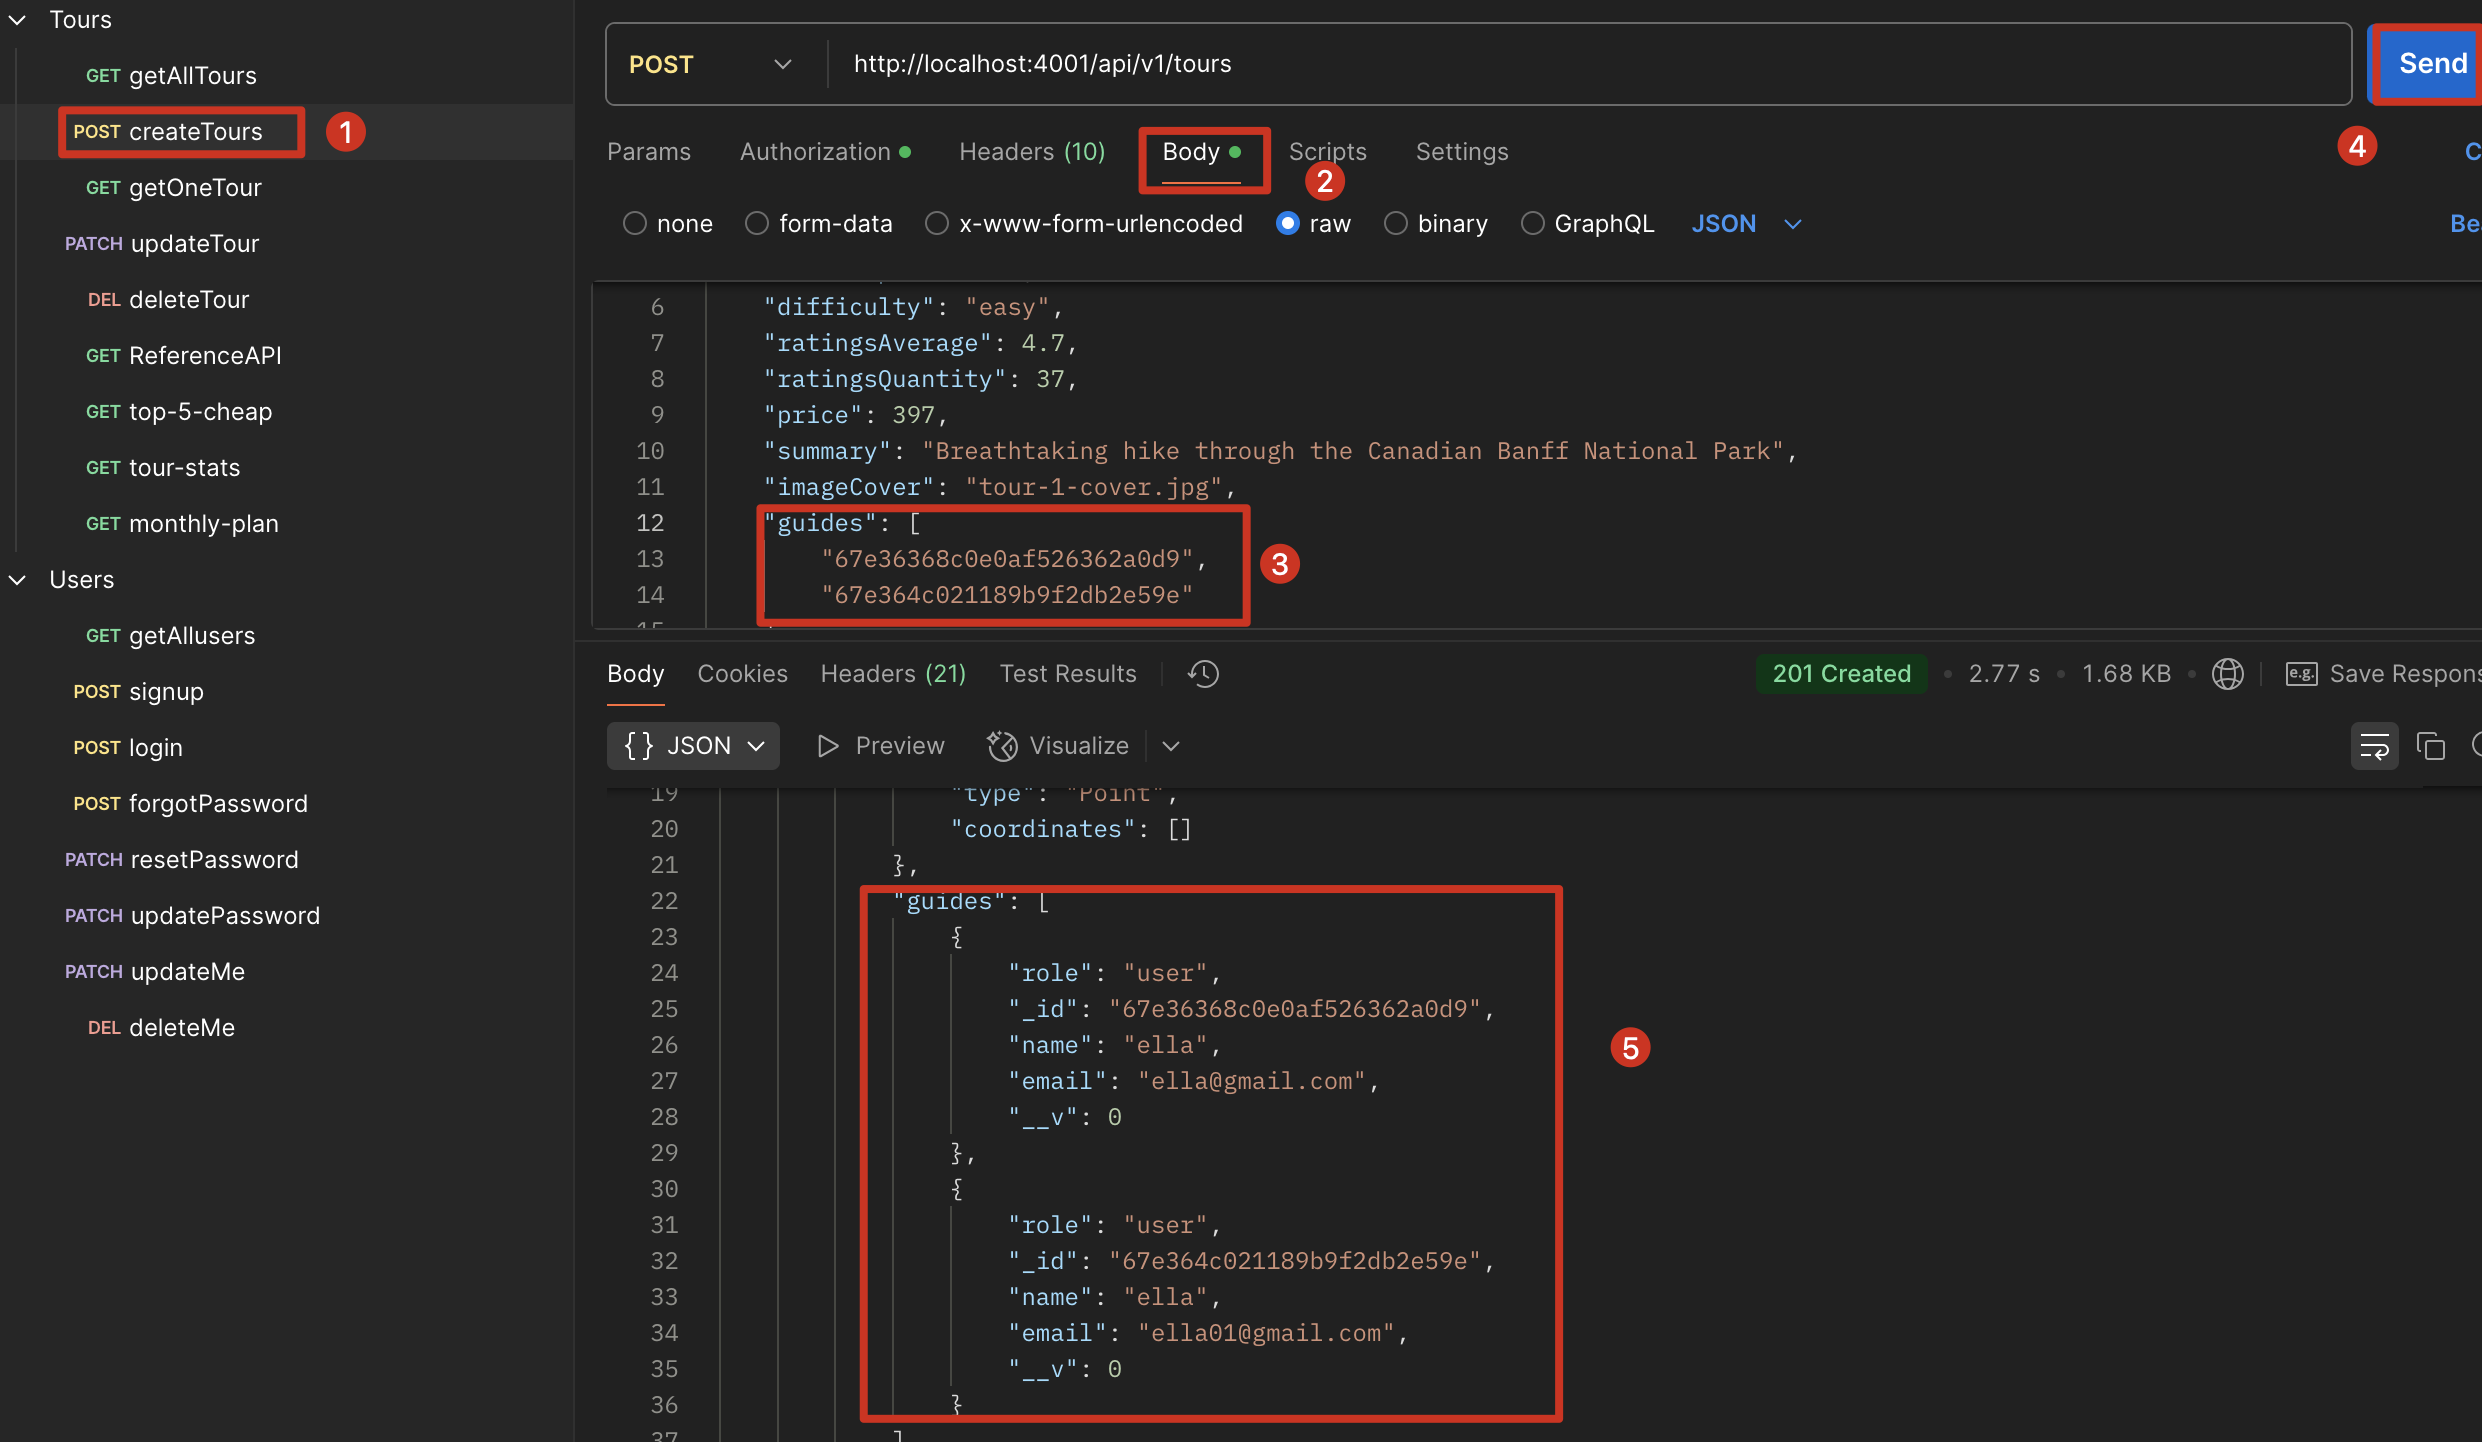
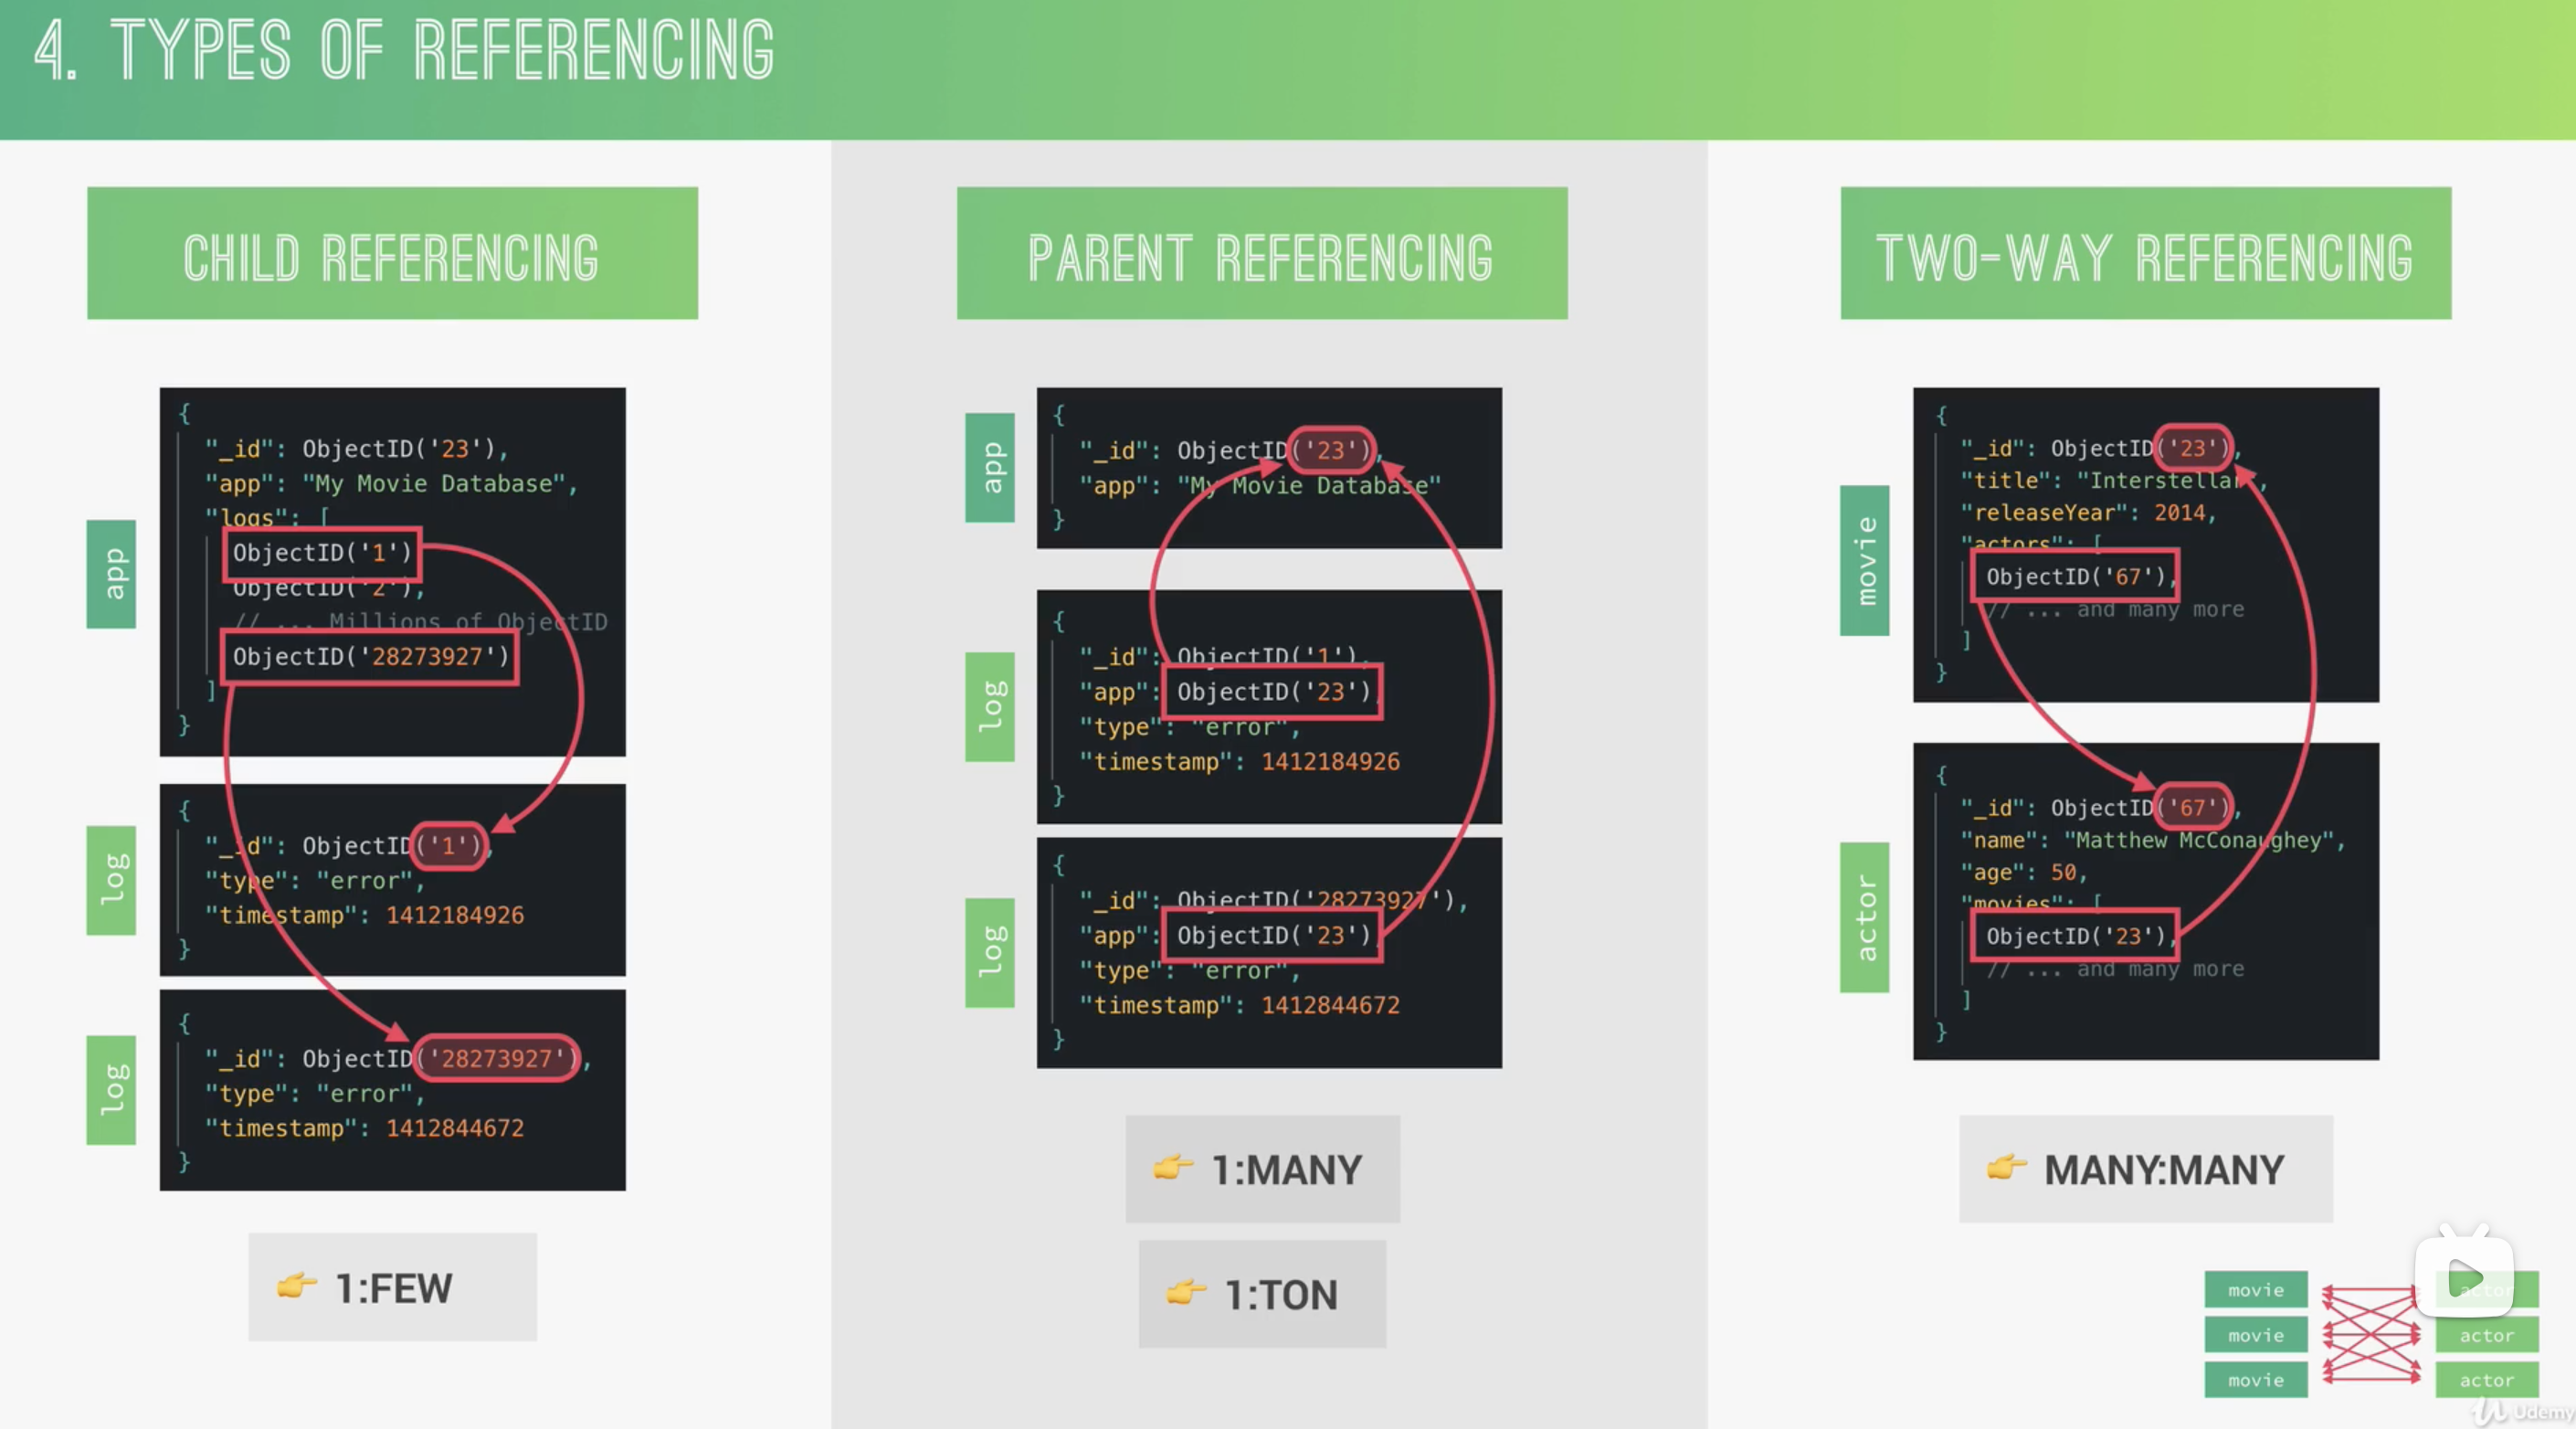
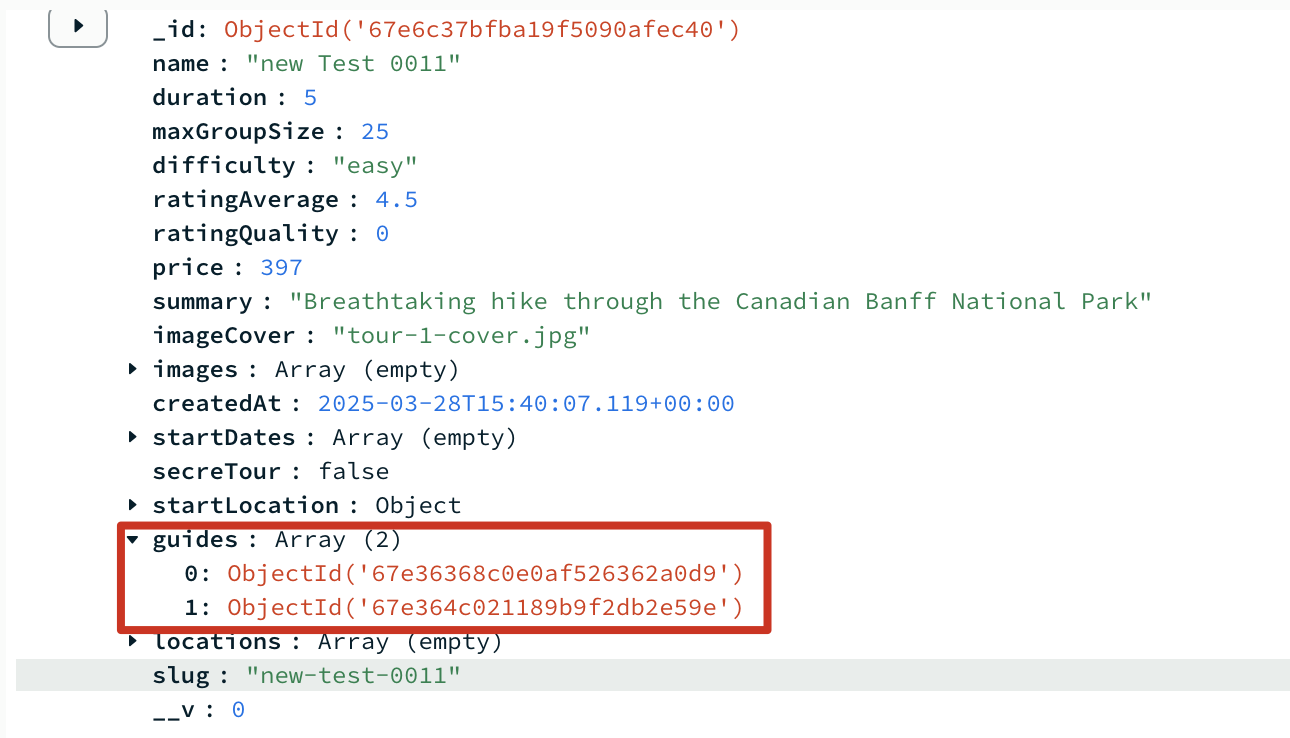
Child Reference + Populate
步骤
- 创建一个对其他 Model 的引用
- populate 刚才指定的 field
tour 中仅引用 user 的 id,不嵌入,他们仍然是两个完全独立的数据库
Tours model 的 guides 字段设为 ObjectId数组。 ref 选项告诉 Mongoose 在填充的时候使用哪个 model,本例中为 Users model。所有储存在此的 _id 都必须是 Users model 中 document 的 _id。
1 | // 新增 guides 的 shcema,与 embedding 不同 |
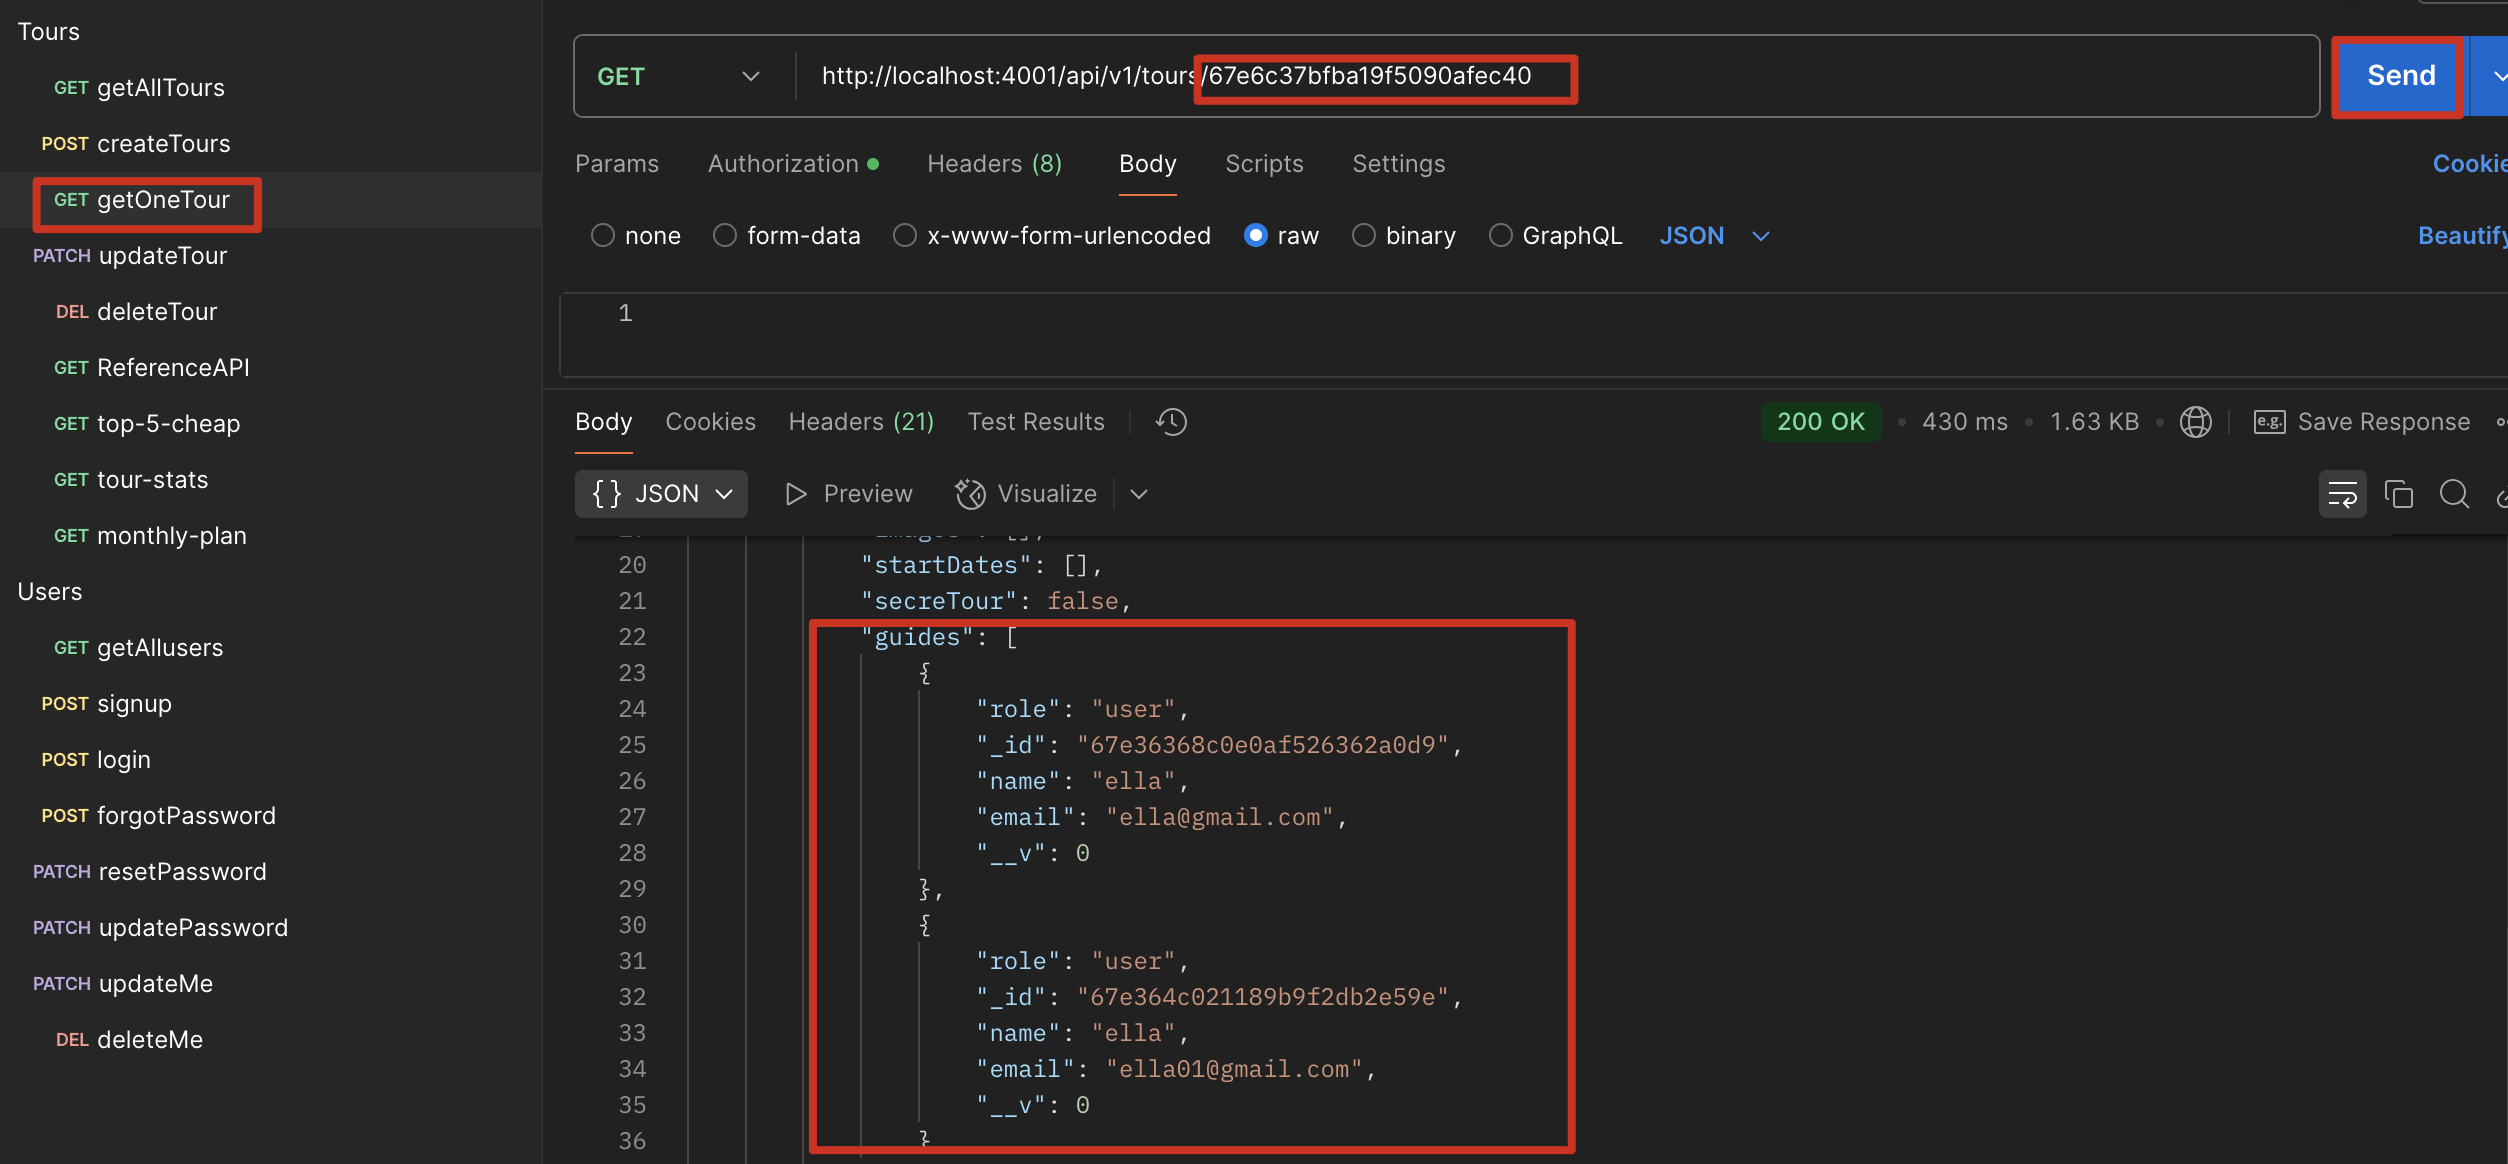
Populating
populate 会在后台创建一个查询,可能会影响性能,小程序还好,如果很大的数据体量,可能影响会比较大
1 | exports.getTour = catchAsync(async (req, res, next) => { |
优化
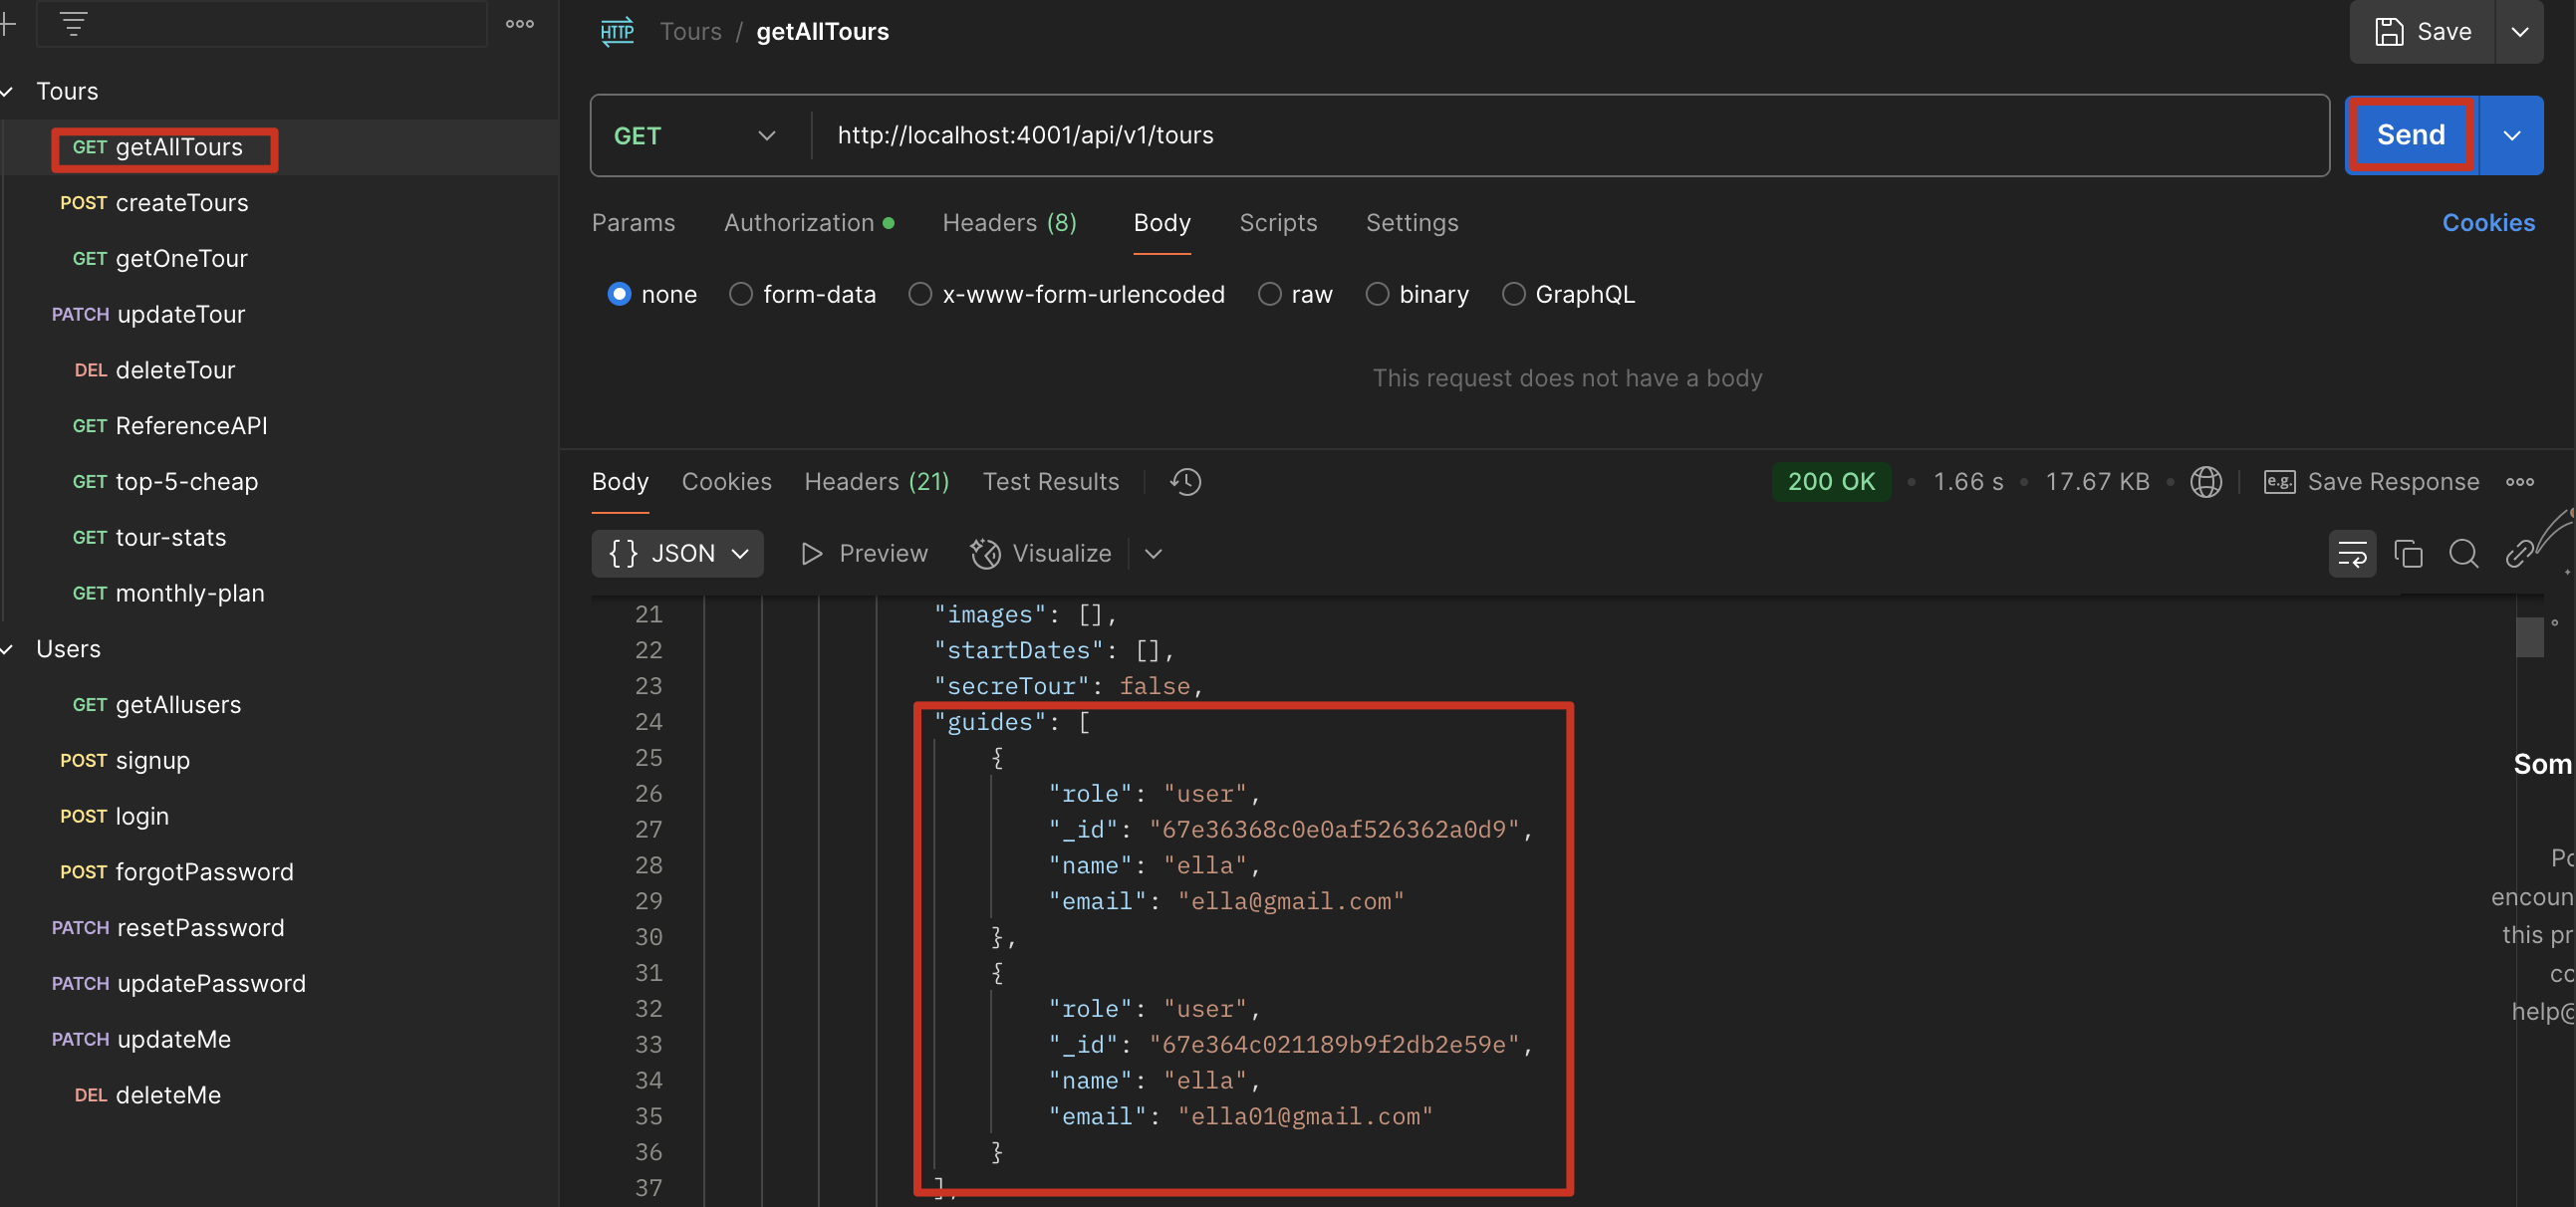
使用 query middleware,让除了 getOneTour,getAllTour 也能 ref User 的数据,Tour 中所有需要查询的操作都会运行这个 middleware
1 | tourSchema.pre(/^find/, function (next) { |
Parent Reference
和 child reference 的区别是引用元素 tour 和 user 只会有一个,所以不用[]
因为是父引用,孩子节点会指向父节点,但是父节点并不能获取孩子节点的数据
而 populate 时要填充两个字段,需要两次调用 populate
1 | tour: { |
1 | reviewSchema.pre(/^find/, function (next) { |
创建 Review Model, Controller, Route 以及根目录下引用 route
顺序:Model -> Controller -> Route -> app.js
virtual populate
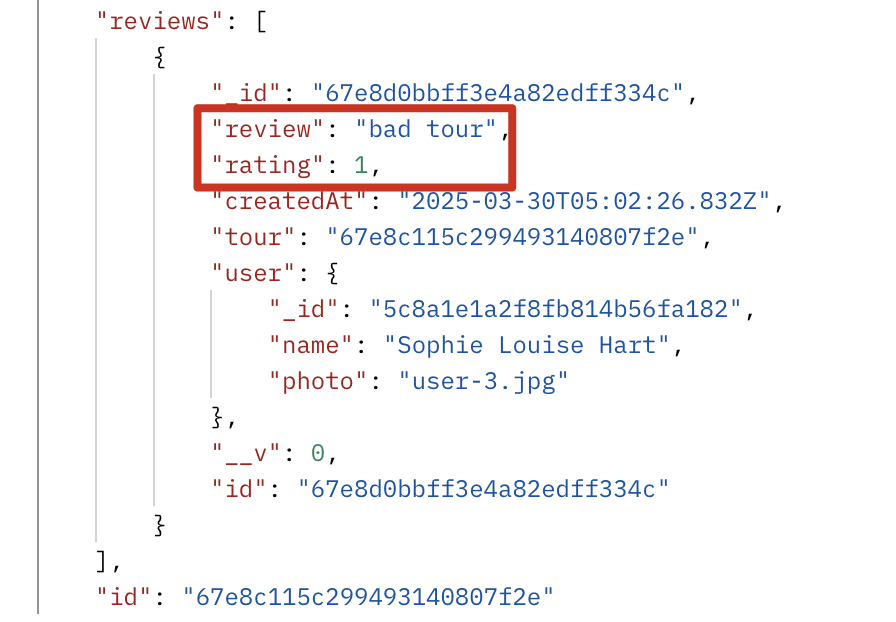
因为是父引用,孩子节点会指向父节点,但是父节点并不能获取孩子节点的数据,,现在我们想要从父节点 tour 获取所有子节点 review 的数据,用 review 填充 tour,所以我们这里引入了 virtual populate
我们可以获取某个 tour 中所有的 reviews,但是却不用将 review 的 id 存在 tour 中,也就是说 virtual populate 是一种:在 tour 中保留 review id 的 array,但实际上并没有将其持久化到数据库中,有点像虚拟字段,但是有填充
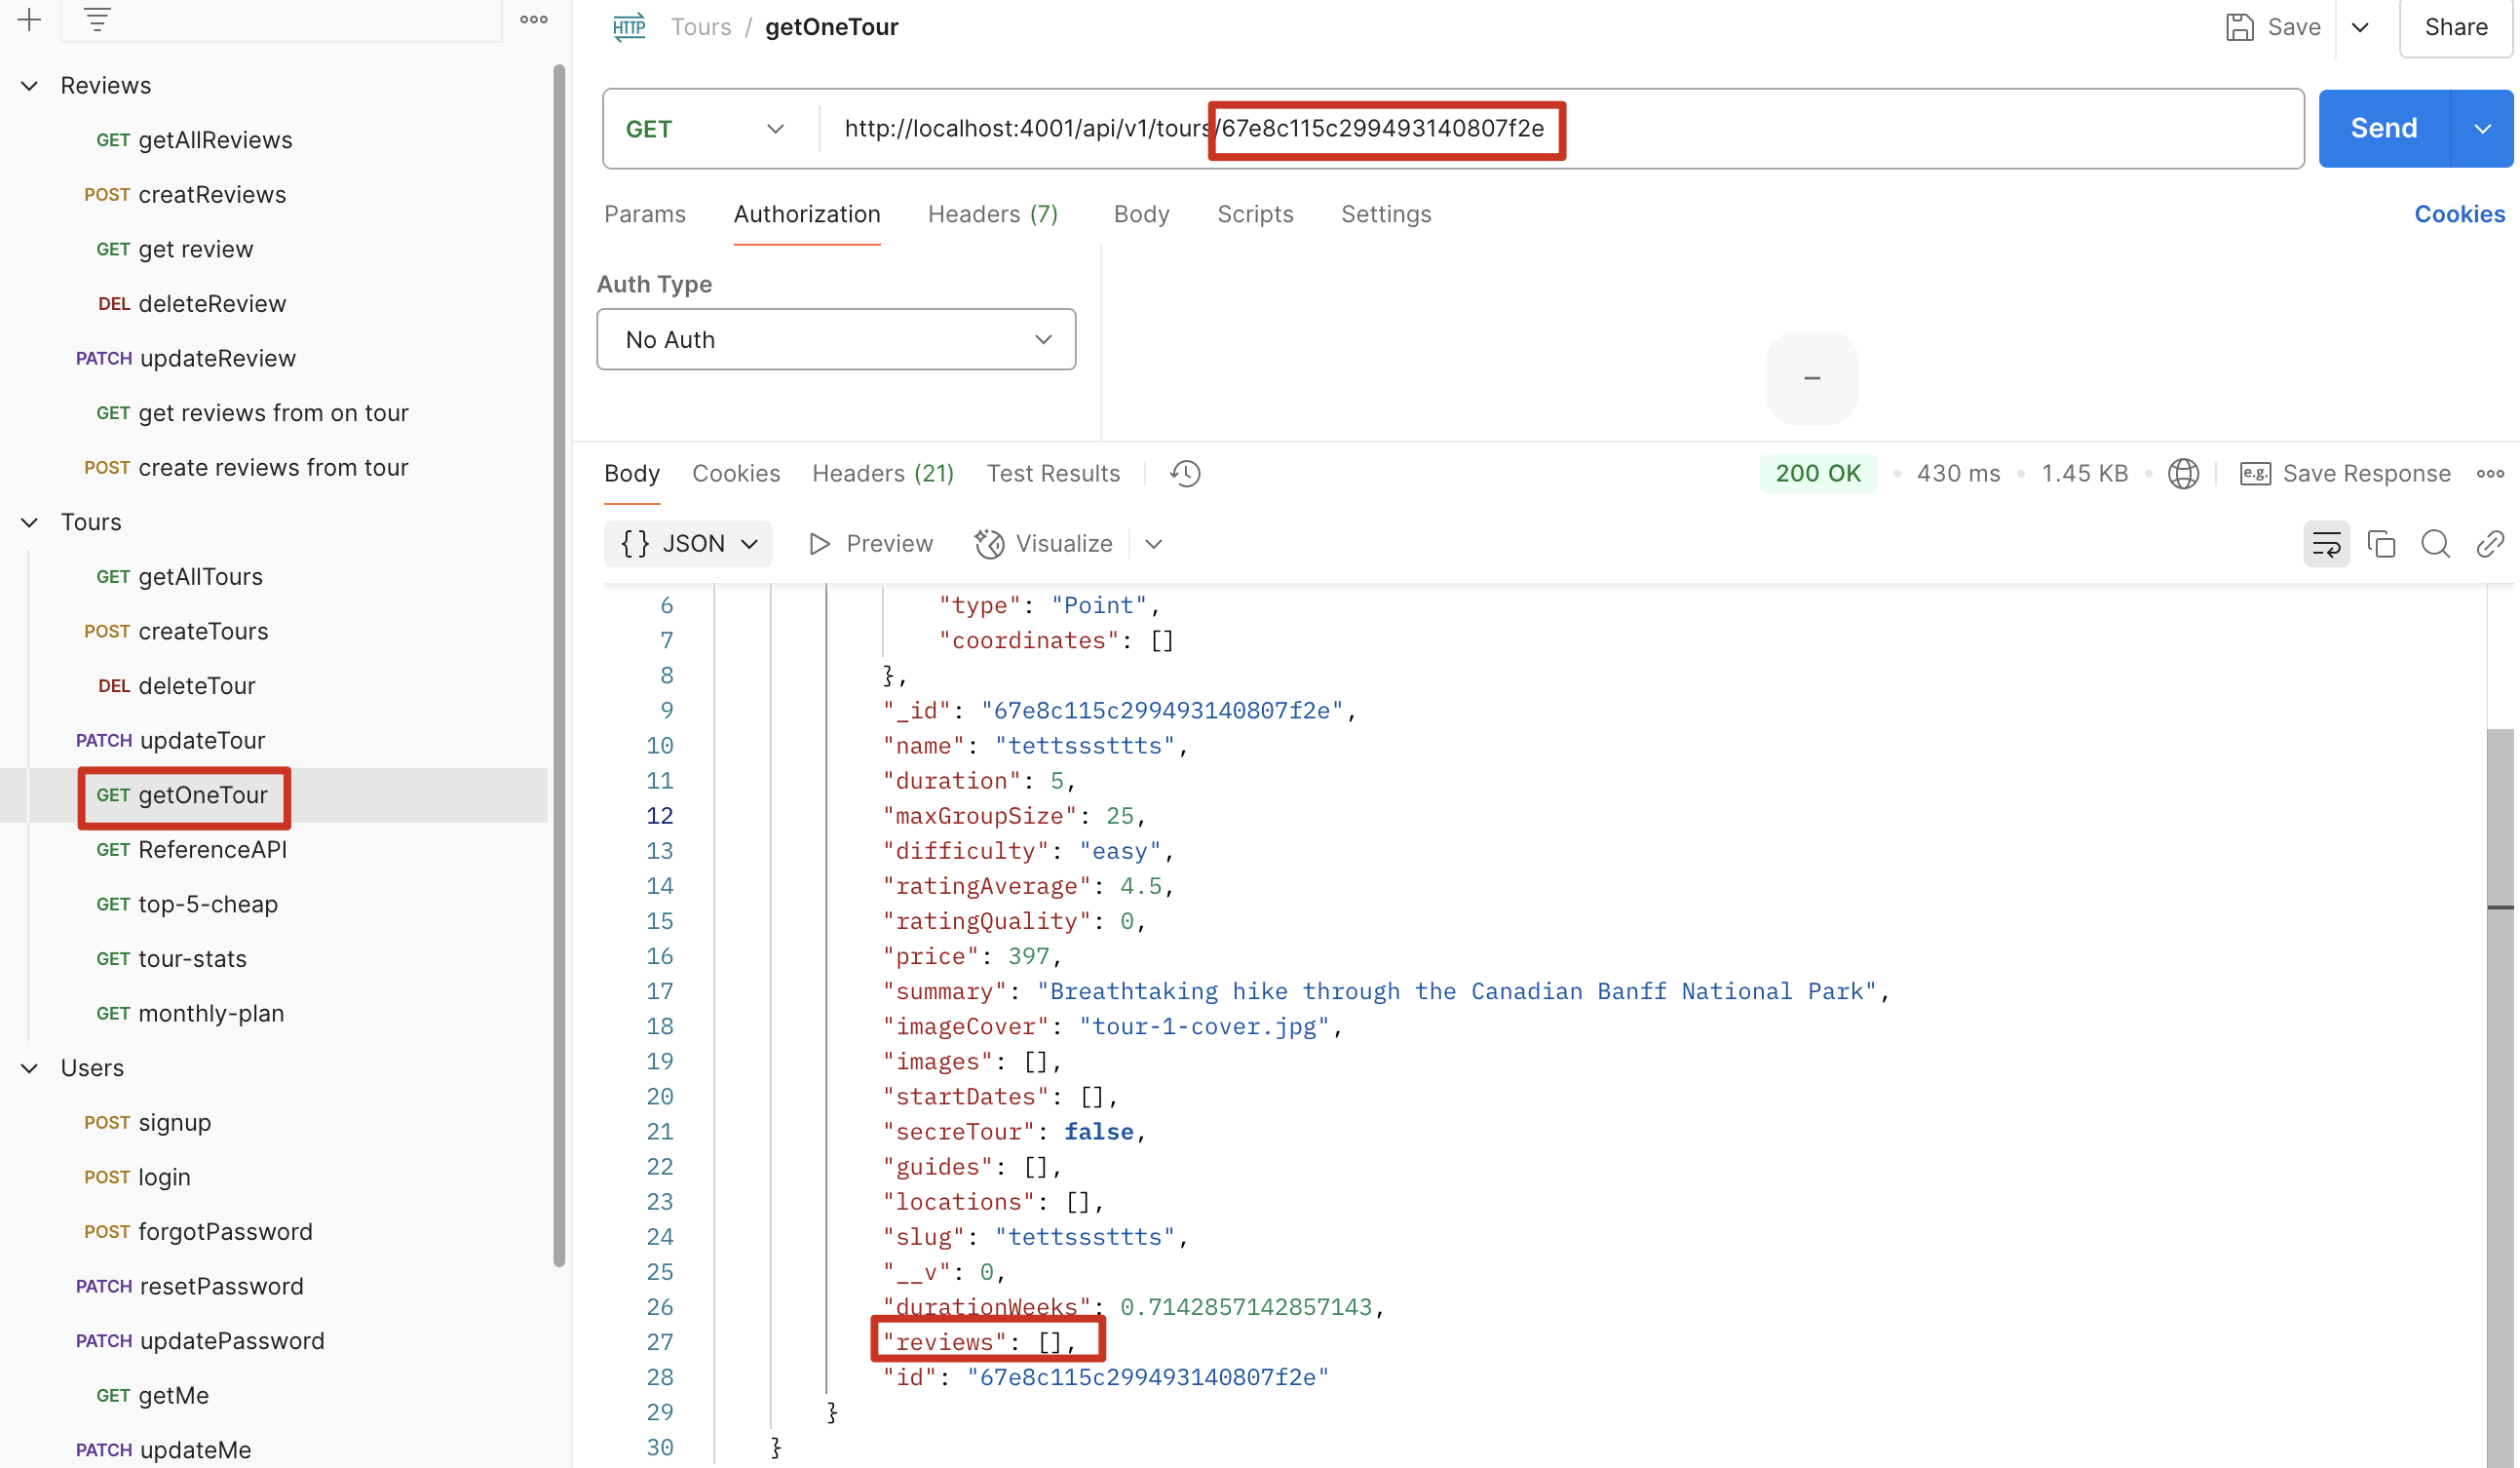
我们获取某个 tour 的全部评论,因此只将 getOneTour populate
1 | // Virtual Populate |
1 | exports.getTour = catchAsync(async (req, res, next) => { |

总结
embedding:一次旅行可能有多个导游,但不会超过 10 个,可以使用这个方式,这个方式会将 review 中导游的数据也存入数据库
child reference + populate:一次旅行可能有多个导游,但不会超过 10 个,这个方式只会存储导游的 id,查询时才会填充展示出来,不会存储多余数据
parent reference + virtual populate:一个酒店获取全部评论,评论数可能成千上万,因此只能使用这个方式
Nest Route
考虑一下,在 createReview 时,我们的 tour 和 user 中的 id 怎么放进去,测试时我们通过数据库拿到并复制到该字段,但是现实中,我们的 user id 来自于当前登录的 id,tour id 来自于当前的 tour
因此我们要设计一个这样的 route:tour/tourId/reviews 来调用 createReview
tourRoute.js 中增加
1 | router |
修改 reviewController.js
1 | exports.createReview = catchAsync(async (req, res, next) => { |
合并参数
场景:刚才我们创建了一个新 route:tours/tourId/reviews/createReview,而原来我们也有一个 route:reviews/createReview,这两个在功能上一集写法上有一定重叠
tours/tourId/reviews
1 | router |
reviews/
1 | router |
为了优化,我们使用合并参数来解决这个问题
tourRoute.js
1 | const reviewRouter = require("../routes/reviewRoutes"); |
reviewRoute.js
这里我们将 mergeParams 置为 true,可以让 reviewRoute 获取从 tourRoute 传过来的/:tourId,从而使用嵌套路由实现tours/tourId/reviews
1 | const router = express.Router({ mergeParams: true }); |
1 | // POST /tours/tourId/reviews |
Aggregation Pipline
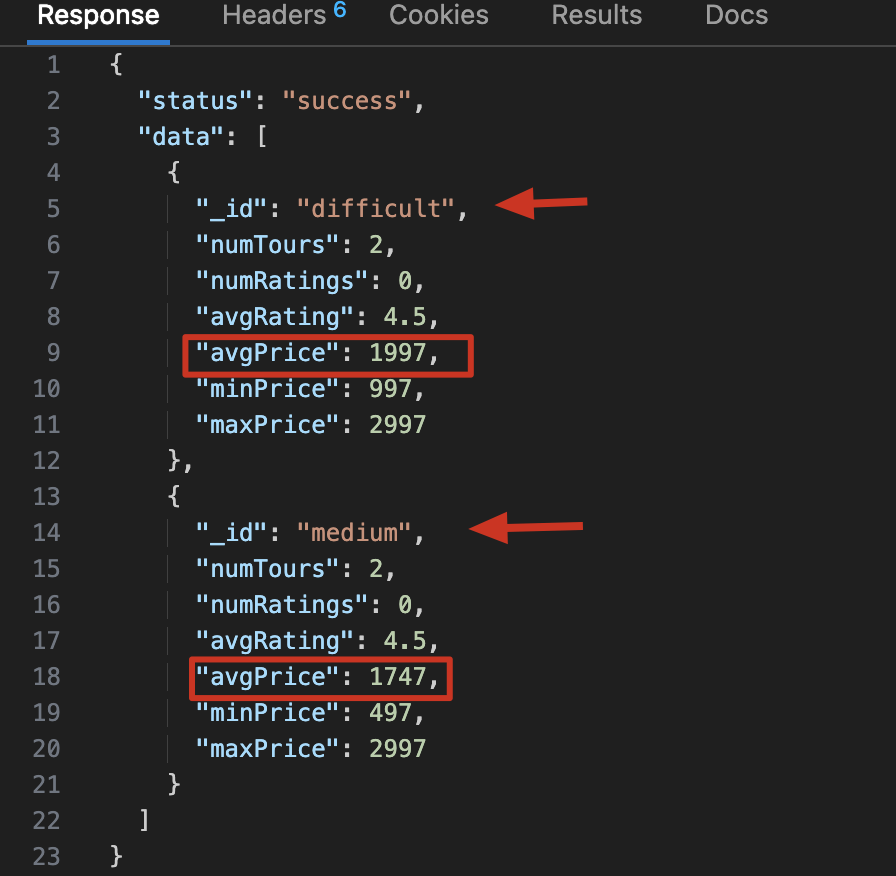
聚合 (Aggregation) 操作 (1) - Aggregation pipeline
Match and Group
1 | const stats = await TourSchema.aggregate([ |
Unwind and Project
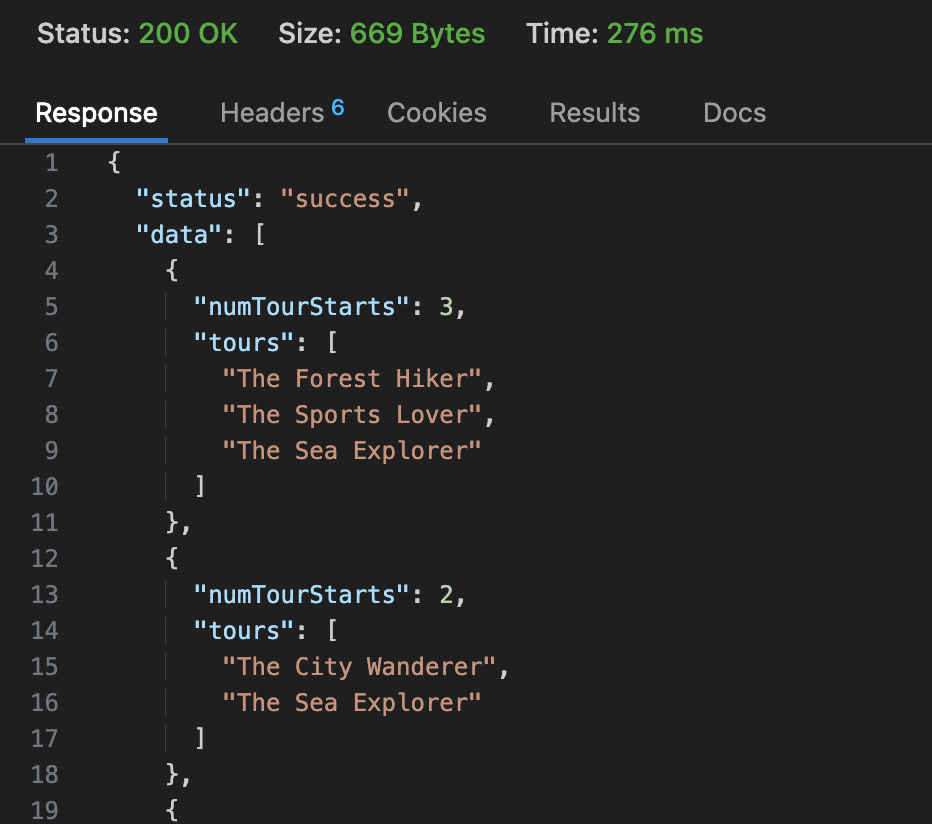
用例:http://localhost:4001/api/v1/tours/monthly-plan/2021
1 | const year = req.params.year * 1; |
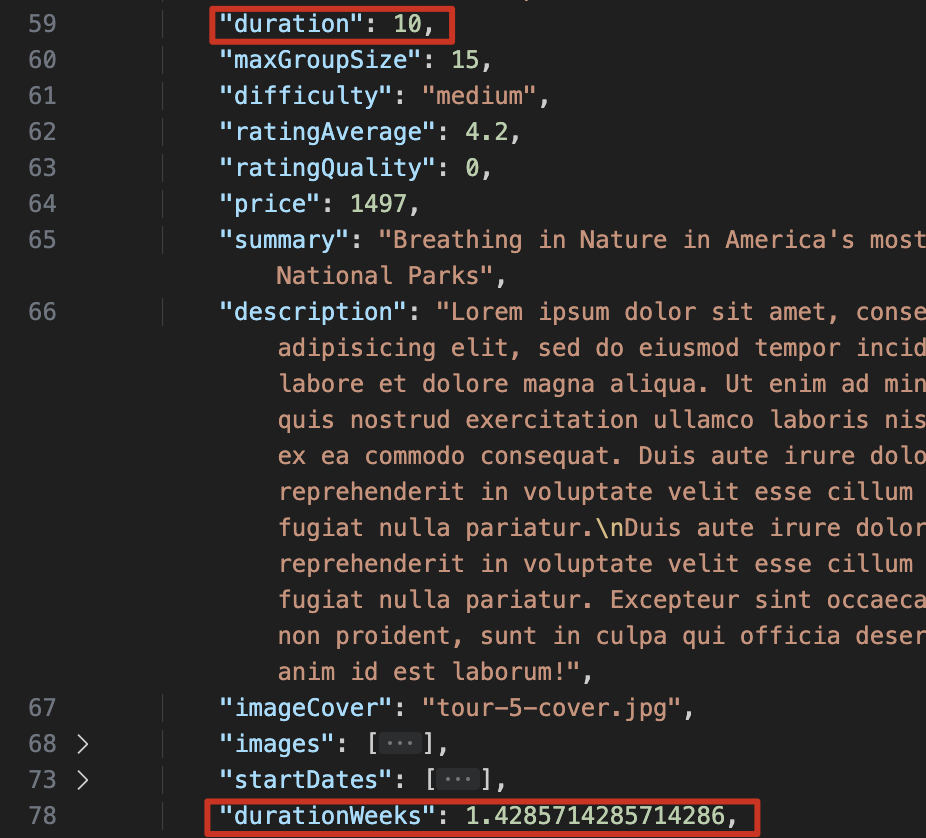
Virtual Properties
怎么理解 Virtual Properties 含义?
mongoose 特有的一种字段处理方式,生成的新字段可以返回给客户端,但不会存入 mongodb,适合处理 model 中的业务逻辑
用例:
1
2
3
4
5
6
7
8
9
10
11
12
13
14
15
16
17
18const tourSchema = mongoose.Schema(
{
duration: {
type: Number,
required: [true, "A tour must have a duration"],
},
},
{
// mongoose.Schema 的第二个参数,可以在这里选择 virtual Properties 是否展示出来
toJSON: { virtuals: true },
toObject: { virtuals: true },
}
);
//使用 function 而不是箭头函数是因为这里我们需要用到 this 关键字,箭头函数没有 this
tourSchema.virtual("durationWeeks").get(function () {
return this.duration / 7;
});使用上述用例后,再次执行数据库 get 操作,会返回包含 durationWeeks 的数据
MongoDB
Database -> Collection -> Documents
数据形式很像 json,是 bson 的格式
如果本地 terminal 运行,mongo 命令就可以进入到 mongo shell
1
2
3
4
5
6
7use natours-test #新建/切换到数据库
db.tours.insertOne({ name:"The forest hiker", price:297, rating:4.7 }) #新建 collection tours,并向其表中插入一条数据
db.tours.insertMany([{}, {}, {}]) #插入多条
db.tour.find() #全局查找
show dbs #展示所有数据库
show collections #展示所有表
quit() #退出 mongo shell1
2
3
4
5
6db.tours.find() #全局查找
db.tours.find({name: "xxx"}) #指定某条数据内容查找
db.tours.find({ price: {$lte:500} }) #查找价格小于 500 的数据,lte 代表 less than equal,这里也可以用 lt
db.tours.find({ price: {$lte:500}, rating: {$gte:4.8} }) #与逻辑查找两个条件数据
db.tours.find({ $or: [{price: {$lte:500}},{第二个查询条件} ]}) #或逻辑查询两个条件
db.tours.find({ $or: [{price: {$lte:500}},{第二个查询条件} ]}, name: 1) #指定 name=1 会只返回 name 的数据1
2
3
4db.tours.updateOne({name: xx}, {$set: {price: 597}}) #更新一条数据,第一个参数用于查询并获取指定数据,第二个参数用于修改指定内容,也可以用$set 新增字段,跟这个方式一样
db.tours.deleteMany({rating: {$lt: 4.8}}) #删除评分小于 4.8 的所有数据
db.tours.deleteMany({}) #删除所有数据!!!小心使用,提前备份数据mongodb 图形界面:compass,运行时需要保证 mongod 在 terminal 后台运行,这个有点像 beekeeper,但简单一些,连接时只需要保证 mongod 在运行,然后点击 connect 就行
mongodb Atlas 可以连接 termianl 的 mongo shell,也可以连接 compass
Mongodb Atlas -> project -> cluster -> collection
配置 Atlas 的 Ip address 时,最好配置本地计算机的 ip 地址,0.0.0.0/0 是所有 ip 地址都可以访问,如果前期配置不好,连接不上,可以暂时使用这个 I have an issue connecting to my cluster with MongoDB VSCode on the M3 MacBook.
vscode 配置连接 mongodb
.env (要注意下面的链接要在 mongodb.net/后加上 database 名称,否则连不上)
1
2DATABASE=mongodb+srv://ellawu010:<PASSWORD>@cluster0.mgesg.mongodb.net/natours?retryWrites=true&w=majority&appName=Cluster0
DATABASE_PASSWORD=YOUT_PASSWORD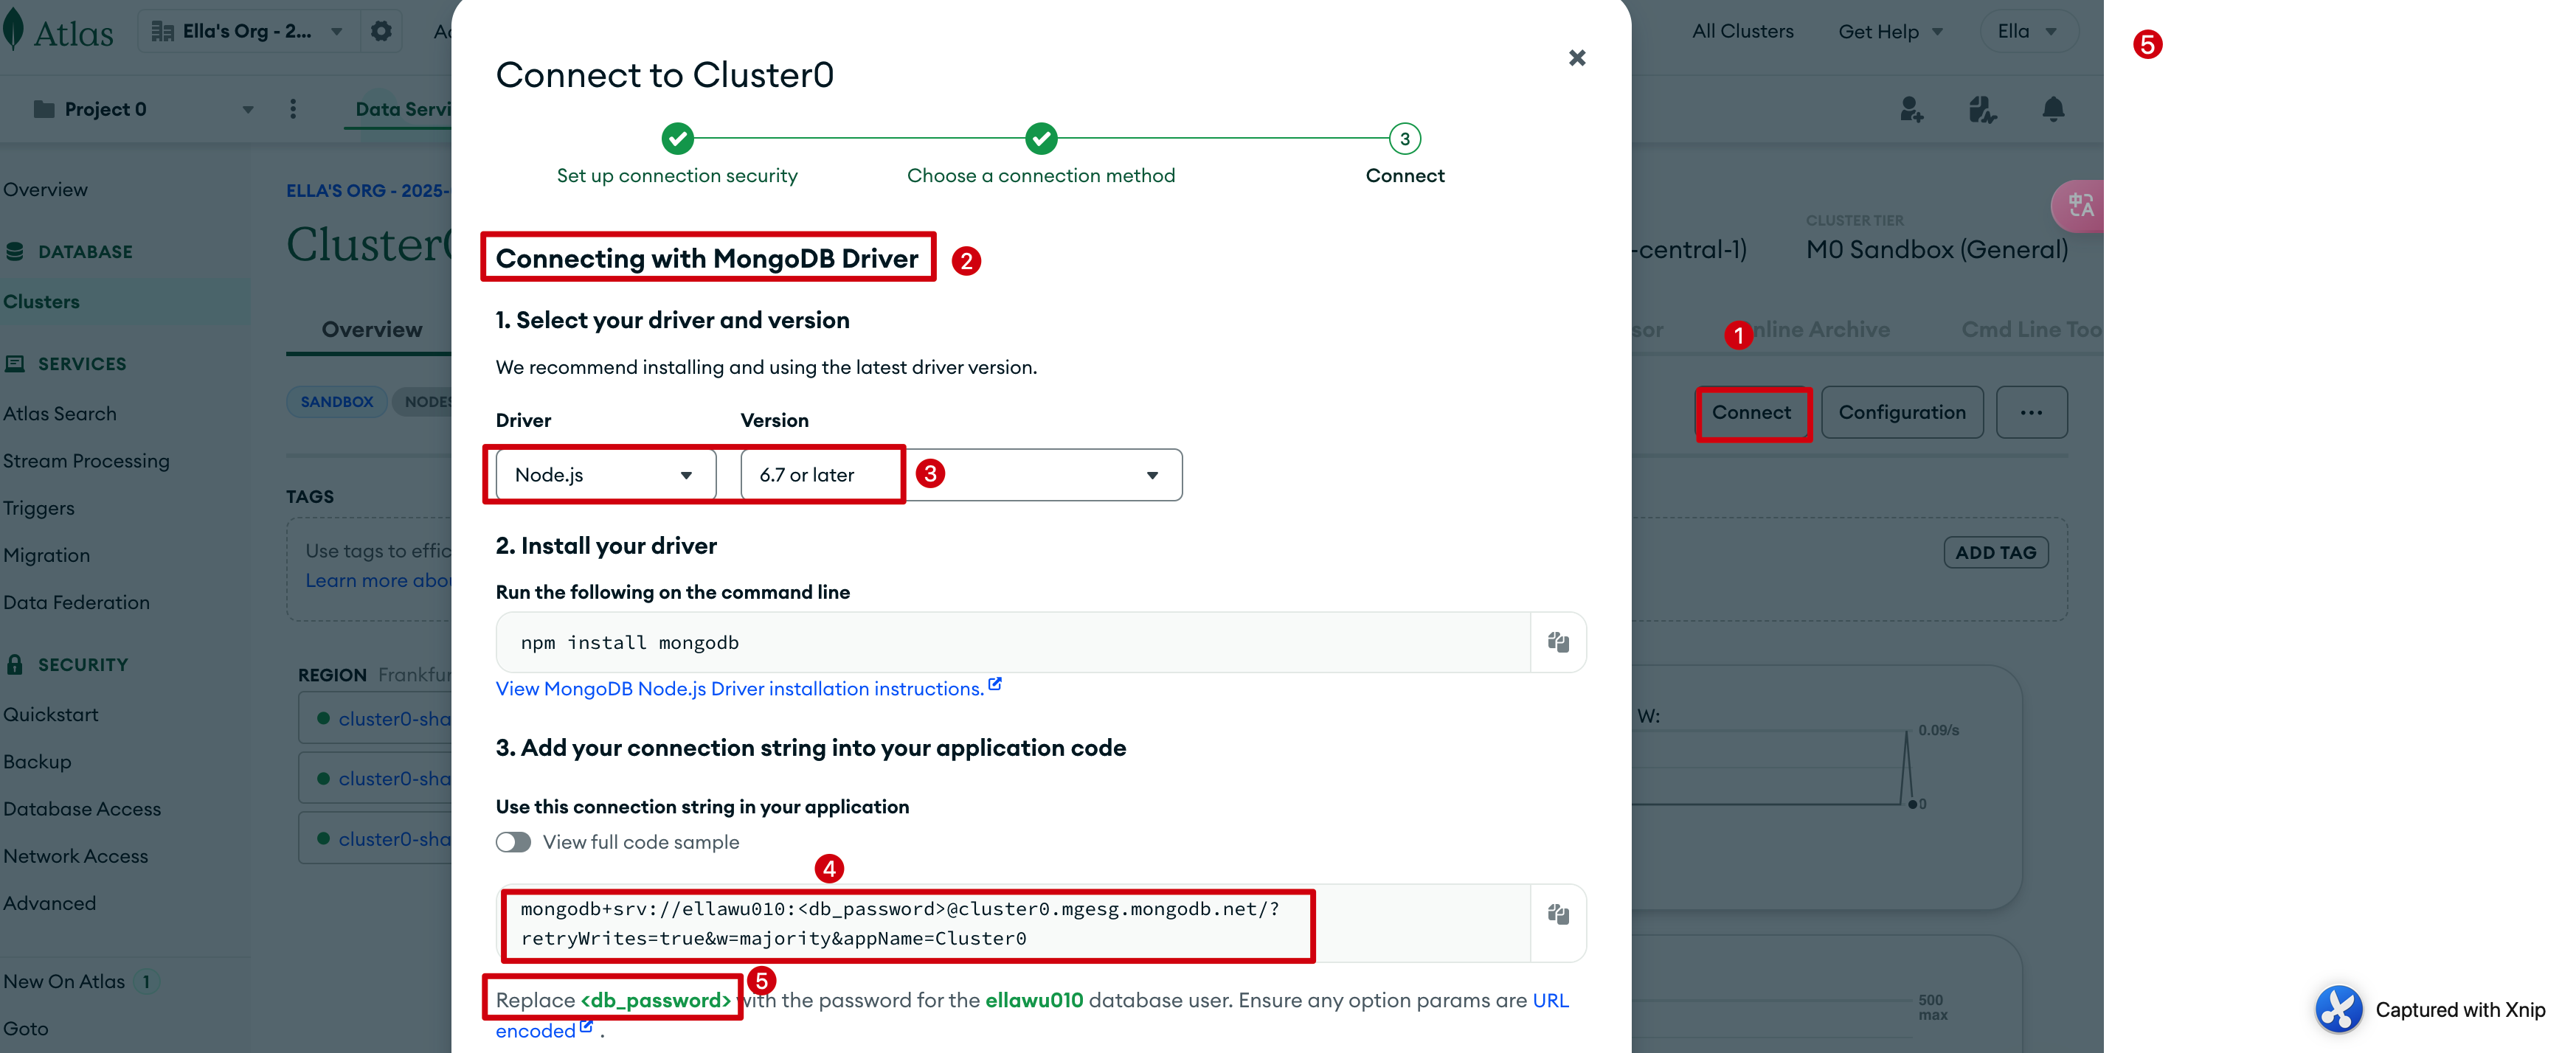
Middleware
- 概念性:pre hooks, post hooks
- 四种 middleware: document, query, aggregate, model middleware
Document Middleware
准备:安装slugify,npm i slugify,schema 中加入slug: String
用途:在保存/生成数据之前进行一些操作,比如这里是保存 slug 到数据库
1 | // DOCUMENT MIDDLEWARE: runs before .save() and .create() |
Query Middleware
1 | // QUERY MIDDLEWARE: |
Aggregate Middleware
1 | // AGGREGATE MIDDLEWARE: runs before .aggregate() |
Data Validation
内置 validators
对于 create 操作,下面的验证会自动生效
对于 update 操作,需要配置 runValidators 为 true
1 | const tour = await TourSchema.findByIdAndUpdate(req.params.id, req.body, { |
字符串长度验证 -
max lengthminlength1
2
3
4
5
6
7name: {
type: String,
required: [true, 'A tour must have a name'],
unique: true,
maxlength: [40, 'A tour name must have less or equal than 40 characters'],
minlength: [10, 'A tour name must have more or equal than 10 characters'],
},number 范围 -
maxmin1
2
3
4
5
6ratingAverage: {
type: Number,
default: 4.5,
max: [5, 'A rating must less than 5'],
min: [1, 'A rating must more than 1'],
},字符串枚举验证 -
enum1
2
3
4
5
6
7
8difficulty: {
type: String,
required: [true, 'A tour must have difficulty'],
enum: {
values: ['easy', 'medium', 'difficult'],
message: 'Difficulty is either: easy, medium and difficult',
},
},
自定义 validators
使用validate,this 指向当前的 document,({VALUE}) 是 mongoose 自带的方法,可以获取 val 的值
1 | priceDiscount: { |
validator (外置库)
安装:npm i validator
1 | const validator = require('validator'); |
Best Practice: 计算评分的平均数
create
create 新的 review 时,同步更新 review 总量和平均值,并同步到 Tour 表中
使用静态方法 reviewSchema.statics.calcAverageRatings
在 Model.js 中,this.constructor : this 是当前的 document,constructor 是创建了这个 document 的 Model,
步骤:
- 使用静态方法 + aggregate 操作,匹配指定 tour 的 review 数据并计算数量及平均值
- 同步更新 current tour 中的评论数量、平均值字段
- 使用 post ‘save’方法保证在创建新评论之后进行调用它,使用 this.constructor 解决模型指向问题
代码实现
在 reviewModel.js 中新增以下代码
1 | const Tour = require("./tourModel"); |
计算后,tour document 也会同步更新

Update, delete #168
update 或 delete review 时,同步更新 review 总量及平均值
这节难一点,因为之前使用的 save document middleware 在这里不适用,它不能用于除 save、create 之外的操作,我们只能用 query middleware,但是 query middlware 不能直接操作数据库
Query middleware 只有 query 的权限
如何绕过这个限制?
完整流程
- 用户执行
findOneAndUpdate或findOneAndDelete pre钩子:- 通过
this.getQuery()获取查询条件 - 用
findOne(this.getQuery())查询即将被修改/删除的Review文档 - 存储该文档在
this.r变量中
- 通过
- MongoDB 执行
findOneAndUpdate或findOneAndDelete post钩子:- 通过
this.r访问pre钩子中存储的旧Review记录 - 调用
calcAverageRatings(this.r.tour)重新计算 Tour 评分
- 通过
findByIdAndUpdate
findByIdAndDelete
他们俩执行后,会触发以findOneAnd开头的中间件,比如findByIdAndUpdate等价于findOneAndUpdate(),详见这里:findByIdAndUpdate
1 | reviewSchema.pre(/^findOneAnd/, async function (next) { |
现在删除或者修改某个 tour 的 review,在那个 tour 中会有对应的修改
防止重复的 review
防止一个用户对同一个 tour 重复写 review
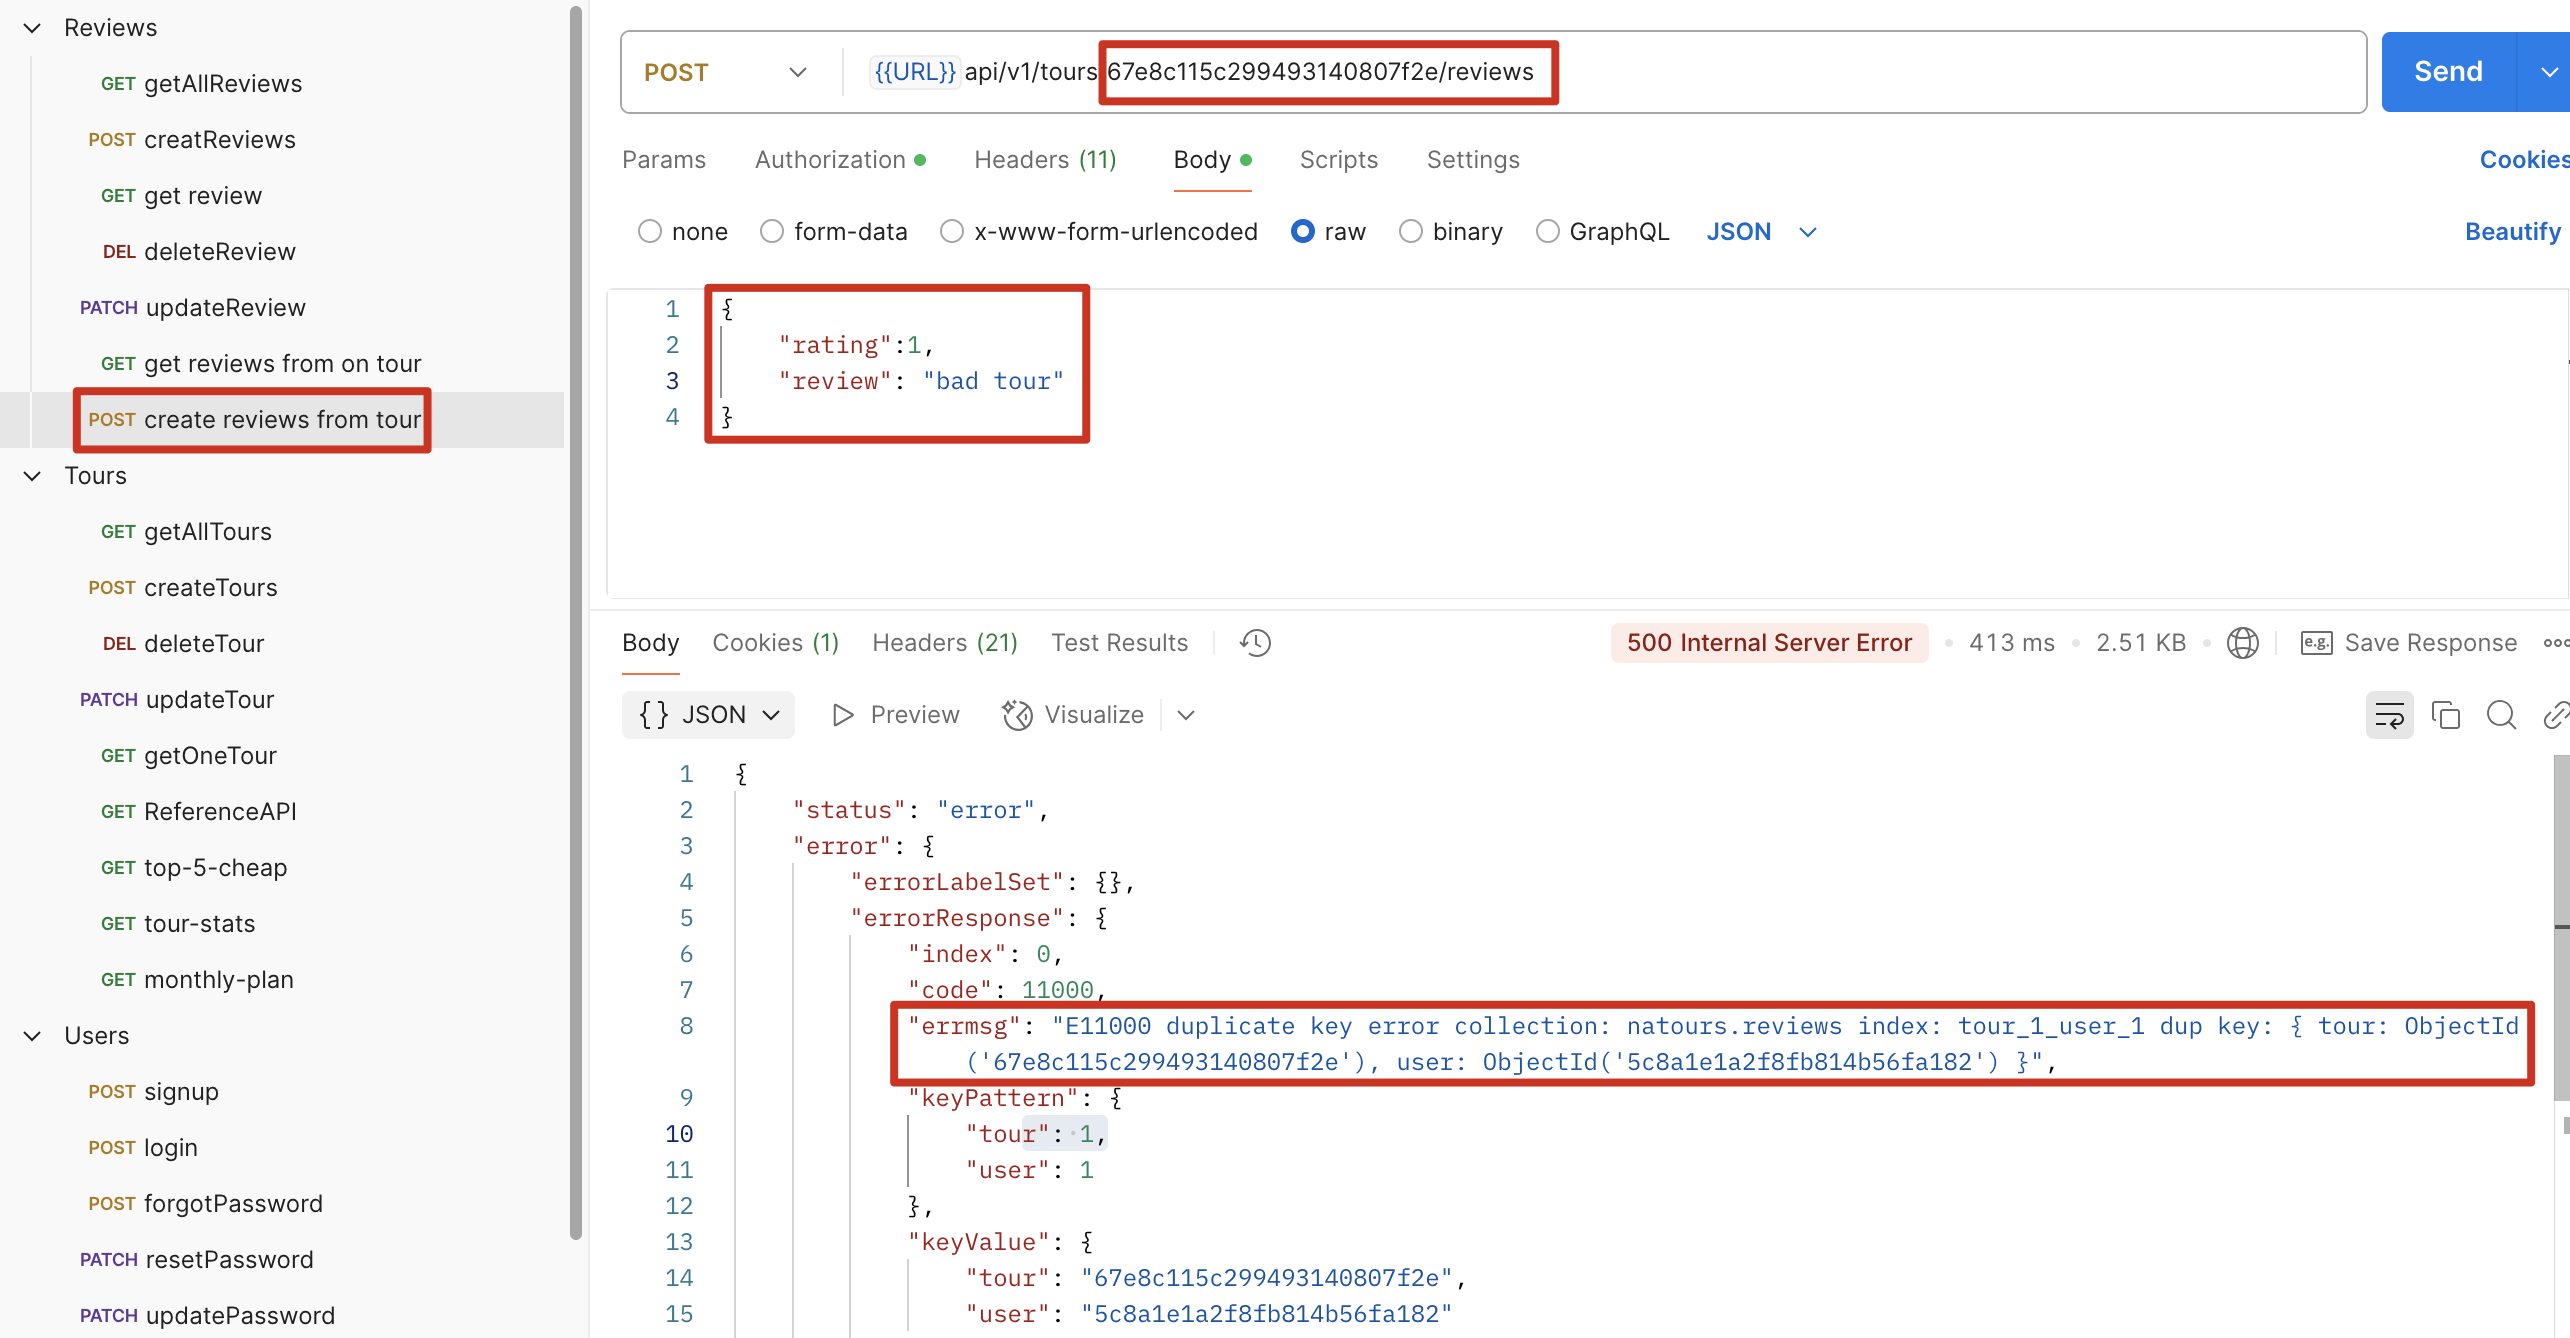
1 | reviewSchema.index({ tour: 1, user: 1 }, { unique: true }); |
测试:
- 登录 user 账号,准备一个 review 为空的 tour
- 为这个 tour 新增一个 review
同一个账号对同一个 tour 再次新增 review(review 内容不重要,可以相同也可以不同),报错
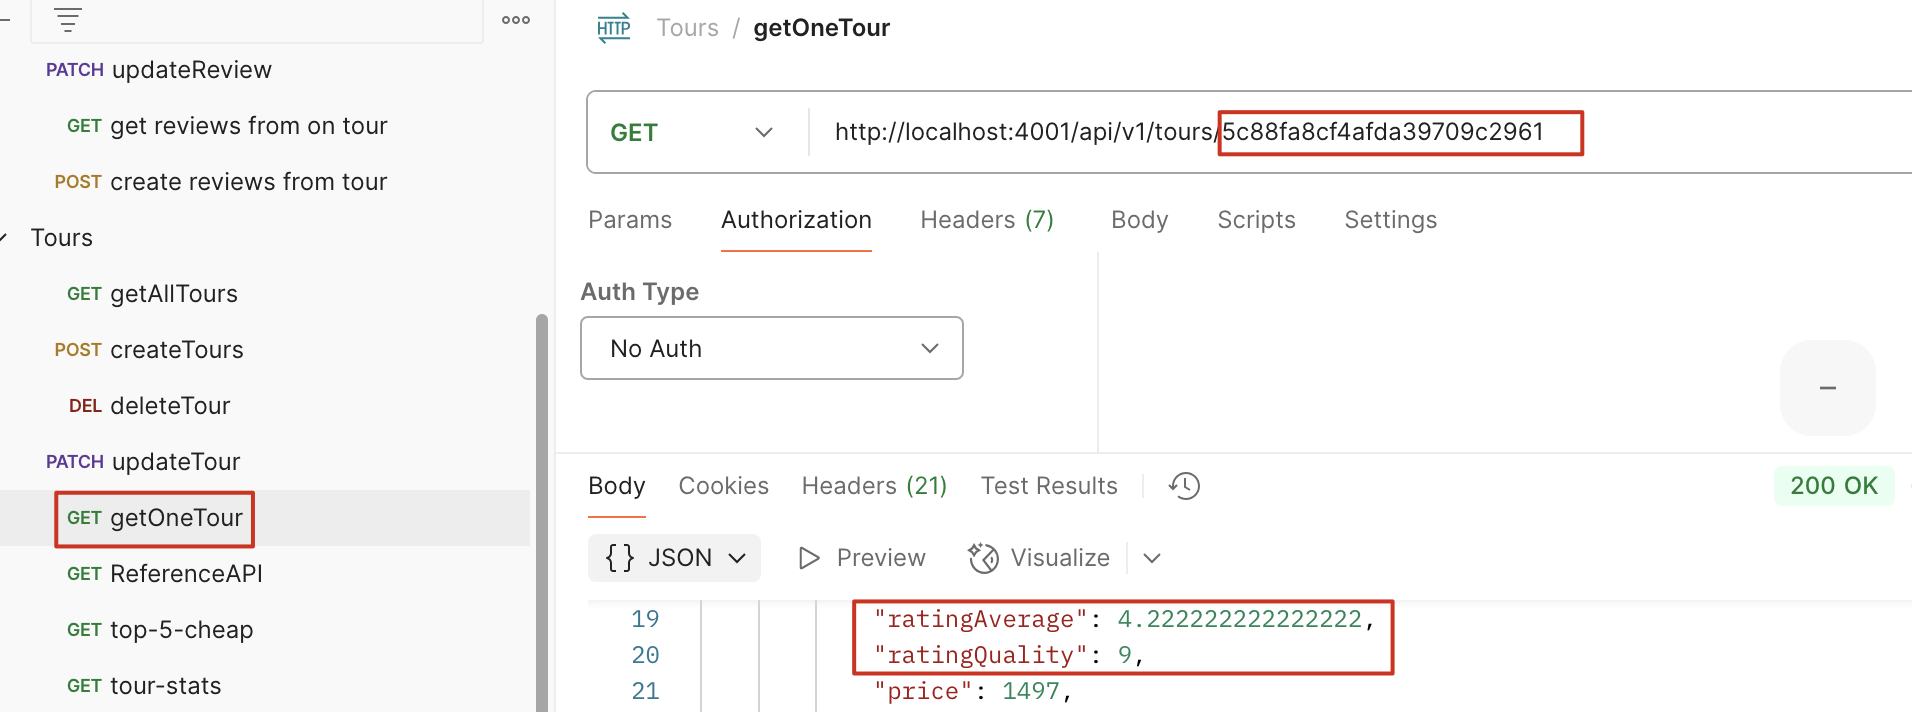
如何修改 mongoose Schema 中的数值四舍五入保留一位小数
示例:修改 review 的平均值,四舍五入保留 1 位小数
使用setter
1 | ratingAverage: { |
CRUD 操作与 API 设计
Mongoose CRUD
Model.deleteMany()Model.deleteOne()Model.find()Model.findById()Model.findByIdAndDelete()Model.findByIdAndRemove()Model.findByIdAndUpdate()Model.findOne()Model.findOneAndDelete()Model.findOneAndReplace()Model.findOneAndUpdate()Model.replaceOne()Model.updateMany()Model.updateOne()
创建一个 factory function 统一管理 CRUD
Create, update, delete
我们目前有三个 model: tour, user, review,每个 model 都有各自的 delete 函数,但他们其实非常相似,所以这里我们使用一个 factory 函数来统一这些 CRUD 方法,通过传递不同的 model 使代码整洁高效复用
步骤:
- 创建一个 handlerFactory.js
- 重写 deleteOne 函数,(其他 create update 函数也是差不多的,注意权限的限制)
- 分别在 tour, user, review 中调用该函数
- 新增 router,同时增加 protect 和 restrict
1 | // handlerFactory.js |
1 | router.route("/:id").delete( |
Reading (getAll, getOne)
这个相比其他工厂函数会复杂一些,因为这里有一些 query middleware 以及 populate
getOne
1 | exports.getOne = (Model, popuOptions) => |
getAll
1 | exports.getAll = (Model) => |
API 权限设计
Tour
getAllTour:获取全部的 tour,权限为:everyone
创建、删除、更新单个 tour,权限为:登录 + {admin, lead-guide}
getTour:获取单个 tour,权限为:everyone
User
Signup, login, forgotPassword, resetPassword:权限为:everyone
updatePassword, getMe, updateMe, deleteMe:权限为:登录
getAllUsers, createUser, getUser, updateUser, deleteUser:权限为:登录 + {admin}
这里权限的问题可以使用两个 router.use 解决,利用 middleware 依赖顺序执行的特性,使代码简洁
1 | const router = express.Router(); |
Review
只有登录后的 user 才能发布 review,只有 user 和 admin 才能更新、删除 review
getAllReviews, getReview:权限为:登录
createReview 权限为:登录 + {user}
updateReview, deleteReview:权限为:登录 + {user, admin}
Read Performance Optimization
使用 index,具体怎么选择需要看:具体字段查询的频率,维持 index 的成本,读写的模式
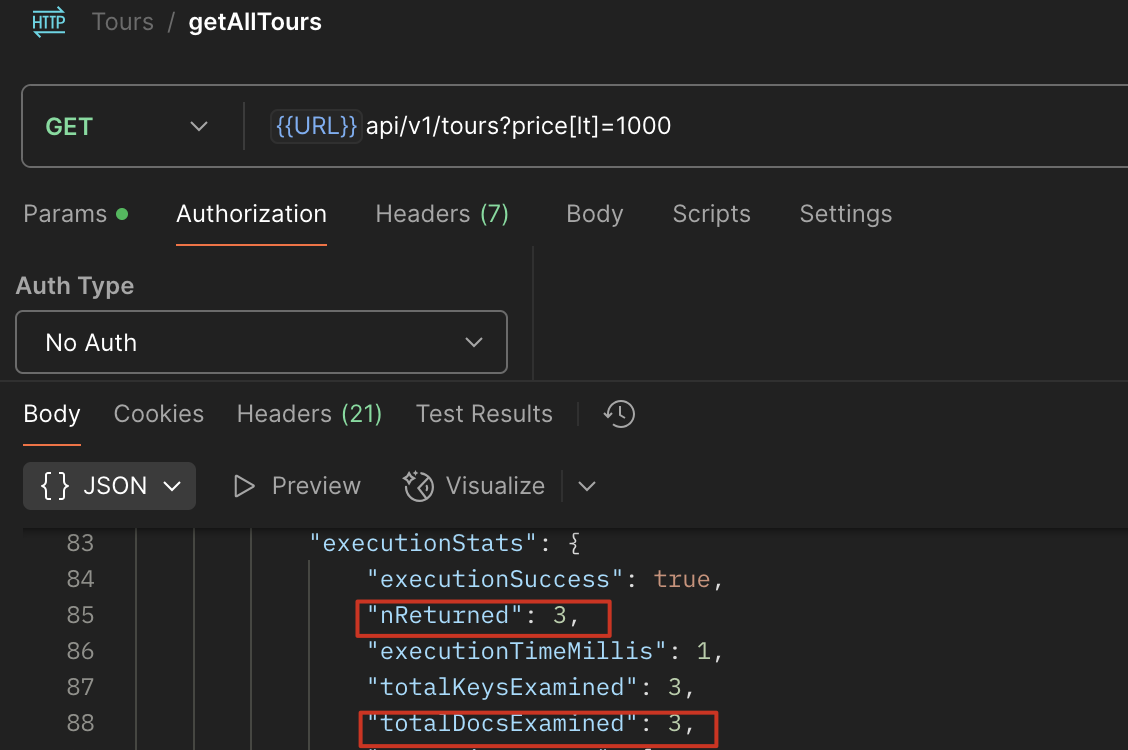
单索引
在 getAll 使用 explain() 分析,可以看到在 price>1000 的条件下查询,查询全部的数据返回 3 个数据,这里的效率很低,如何优化?
http://localhost:4001/api/v1/tours?price[lt]=1000
1 | exports.getAll = (Model) => |

使用 index,在 tourModel 中对 price 进行排序,再查询
1 | tourSchema.index({ price: 1 }); |
复合索引
http://localhost:4001/api/v1/tours?price[lt]=1000&ratingAverage[gt]=4.5
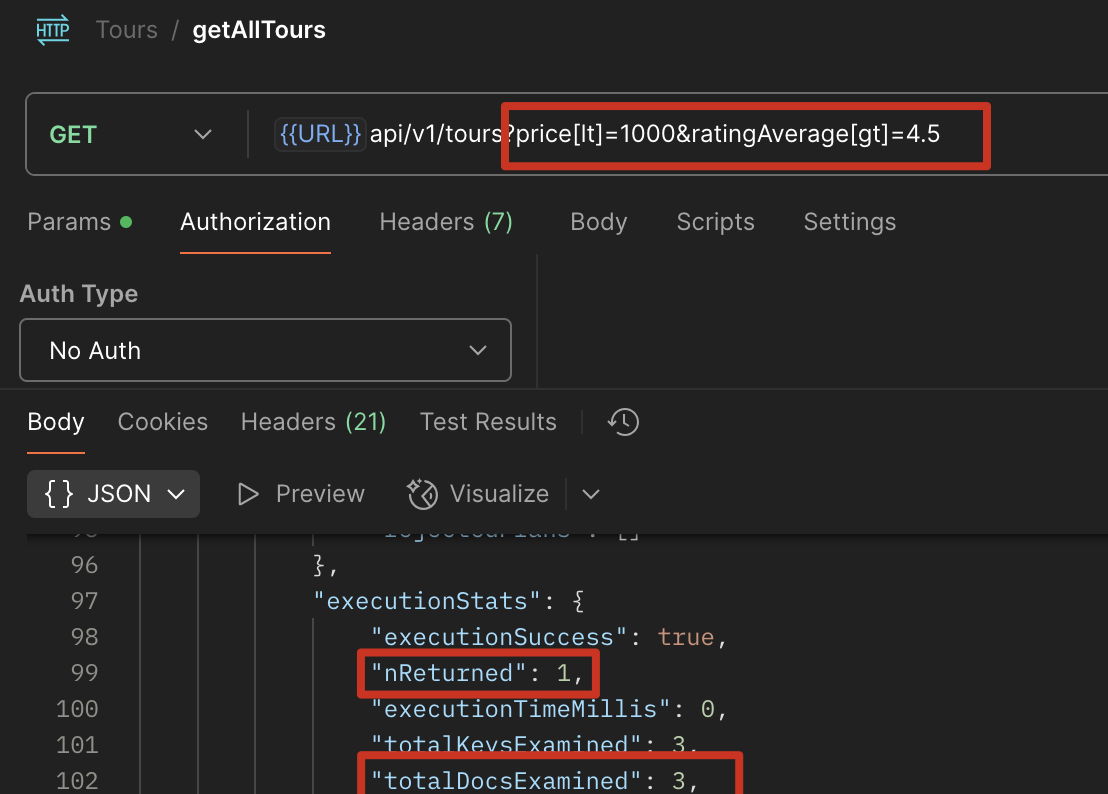
优化后
1 | tourSchema.index({ price: 1, ratingAverage: -1 }); |
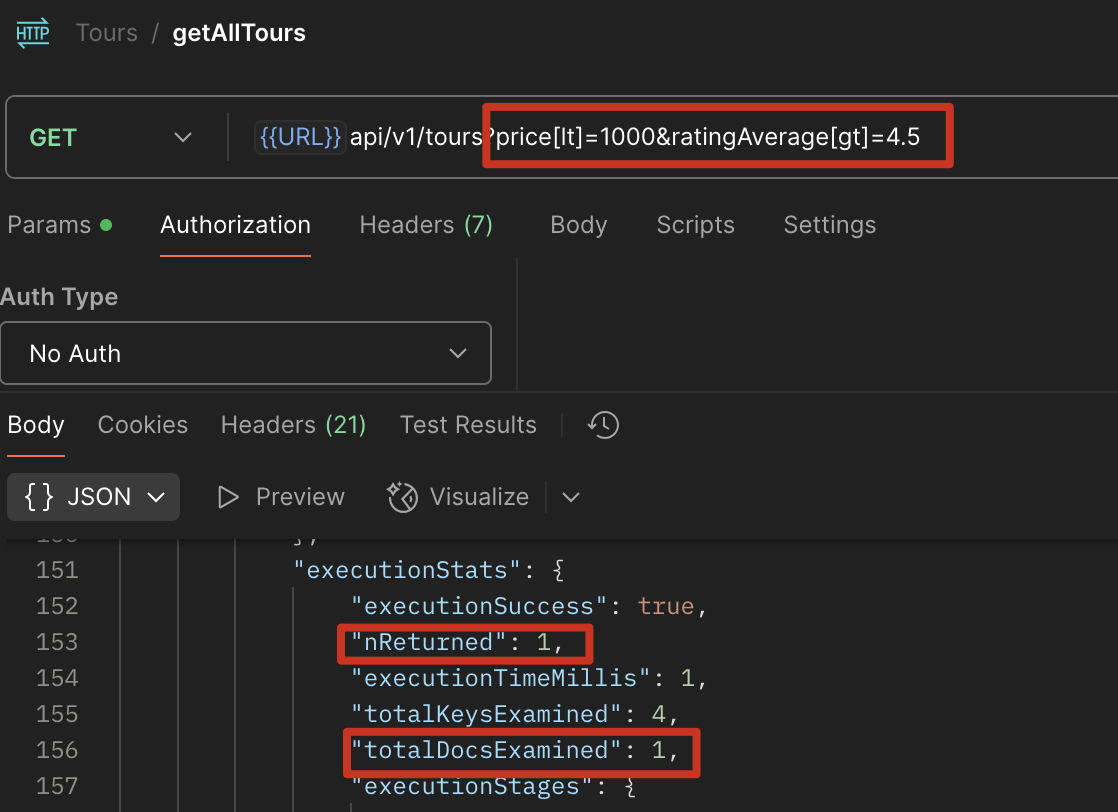
可以看到,这是我们刚才生成的索引

查询功能扩展(过滤、排序、字段选择和分页)
两种方式写 data.querry
硬编码 & req.query
1 | const tour = await TourSchema.find({ |
Mongoose.where()
1 | const tour = await TourSchema.find() |
筛选数据 req.querry
req.querry代表http://localhost:4001/api/v1/tours?difficulty=easy&sort=2&page=1&duration[gte]=5中?后的字段组成的 Array,在 terminal 中打印出来是这样:{ difficulty: ‘easy’, sort: ‘2’, page: ‘1’, duration: { gte: ‘5’ } }
仅筛选
用例:
http://localhost:4001/api/v1/tours?difficulty=easy, 解析出 difficulty 并用于筛选1
2
3
4
5// EXECUTE QUERRY
const tours = await TourSchema.find(req.query);
console.log(req.query);
// { difficulty: 'easy' }过滤不做筛选的字段
用例:
http://localhost:4001/api/v1/tours?difficulty=easy&sort=2&page=1,sort、page 不参与筛选1
2
3
4
5
6
7
8
9
10
11// BUILD QUERRY
const queryObj = { ...req.query }; //深拷贝 object
const excludeFields = ["page", "limit", "sort", "fields"];
excludeFields.forEach((el) => delete queryObj[el]); // 循环删除包含 excludeFields 字段的数据
const query = TourSchema.find(queryObj);
console.log(req.query, queryObj);
// 输出:{ difficulty: 'easy', sort: '2', page: '1' } { difficulty: 'easy' },可以看出来 queryObj 中的某些数据被过滤掉了
// EXECUTE QUERRY
const tours = await query;筛选 大于、小于数据
用例:
http://localhost:4001/api/v1/tours?difficulty=easy&sort=2&page=1&duration[gte]=5, 需要针对gte做操作,加上$符号。(为什么这里要加$符号?因为 mongodb 的命令行操作使用$gte 进行操作)1
2
3
4
5
6
7
8
9
10
11
12
13
14
15
16
17
18
19
20
21// BUILD QUERRY
// 1A) Filtering
const queryObj = { ...req.query };
const excludeFields = ["page", "limit", "sort", "fields"];
excludeFields.forEach((el) => delete queryObj[el]);
console.log(req.query, queryObj);
// { difficulty: 'easy', sort: '2', page: '1', duration: { gte: '5' } } { difficulty: 'easy', duration: { gte: '5' } }
// 1B) Advance filtering
let queryStr = JSON.stringify(queryObj); //将 Object 转字符串
// 正则匹配特定字段,g 代表多次匹配,callback 将每次匹配到的字段加上$符号,大于:gte, gt, 小于:lte, lt
queryStr = queryStr.replace(/\b(gte|gt|lte|lt)\b/g, (match) => `$${match}`);
console.log(JSON.parse(queryStr));
// { difficulty: 'easy', duration: { '$gte': '5' } }
const query = TourSchema.find(JSON.parse(queryStr));
// EXECUTE QUERRY
const tours = await query;
排序
单条件排序
用例:
http://localhost:4001/api/v1/tours?difficulty=easy&sort=price,针对 price 进行升序排序Q: 如何降序排序?
A: 在
price前加上-,即http://localhost:4001/api/v1/tours?difficulty=easy&sort=-price1
2
3
4
5
6
7
8
9
10
11
12
13
14// BUILD QUERRY
// 1A) Filtering
...
// 1B) Advance filtering
...
// 2) Sorting
if (req.query.sort) {
query = query.sort(req.query.sort); // 根据 sort 对应的字段进行排序
} else {
query = query.sort('-createdAt'); // 默认时间升序
}
// EXECUTE QUERRY
const tours = await query;多个条件排序
用例:
http://localhost:4001/api/v1/tours?difficulty=easy&sort=-price,duration,先 price 降序,如果 price 相等,按 duration 升序,{ difficulty: 'easy', sort: '-price,duration' }1
2
3
4
5
6
7
8
9
10
11
12
13
14
15// BUILD QUERRY
// 1A) Filtering
...
// 1B) Advance filtering
...
// 2) Sorting
if (req.query.sort) {
const sortBy = req.query.sort.split(',').join(' ') // 去掉逗号换为空格
query = query.sort(sortBy); // 根据 sort 对应的字段进行排序
} else {
query = query.sort('-createdAt'); // 默认时间升序
}
// EXECUTE QUERRY
const tours = await query;
仅返回特定字段 fields
Fields Limiting
用例:
http://localhost:4001/api/v1/tours?difficulty=easy&fields=name,duration,先根据 difficulty 找出数据,然后返回这些数据中的 name 和 duration。Q: 如何返回不包含特定字段的数据?
A: 同 sort,使用
-,比如:http://localhost:4001/api/v1/tours?difficulty=easy&fields=-name,-price, 返回数据不包含 name 和 priceQ: 如何让 schema 中某个字段默认不返回?
A: 修改 model 中 Schema,该字段加上
select: false1
2
3
4
5
6
7
8
9
10
11
12
13
14
15
16
17// BUILD QUERRY
// 1A) Filtering
...
// 1B) Advance filtering
...
// 2) Sorting
...
// 3)Field limiting
if (req.query.fields) {
const fields = req.query.fields.split(',').join(' ');
query = query.select(fields); // 根据 fields 对应字段返回数据
} else {
query = query.select('-__v'); // 不将 mongodb 默认生成的__v 字段返回,-代表不包括
}
// EXECUTE QUERRY
const tours = await query;
分页 Page
用例
http://localhost:4001/api/v1/tours?page=4&limit=31
2
3
4
5
6
7
8
9
10
11
12
13
14
15
16
17
18
19
20
21
22
23
24// BUILD QUERRY
// 1A) Filtering
...
// 1B) Advance filtering
...
// 2) Sorting
...
// 3)Field limiting
...
// 4)Pagination
const page = req.query.page * 1 || 1; // 默认值,* 1 是因为可以将字符串转换为数字
const limit = req.query.limit * 1 || 100; // 默认值
const skip = (page - 1) * limit;
// page=3&limit=10, 1-10 page 1, 10-20 page 2, 20-30 page 3
query = query.skip(skip).limit(limit);
if (req.query.page) {
const numTours = await TourSchema.countDocuments(); // 获取当前 collection 中有多少个 document
if (skip >= numTours) throw new Error("This page doesn't exist"); //最外层有 try catch,可以接住 error
}
// EXECUTE QUERRY
const tours = await query;
alias 自定义 api
用例:
http://localhost:4001/api/v1/tours/top-5-cheap,可以用这种方式新增很多自定义 api,巧用中间件新增 route
1
2
3router
.route("/top-5-cheap")
.get(tourController.aliasTopTours, tourController.getAllTours);新增中间件
1
2
3
4
5
6exports.aliasTopTours = (req, res, next) => {
req.query.limit = "5";
req.query.sort = "-ratingAverage,price";
req.query.fields = "name,price,ratingAverage,summary,difficulty";
next();
};
代码示例
1 | class APIFeatures { |
调用
1 | const feature = new APIFeatures(TourSchema.find(), req.query) |
常见报错码
HTTP 响应状态码
信息响应 (100–199)
成功响应 (200–299)
重定向消息 (300–399)
客户端错误响应 (400–499)
服务端错误响应 (500–599)
常见状态码
200 OK:GET, PUT 请求成功
201 Created:POST 请求成功,并因此创建了一个新的资源
204 No Content:请求成功,返回 null,一般用于DELETE
400 Bad Request:由于被认为是客户端错误(例如,错误的请求语法、无效的请求消息帧或欺骗性的请求路由),服务器无法或不会处理请求。
401 Unauthorized:这个响应意味着”unauthenticated”。也就是说,客户端必须对自身进行身份验证才能获得请求的响应。
403 Forbidden:客户端没有访问内容的权限;也就是说,它是未经授权的,因此服务器拒绝提供请求的资源
404 Not Found:服务器找不到请求的资源。
405 Method Not Allowed:服务器知道请求方法,但目标资源不支持该方法。例如,API 可能不允许调用DELETE来删除资源。
500 Internal Server Error:服务器遇到了不知道如何处理的情况。
安全与用户认证 Security and Authentication
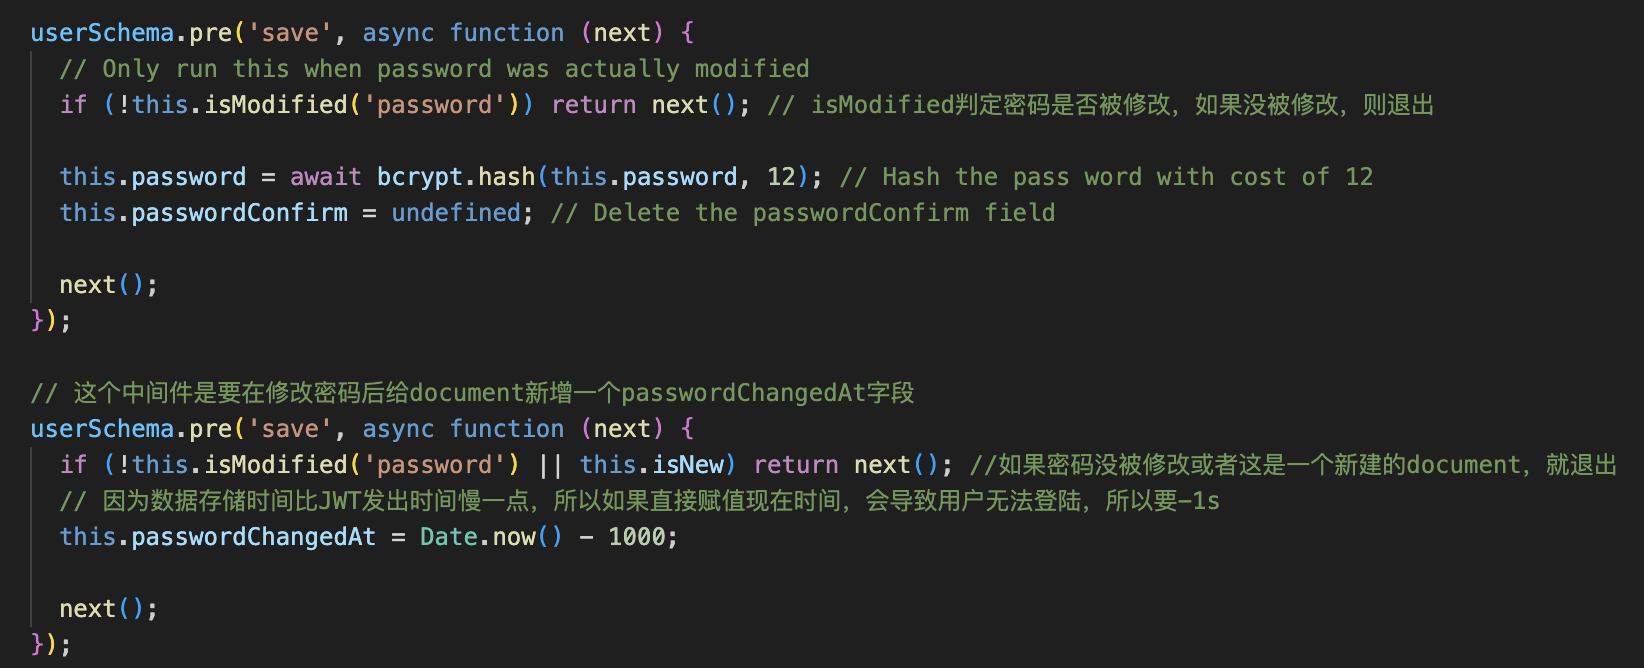
Bcrypt 数据加密
Question:
bcryptvsbcryptjs- bcrypt.hash 中的 number 代表什么?
安装:npm i bcryptjs
使用 Document Middleware,在创建密码请求之后,写入数据库之前进行加密,只有当密码被修改时才调用
注意这里是一个异步函数,需要 await
删除 passwordConfirm 的原因:passwordConfirm 只是为了让用户 doublecheck 他的密码,我们加密后的密码不需要存两次到数据库
1 | userSchema.pre("save", async function (next) { |
JWT
Official Link:
Reference Link:
Question:
- 为什么要保证 server 是 stateless?
安装:npm i jsonwebtoken
流程:
用户发起登录请求后,服务端使用 JWT 生成并返回 token,无需存储用户的登录状态;之后用户每次请求都必须携带该 token,才能从服务端获取正确的数据。

原理:
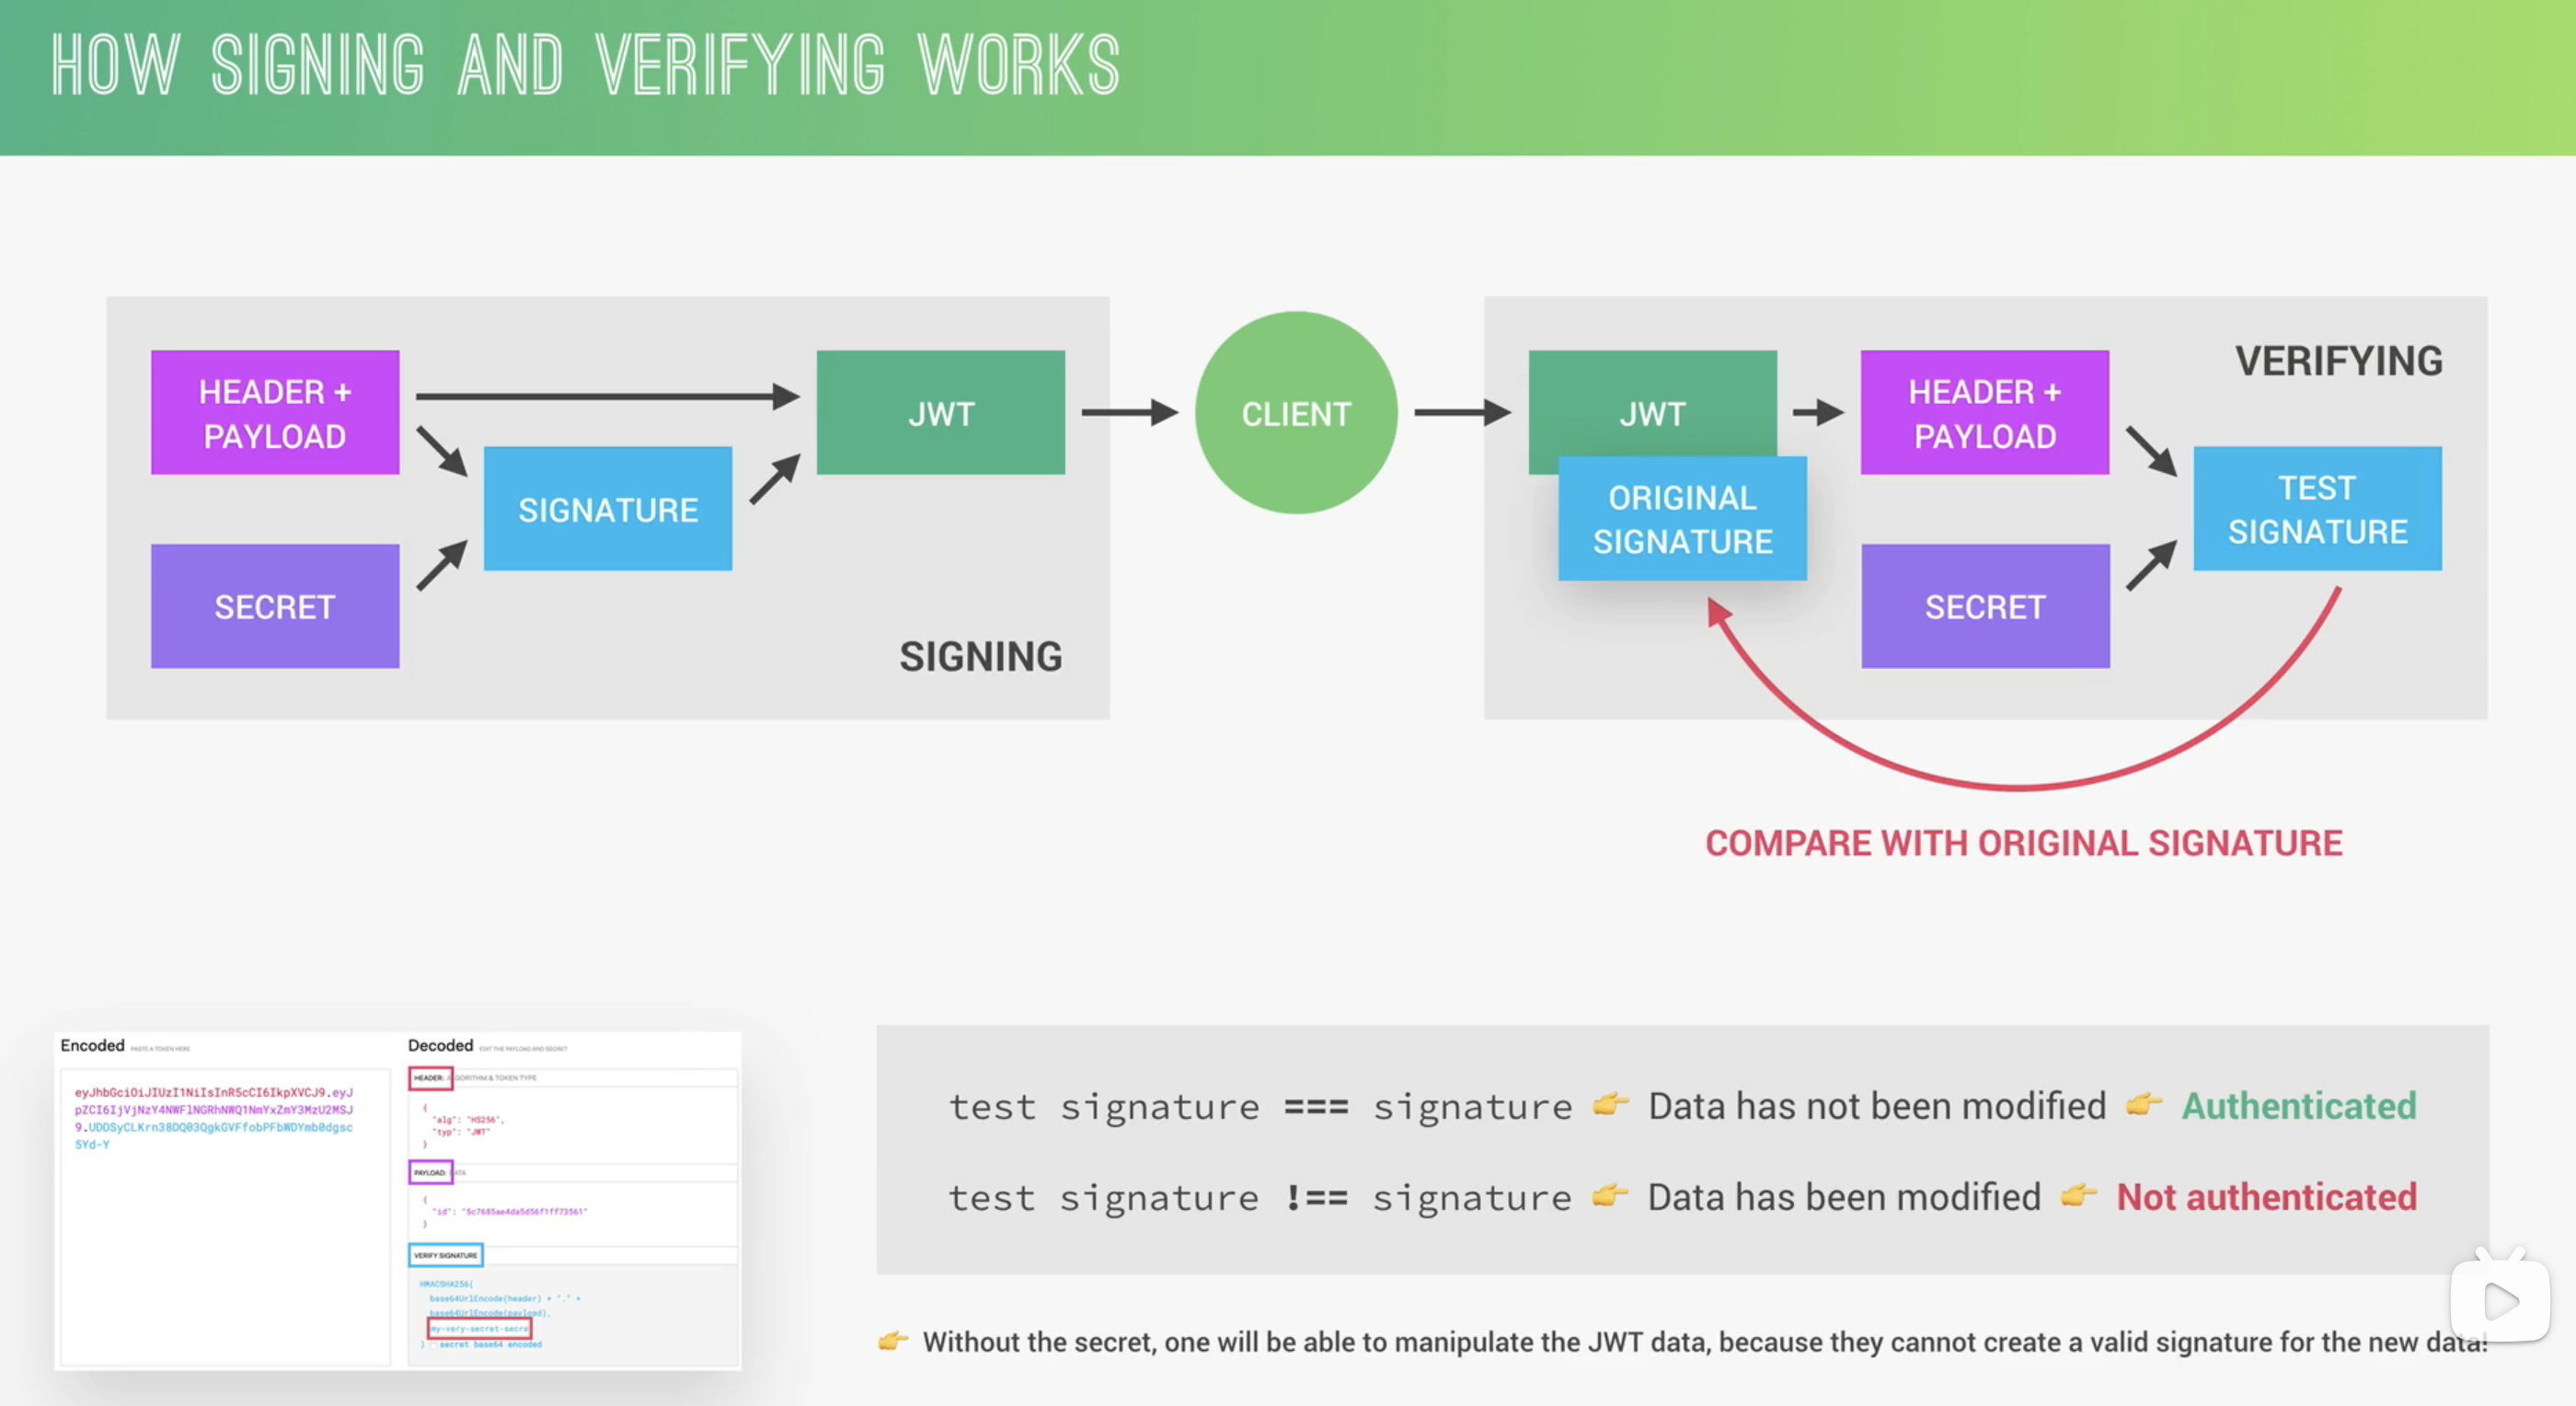
JWT secret
- 建议写在 env 文件
- 因为使用 hsa 256 加密,secret 字符长度最短为32
Auth Event
Sign up
代码示例:
1 | const jwt = require("jsonwebtoken"); |
Login
1 | // mongoose 的 methods 方法 |
针对这一句,因为 password 默认设置为不返回,这里需要获取 password 的值,使用+password的方式获取
1 | const user = await User.findOne({ email }).select("+password"); |
未 ➕password
➕password

Project User access route
大多数教程只有 1、2,但是 3、4 的情况也需要关注
Getting token and check of it’s there
req.headersVerification token
Promisify, Reference linkCheck if user be deleted but token still exist
1
2
3
4
5
6
7
8
9
10// 找 token 中带过来的 id,看是否存在,如果不存在则报错
const freshUser = await User.findById(decoded.id);
if (!freshUser) {
return next(
new AppError(
"The user belong to this token does no longer exist",
401
)
);
}Check if user changed password after the token was issued,这里需要关注 user 修改密码时间以及 token 的过期时间
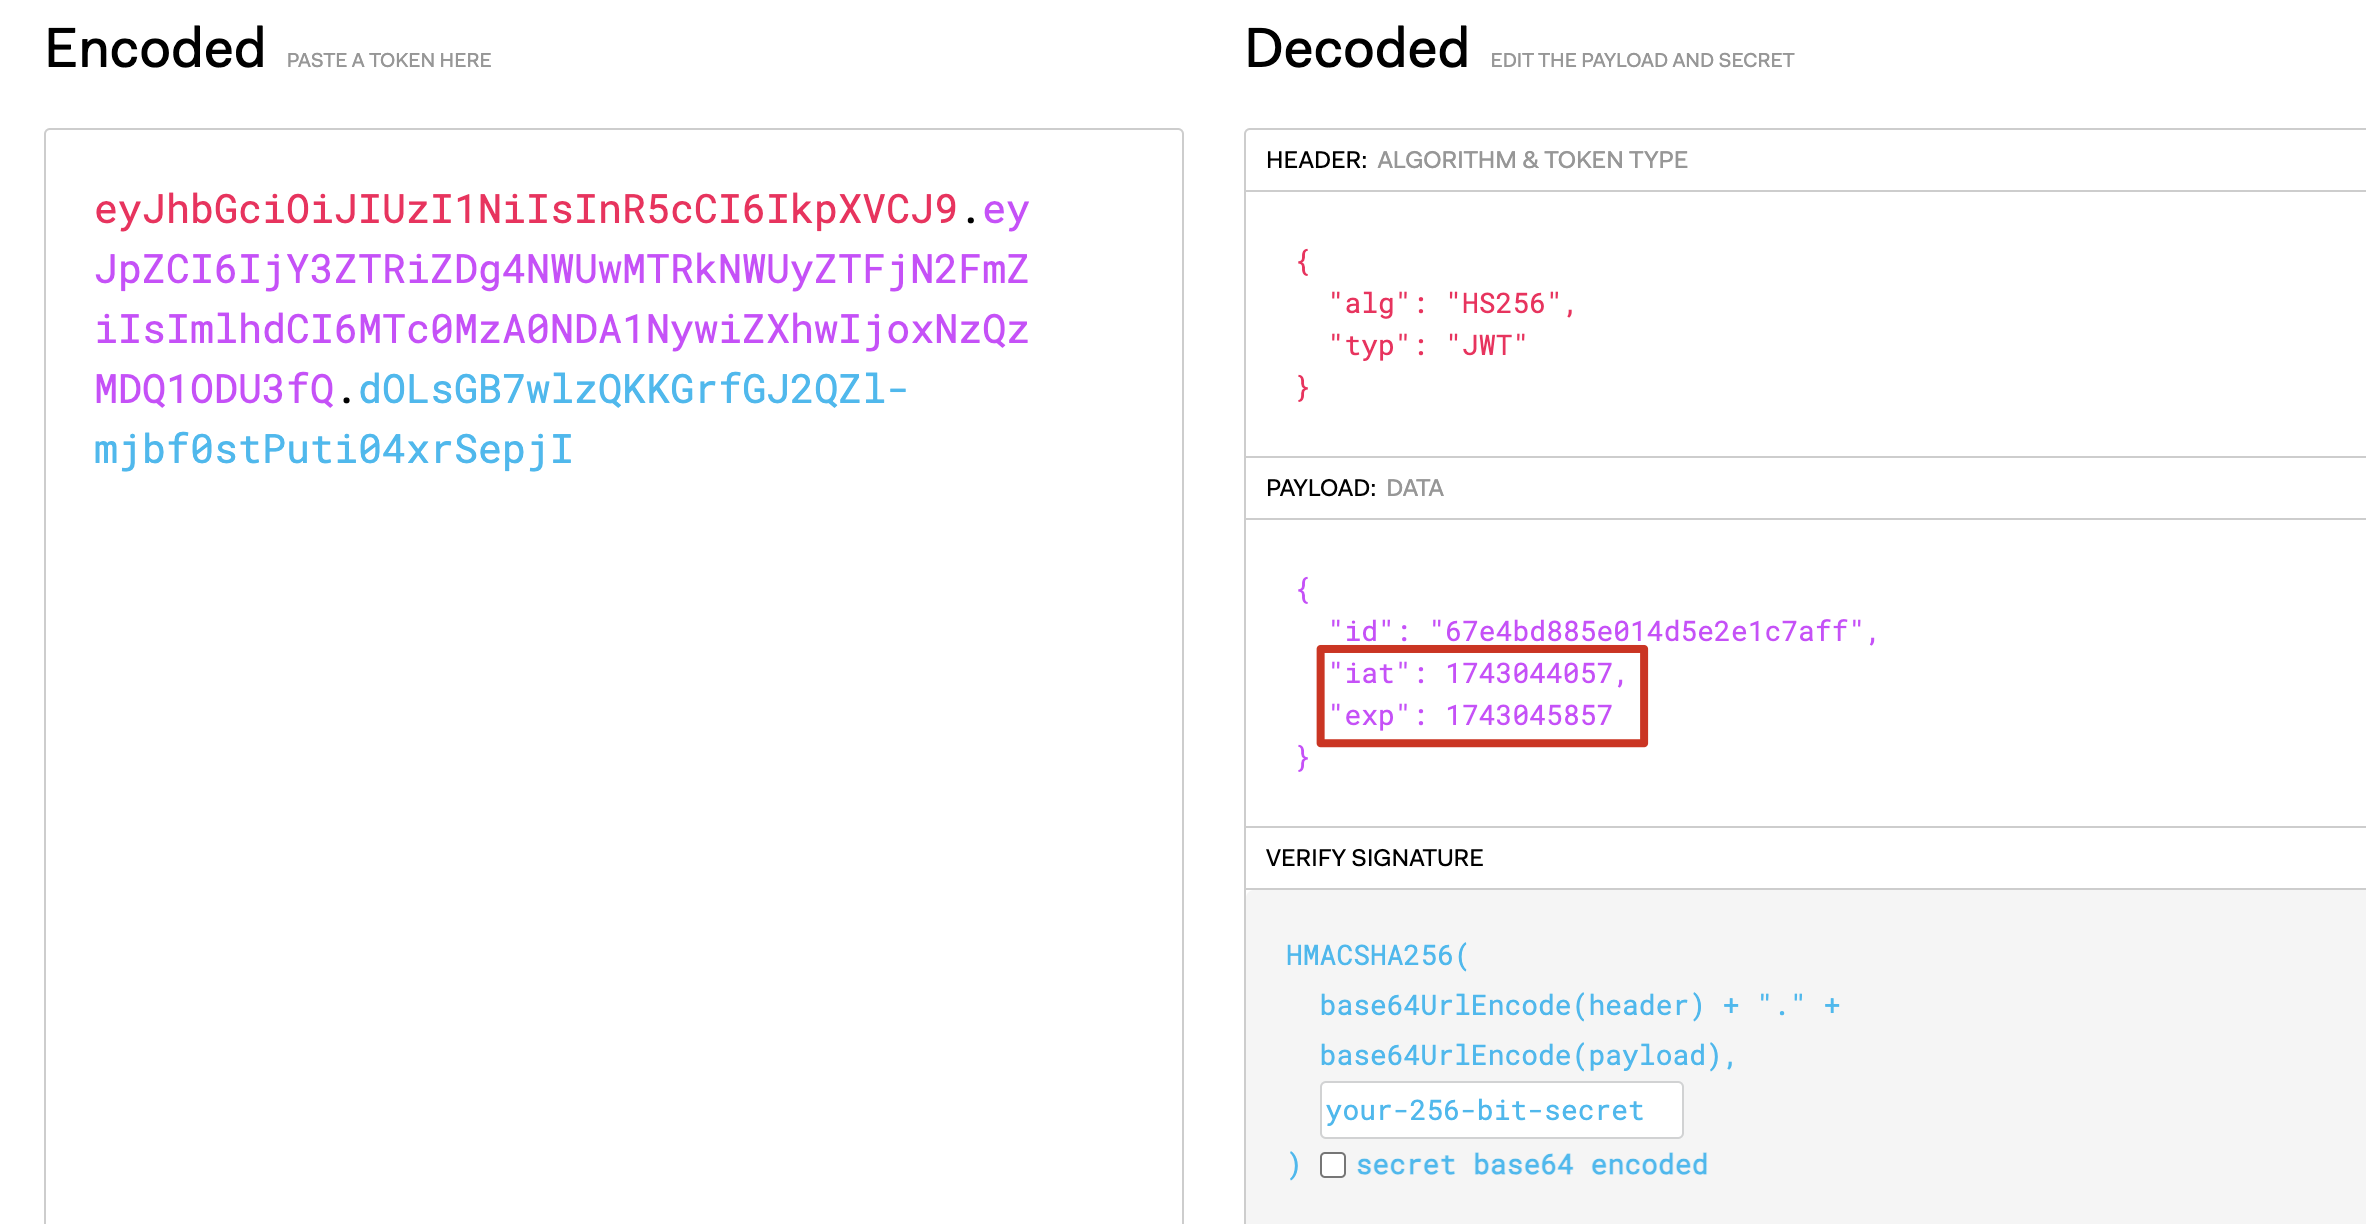
如何获取 jwtTimestamp?
- 拿到一个标准的 jwt,比如:eyJhbGciOiJIUzI1NiIsInR5cCI6IkpXVCJ9.eyJpZCI6IjY3ZTRiZDg4NWUwMTRkNWUyZTFjN2FmZiIsImlhdCI6MTc0MzA0NDA1NywiZXhwIjoxNzQzMDQ1ODU3fQ.dOLsGB7wlzQKKGrfGJ2QZl-mjbf0stPuti04xrSepjI
- 打开 https://jwt.io/,输入 jwt,获得 payload
- 右侧 iat 是创建时间,exp 时是过期时间
- 将”2025-03-27T11:20:10.000Z”转换为”1743045803”这种格式,可以使用 getTime() 函数实现
示例代码:
方法:changedPasswordAfter
1 | // 判断用户是否修改了密码,比较用户修改密码时间和 token 生成时间,默认为 false 表示为未修改密码或者修改密码但在 token 生成之前 |
中间件:protect
1 | exports.protect = catchAsync(async (req, res, next) => { |
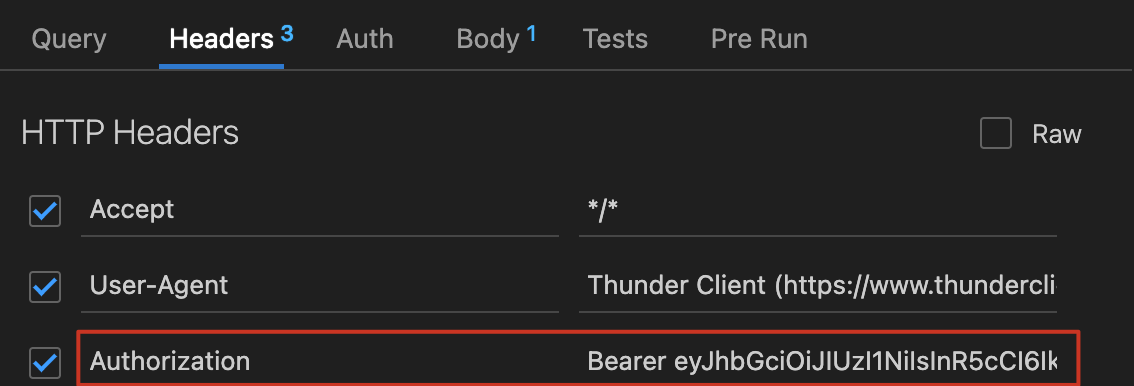
标准的请求头 Header 包括:
key: Authorization
value: Bearer + ‘ ‘ + token
授权特定 user 比如 admin 删除数据库的权利,其他人不能删除
使用中间件
protect 中间件:保护该 route,需要验证 token 成功才能访问
restrictTo 中间件:授予访问权限,只有 login 的人是 admin 以及 lead-guide 才能使用这个 route
1 | router.delete( |
密码重置
点击忘记密码,携带 email 发送 post,会创建一个 reset token(随机 token)发送到 email 中
forgotPassword: 收邮件
用户从电子邮件点击链接,发送携带 reset token 的请求,更新密码
resetPassword: 接收 token 和新密码
步骤:
1 | 创建两个route api |
email.js
1 | const nodemailer = require("nodemailer"); |
1 | exports.forgotPassword = catchAsync(async (req, res, next) => { |
Question:
crypto什么作用?理解一下这两句
1
2const resetToken = crypto.randomBytes(32).toString("hex");
crypto.createHash("sha256").update(resetToken).digest("hex");什么是 mailtrap,怎么用?
可以使用 test tool 发送邮件到虚拟邮箱进行测试验证,不使用真实邮箱一方面是真实邮箱不想收垃圾信息,一方面是真实邮箱有数量限制
遇到的 bug
现象:
user.save()的报错没有 catch 到,terminal 能看到报错信息,程序直接崩溃,response 返回 200 请求成功字样原因:
user.save()前缺少await关键字解释:在 Node.js(或任何支持 Promise 的环境)里,如果对一个返回 Promise 的异步函数没有使用
await(或.then().catch()),那么它抛出的异常不会被常规的try...catch包裹到。结果就是 Promise 中产生的错误既没有被显式捕获,也没有被内部处理,就会变成 未处理的 Promise 拒绝(UnhandledPromiseRejection)。在较新版本的 Node.js 中,未处理的 Promise 拒绝会默认导致程序抛出警告或直接崩溃。现象:数据库中存入的时间比北京时间早 8h
原因:JavaScript 默认使用 Date.now() 存储毫秒级别的 UTC 时间,不是本地时区时间,在中国(UTC+8)查看时就会差 8 个小时。
Reference Link:
更新除密码外其他数据
步骤:
- 确认用户输入内容不包含 password 或 passwordConfirm
- 筛选用户输入内容,只更新固定字段,比如 name,email,过滤用户输入的其他字段
- 使用 findByIdAndUpdate 查找并更新数据库,使用 options.new 和 options.runValidators,保证返回修改后的数据以及保证数据使用 schema validator 验证
- 返回 client response
知识点:
Object.keys(obj).forEach
(obj, …allowedFields)
options.new 和 options.runValidators
1 | const filterObj = (obj, ...allowedFields) => { |
删除账户
原理:并不删除,而是让用户的 active 关掉,这样以后用户重新激活它就可以直接使用
步骤:
- 配置 active 字段
- 新增 route:/deleteMe
- 查找并更新,将字段 active 更新为 false
- 返回给 client
- 配置 find 的 query middleware,查找时仅返回 active 为 true 的数据
配置 active 字段
1 | active: { |
更新 active 字段
1 | exports.deleteMe = catchAsync(async (req, res, next) => { |
配置 query middleware
1 | // 功能:find 开头的函数,查找时仅返回 active 不为 false 的数据;false 代表该数据在用户角度已被删除 |
防御机制 Best Practice
常见安全攻击方式
攻击者获得了数据库的访问权限 (Compromised Database)
解决:加密 password 和加密 rese tpassword token,防止攻击者窃取密码或者重置密码
暴力破解,攻击者试图猜测密码 (Brute Force Attacks )
解决:让登陆请求变得非常慢
1 | - bcrypt 可以让登陆请求变慢 |
跨站脚本攻击 (Cross-site Scripting (XSS) Attacks)
问题:攻击者试图将脚本注入页面以运行他的恶意代码,如果 JWT 存储在本地,攻击者就可能获取
解决:
- 仅将 JWT 存储在 HTTP 的 cookie 中,这样浏览器只能 receive 和 send,不能访问或修改 JWT
- 清理用户输入数据
- 配置一些特殊的 HTTP headers,让攻击难以发生
拒绝服务攻击 (Denial-of-Service (DOS) Attack)
问题:攻击者对服务器请求太多导致服务器崩溃
解决:
速率限制,express-rate-limit
limit body payload (in body-parser),限制 POST 或 PATCH 时,req.body 的内容
避免代码中出现 evil 的正则表达式
NOSQL Query Injection
解决:
- 使用 MongoDB 可以利用 SchemaTypes
- 清理用户输入数据
其他建议
- 使用 HTTPS
- 生成随机的 password reset token 和过期时间
- 修改密码后,之前的 JWT 不再有效
- 不要把私密的配置文件上传到 git
- 不要发送 error 数据给用户
- 使用 scurf 防止 XSS 攻击
- 在用户进行支付操作时,再次让用户验证信息
- 创建一个不受信任的 jwt 列表,每次请求时验证一下
- 首次创建账户后确认 email
- 使用 refresh token 保证用户可以一直登陆,直到他们主动退出
- Two-factor authentication,比如登陆后需要验证手机短信
配置发送 cookie 到 client
步骤:
- 在 sendToken 函数中,将 cookie 写入
- 配置 cookie 的参数
知识点:
cookie 配置:
过期时间:不需要单位,但需要转换为毫秒
secure 为 true:cookie 只能使用 HTTPS 发送,在生产环境下启用
httpOnly 为 true:浏览器不能以任何方式访问或修改 cookie
1 | const createSendToken = (user, statusCode, res) => { |
开发环境下测试结果

API 请求频率限制
使用一个全局的 middleware 来配置
安装:npm i express-rate-limit
1 | // 一小时内允许来自同一个 IP 的 100 个请求 |
验证:在 postman 中,任意发出一个请求,可以看到限制次数在减少,但如果此时 server 重启,次数会重置
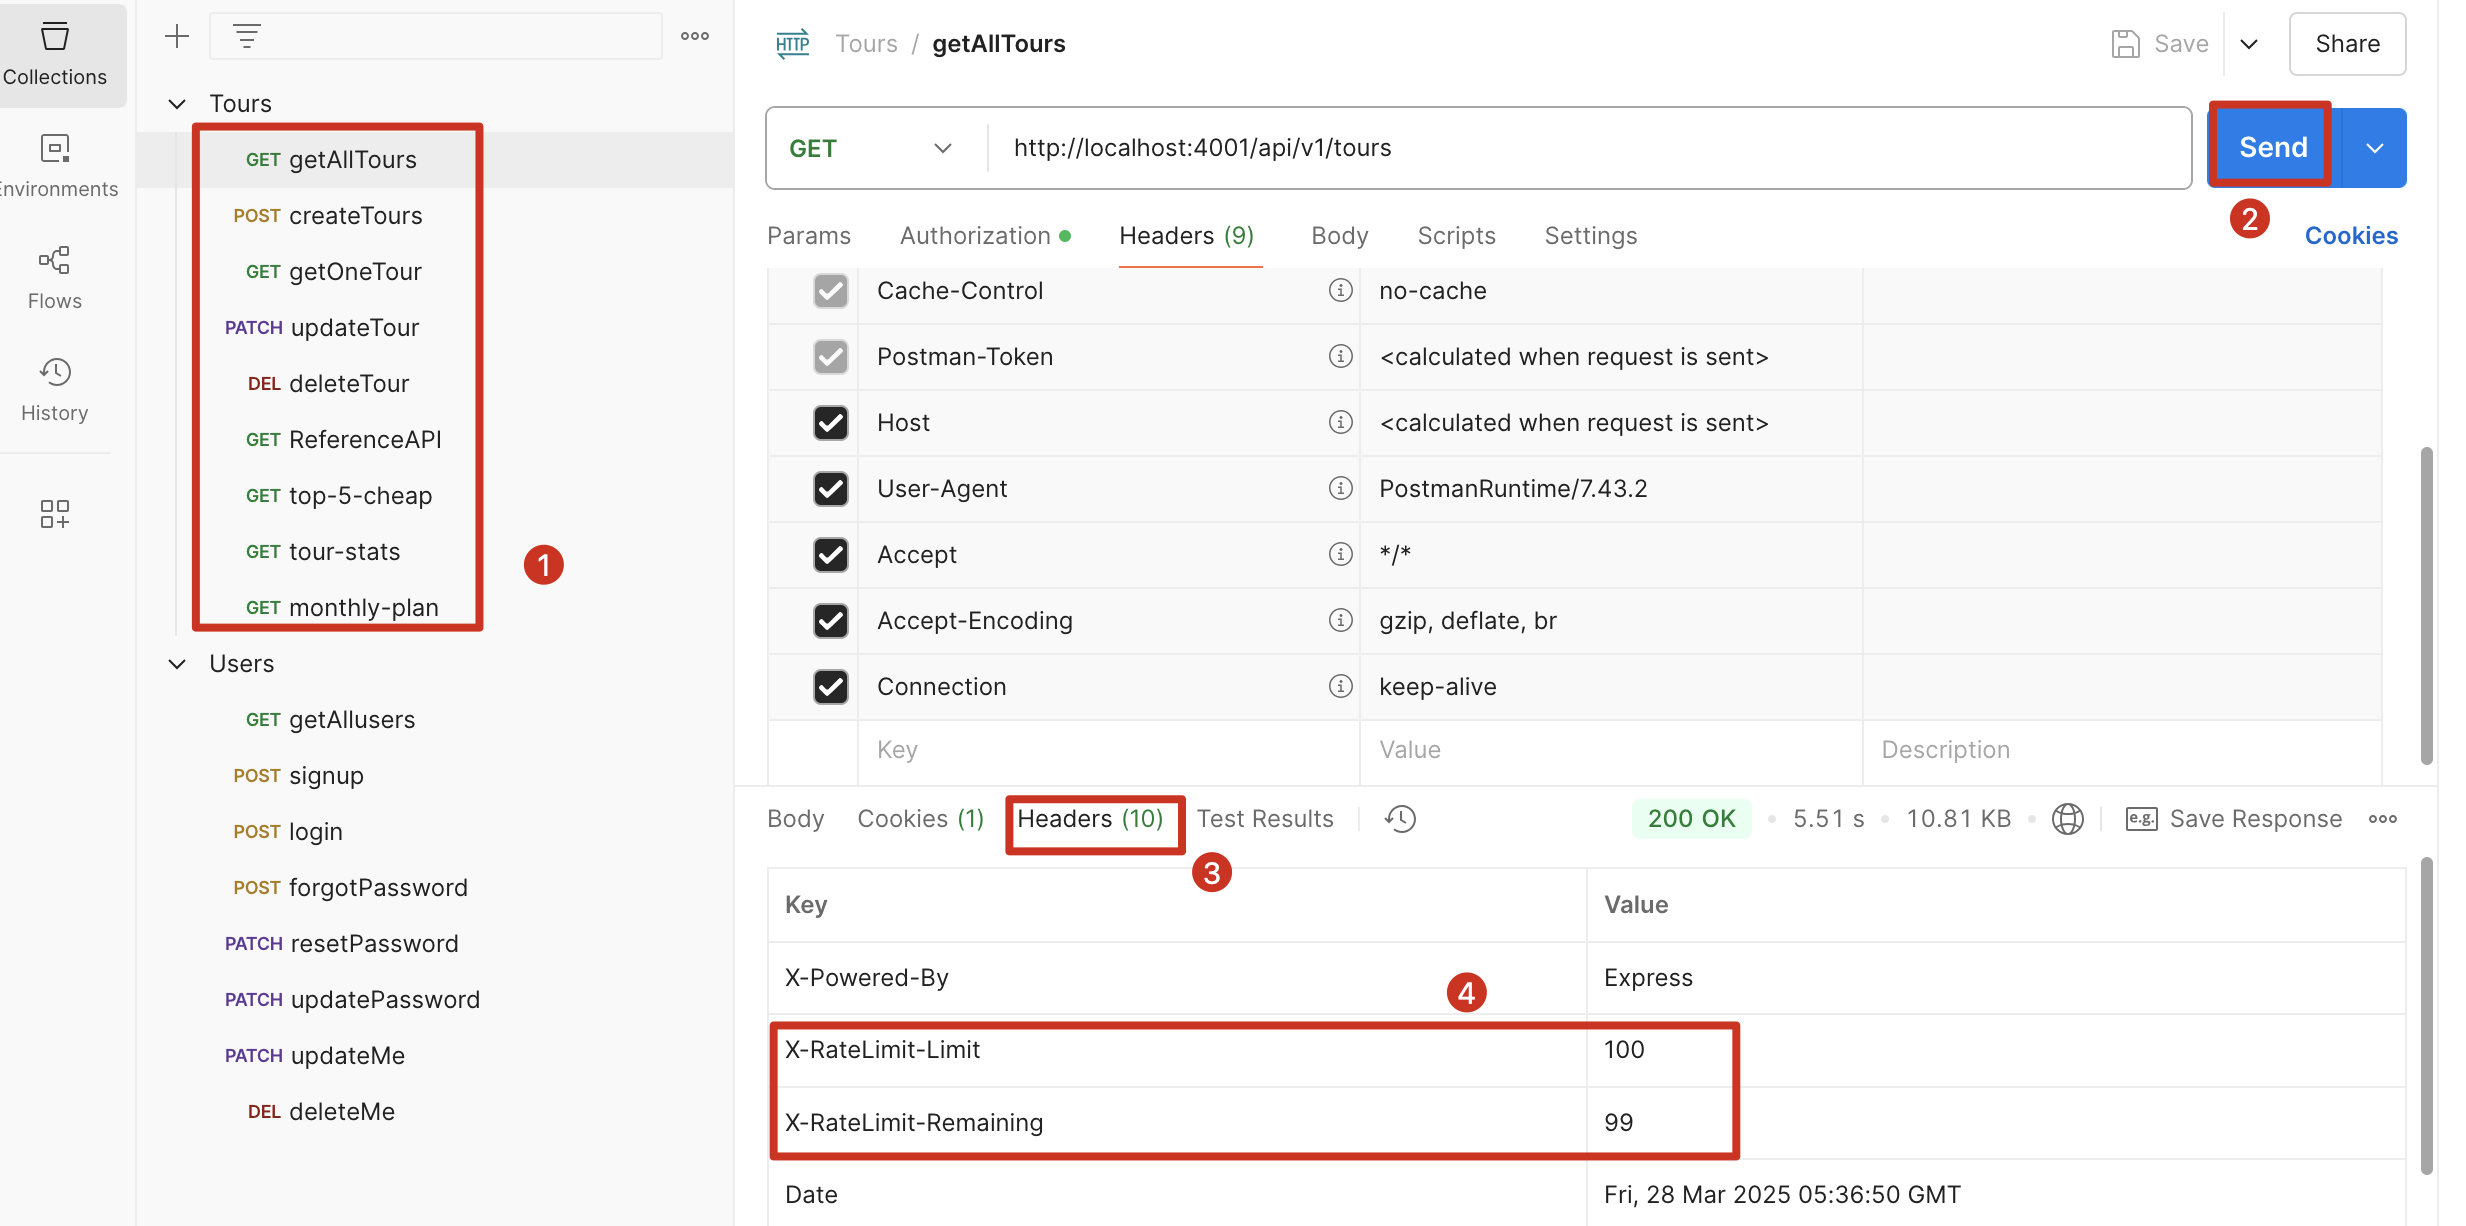
超过指定次数后,会报错

配置 Security HTTP Headers
安装:npm i helmet
Offical Link: https://github.com/helmetjs/helmet
验证:查看 postman Headers 信息
数据清理 - 预防 NOSQL 和 XSS 攻击
用于抵御两种攻击
NOSQL query injection
npm i express-mongo-sanitizeXSS
npm i xss-clean
模拟 NOSQL query injection
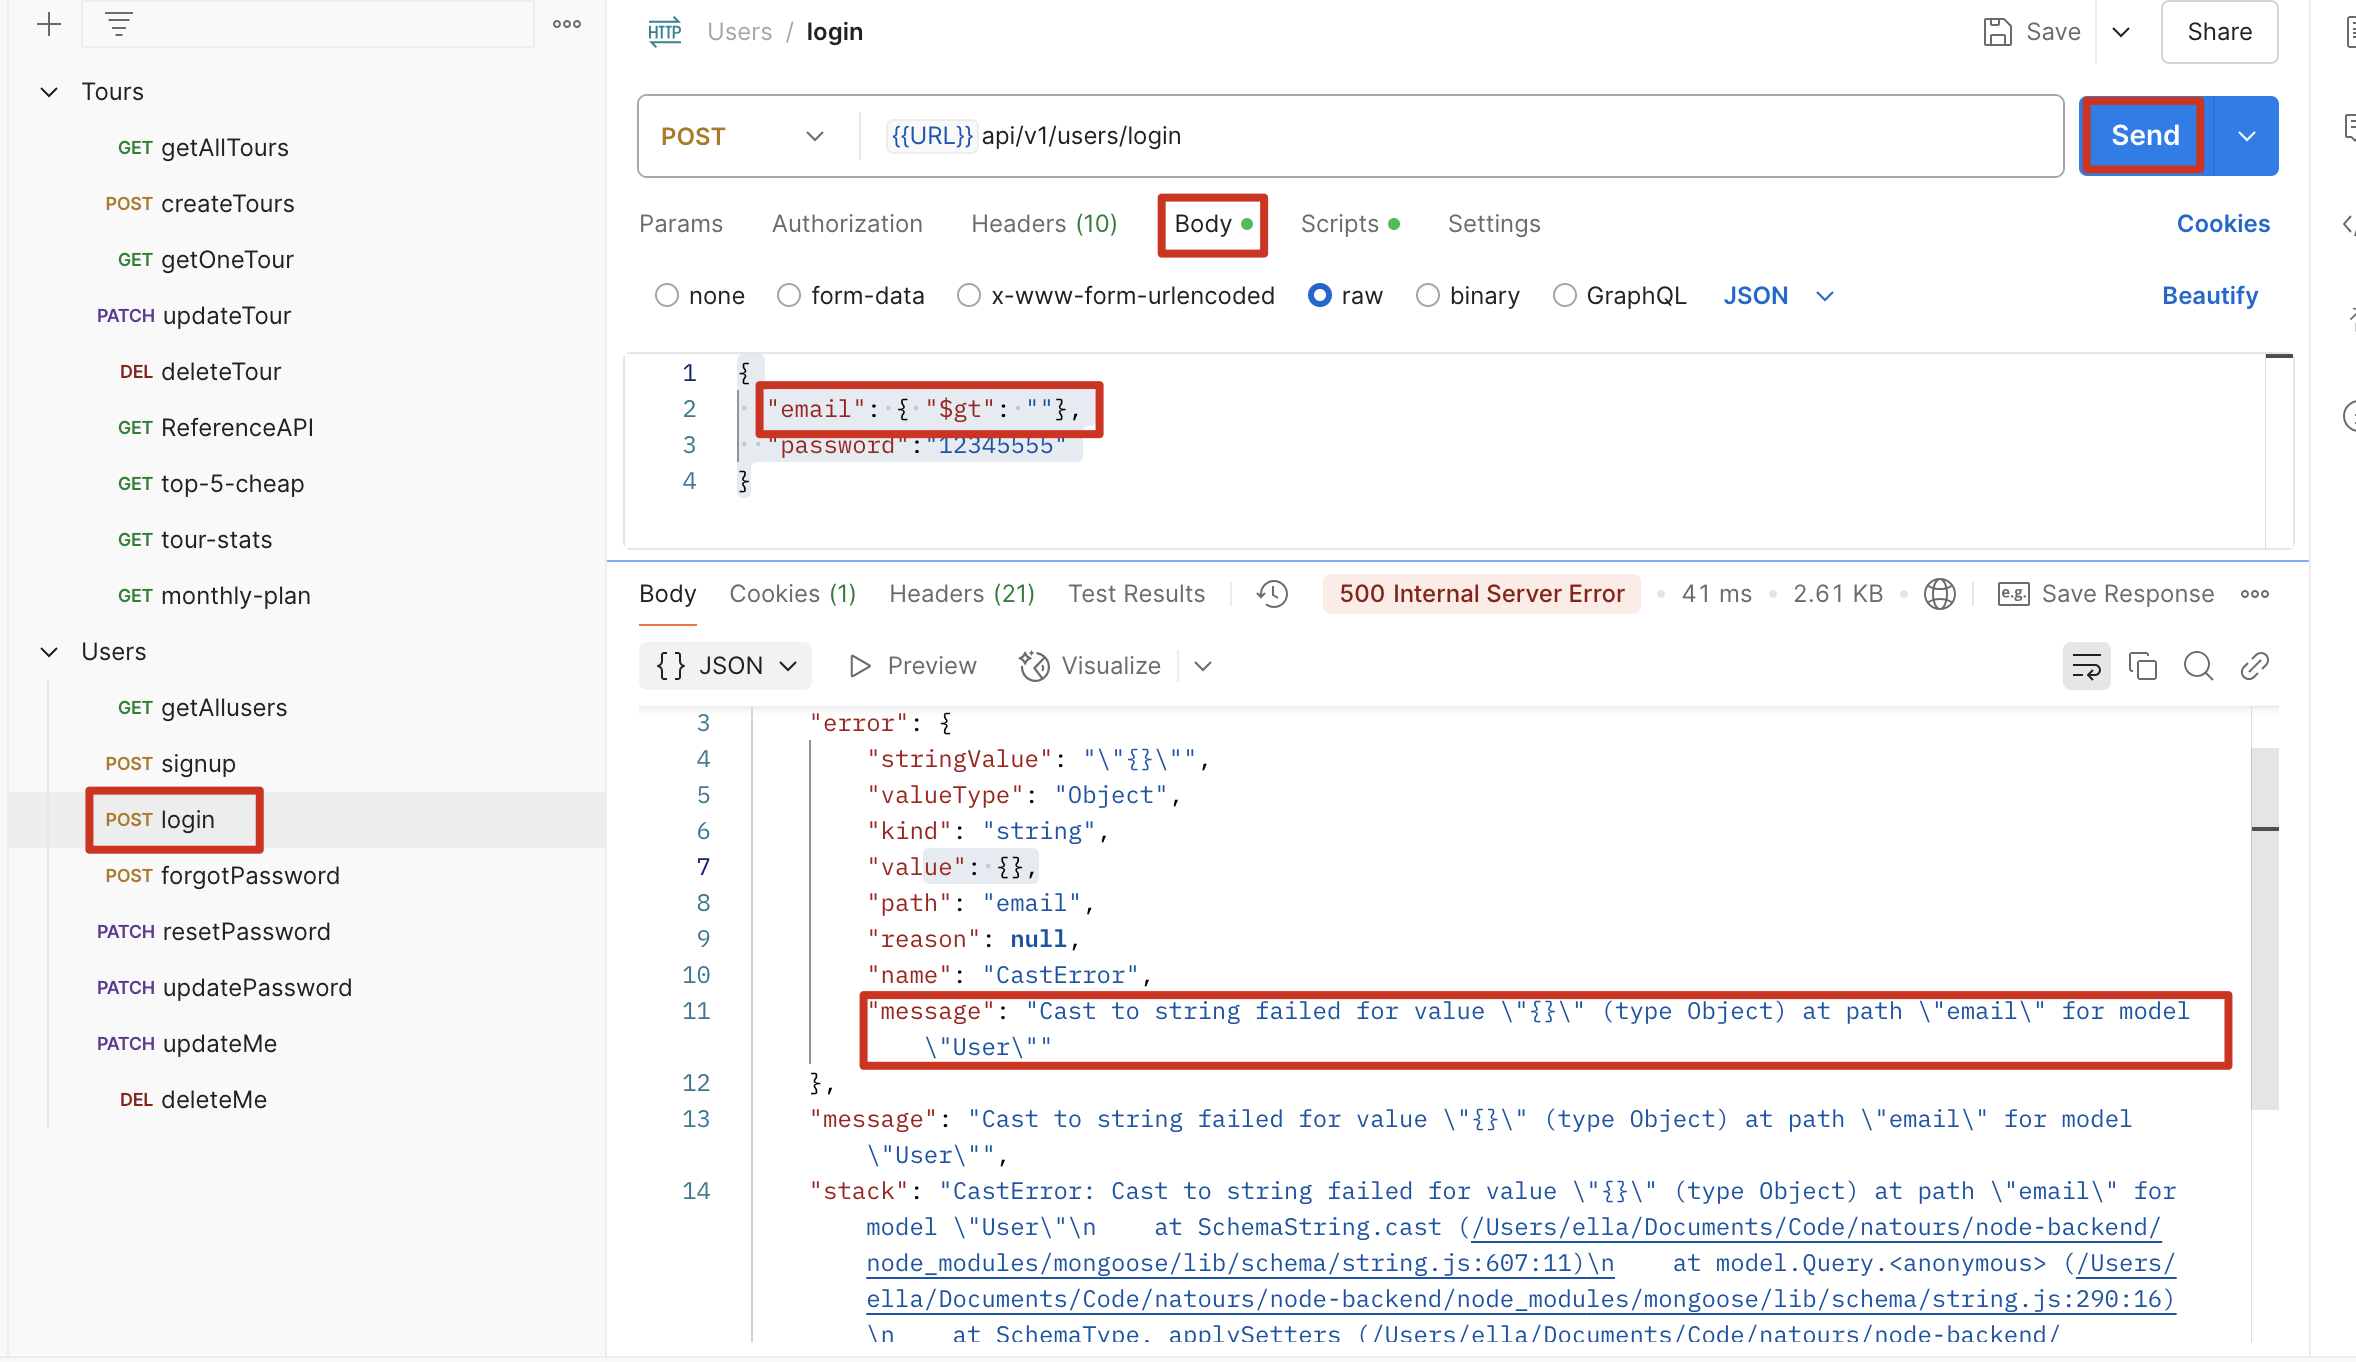
现象:在知道密码但不知道用户邮箱的情况下登陆
步骤:点击 login,在 body 中输入"email": { "$gt": ""},点击 send,此时会登录成功,并且此时是以admin的身份登录的
原因:"email": { "$gt": ""}会
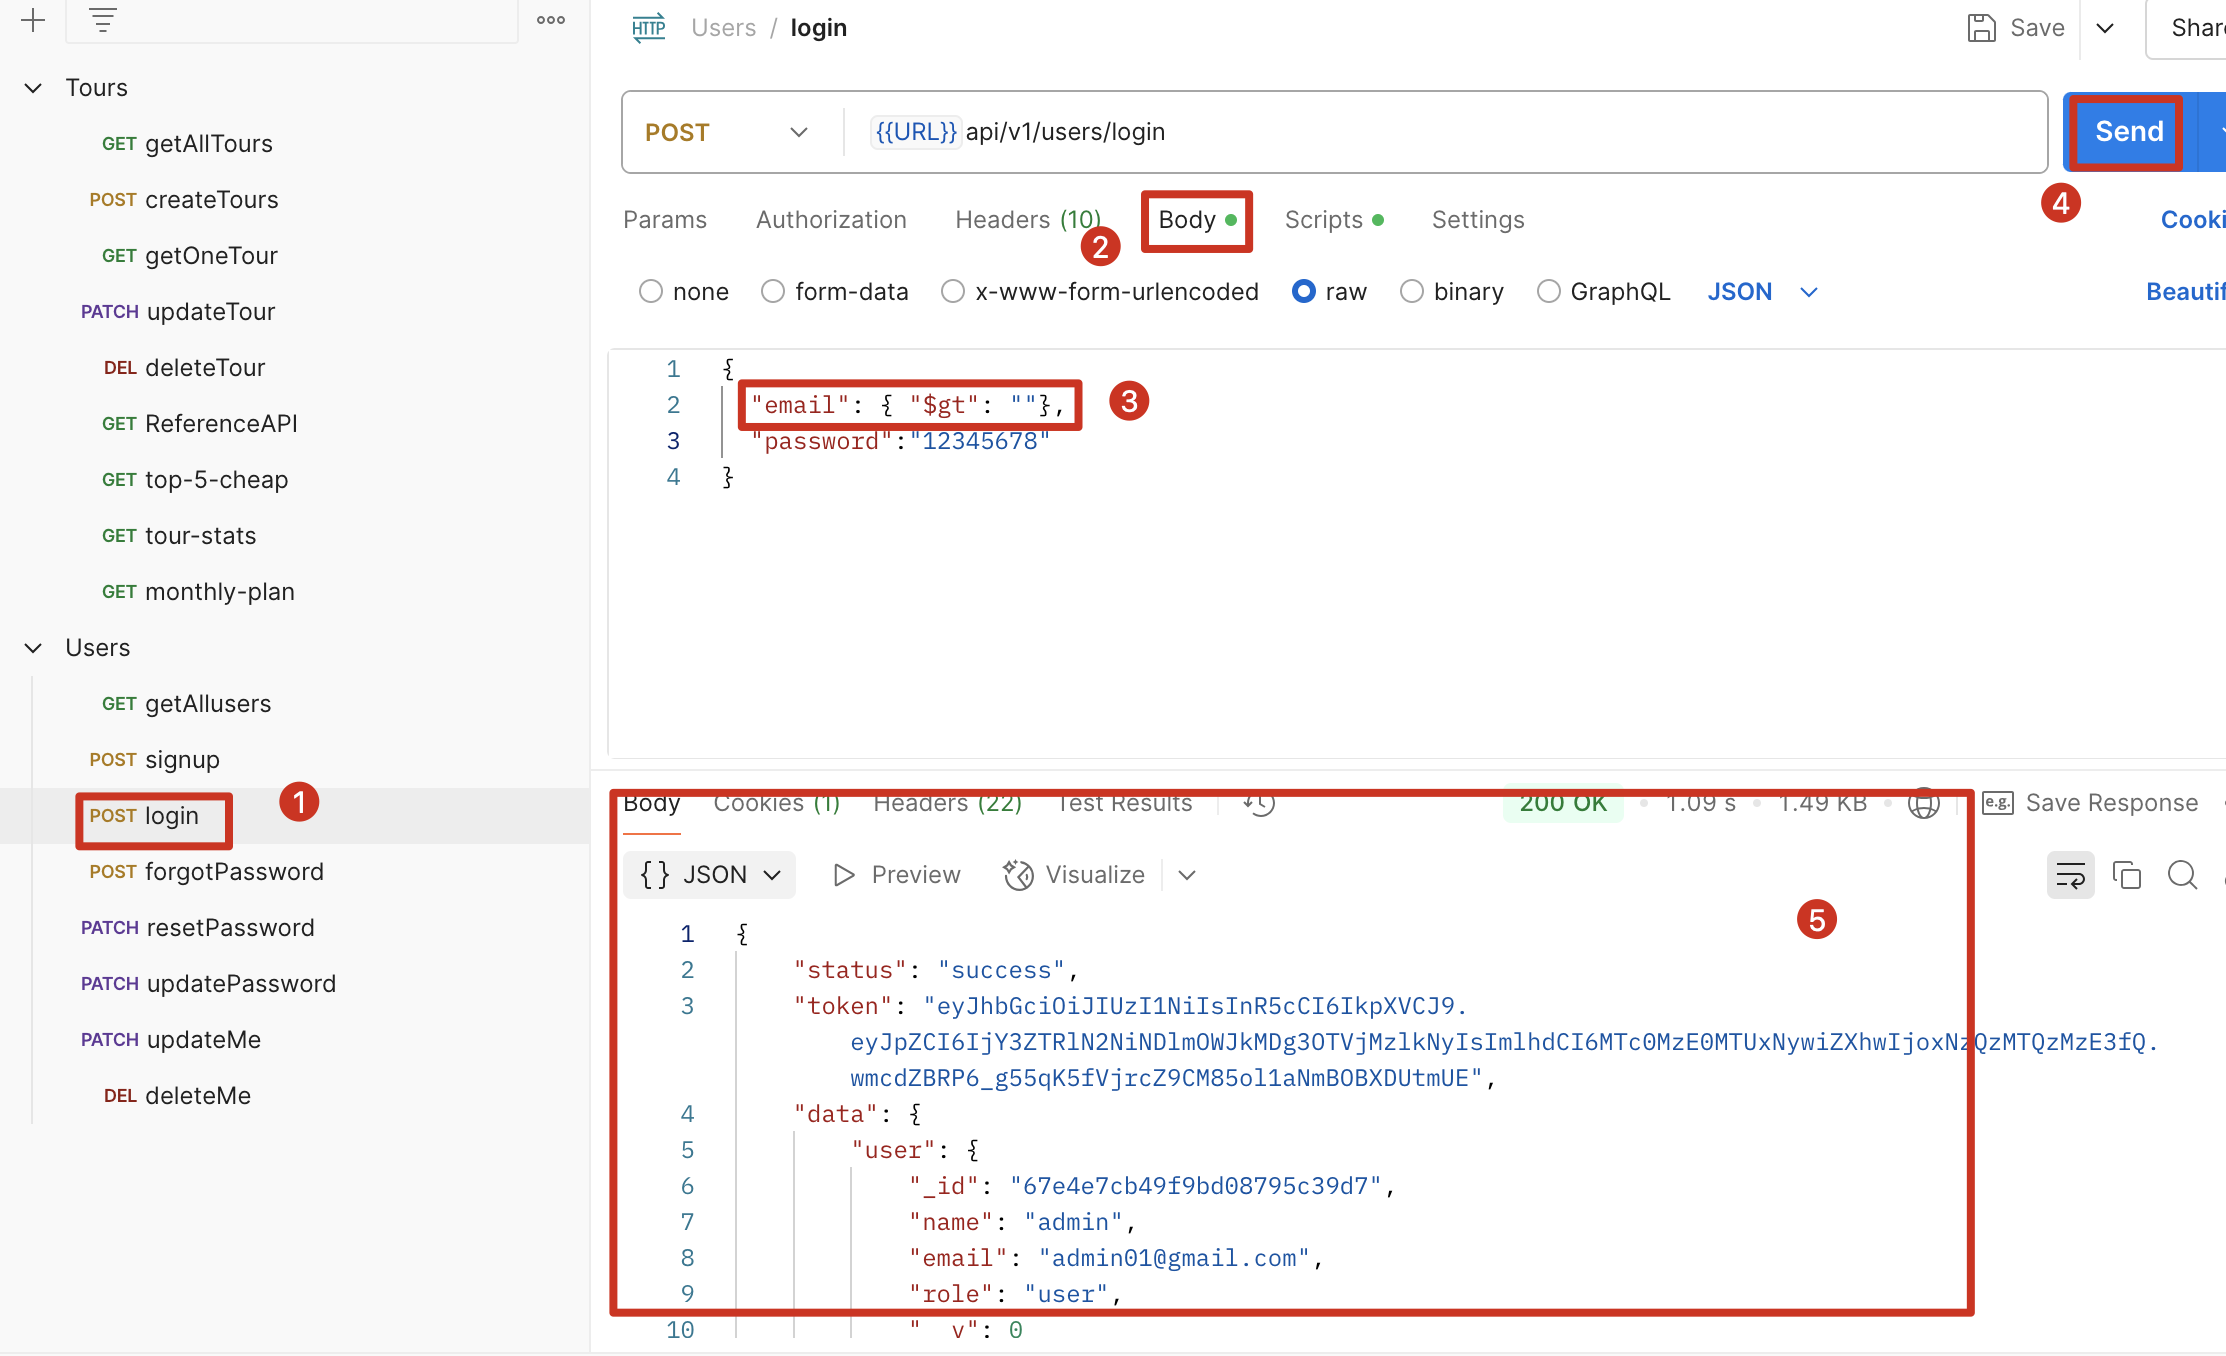
解决:安装 express-mongo-sanitize,并调用该中间件
1 | const mongoSanitize = require("express-mongo-sanitize"); |
修改后:
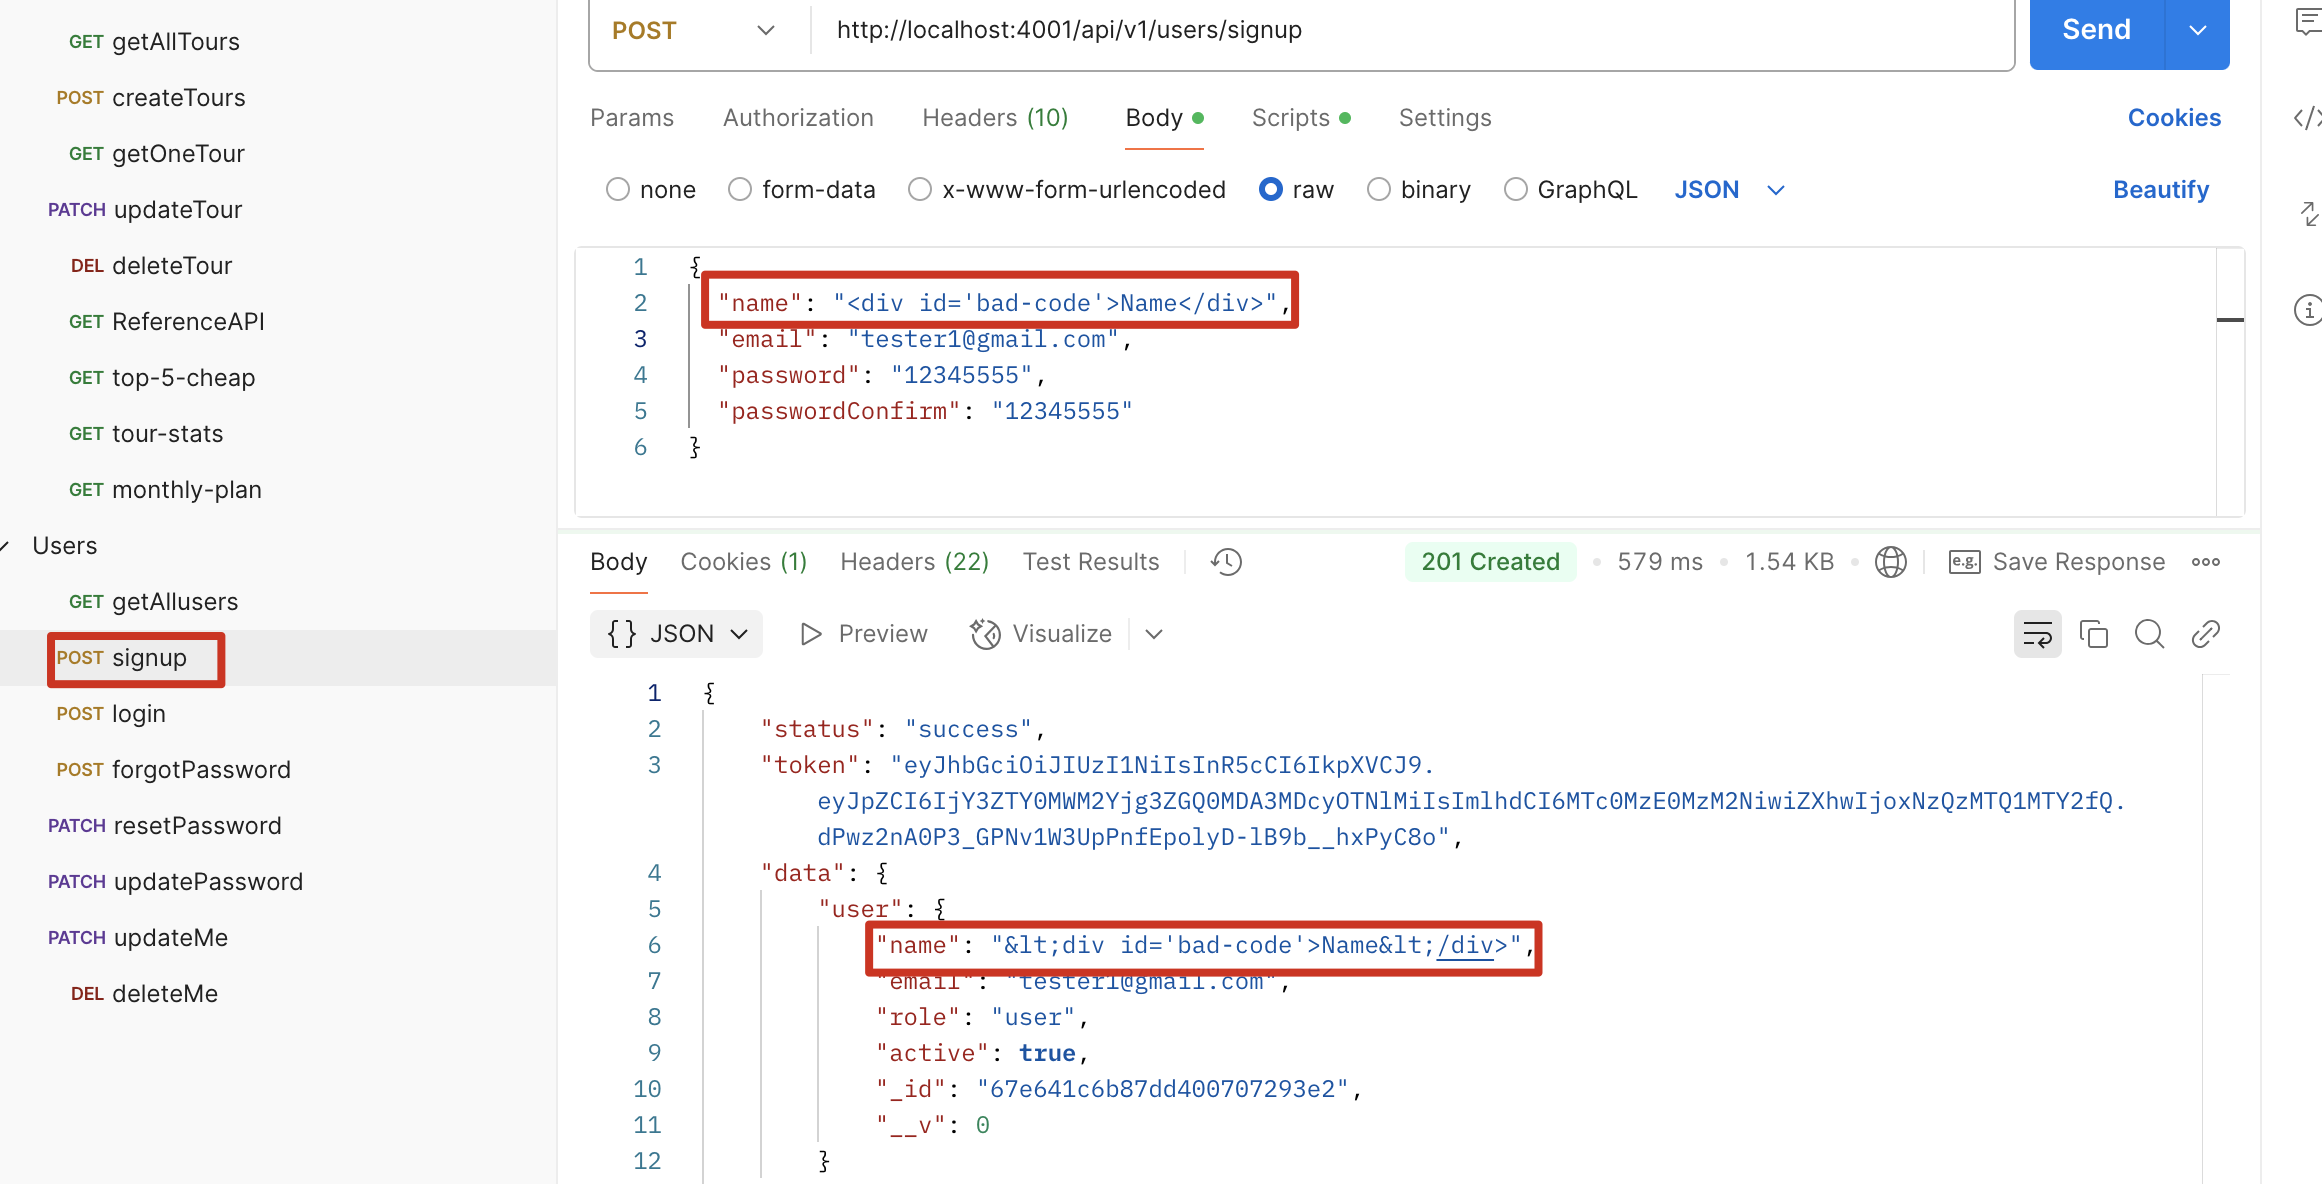
模拟 XSS 攻击
现象:攻击者会将恶意 HTML 注入 server,可能会产生不好的影响
解决:使用 xss-clean middleware 可以将 HTML 符号转换
1 | const xss = require("xss-clean"); |
修改前
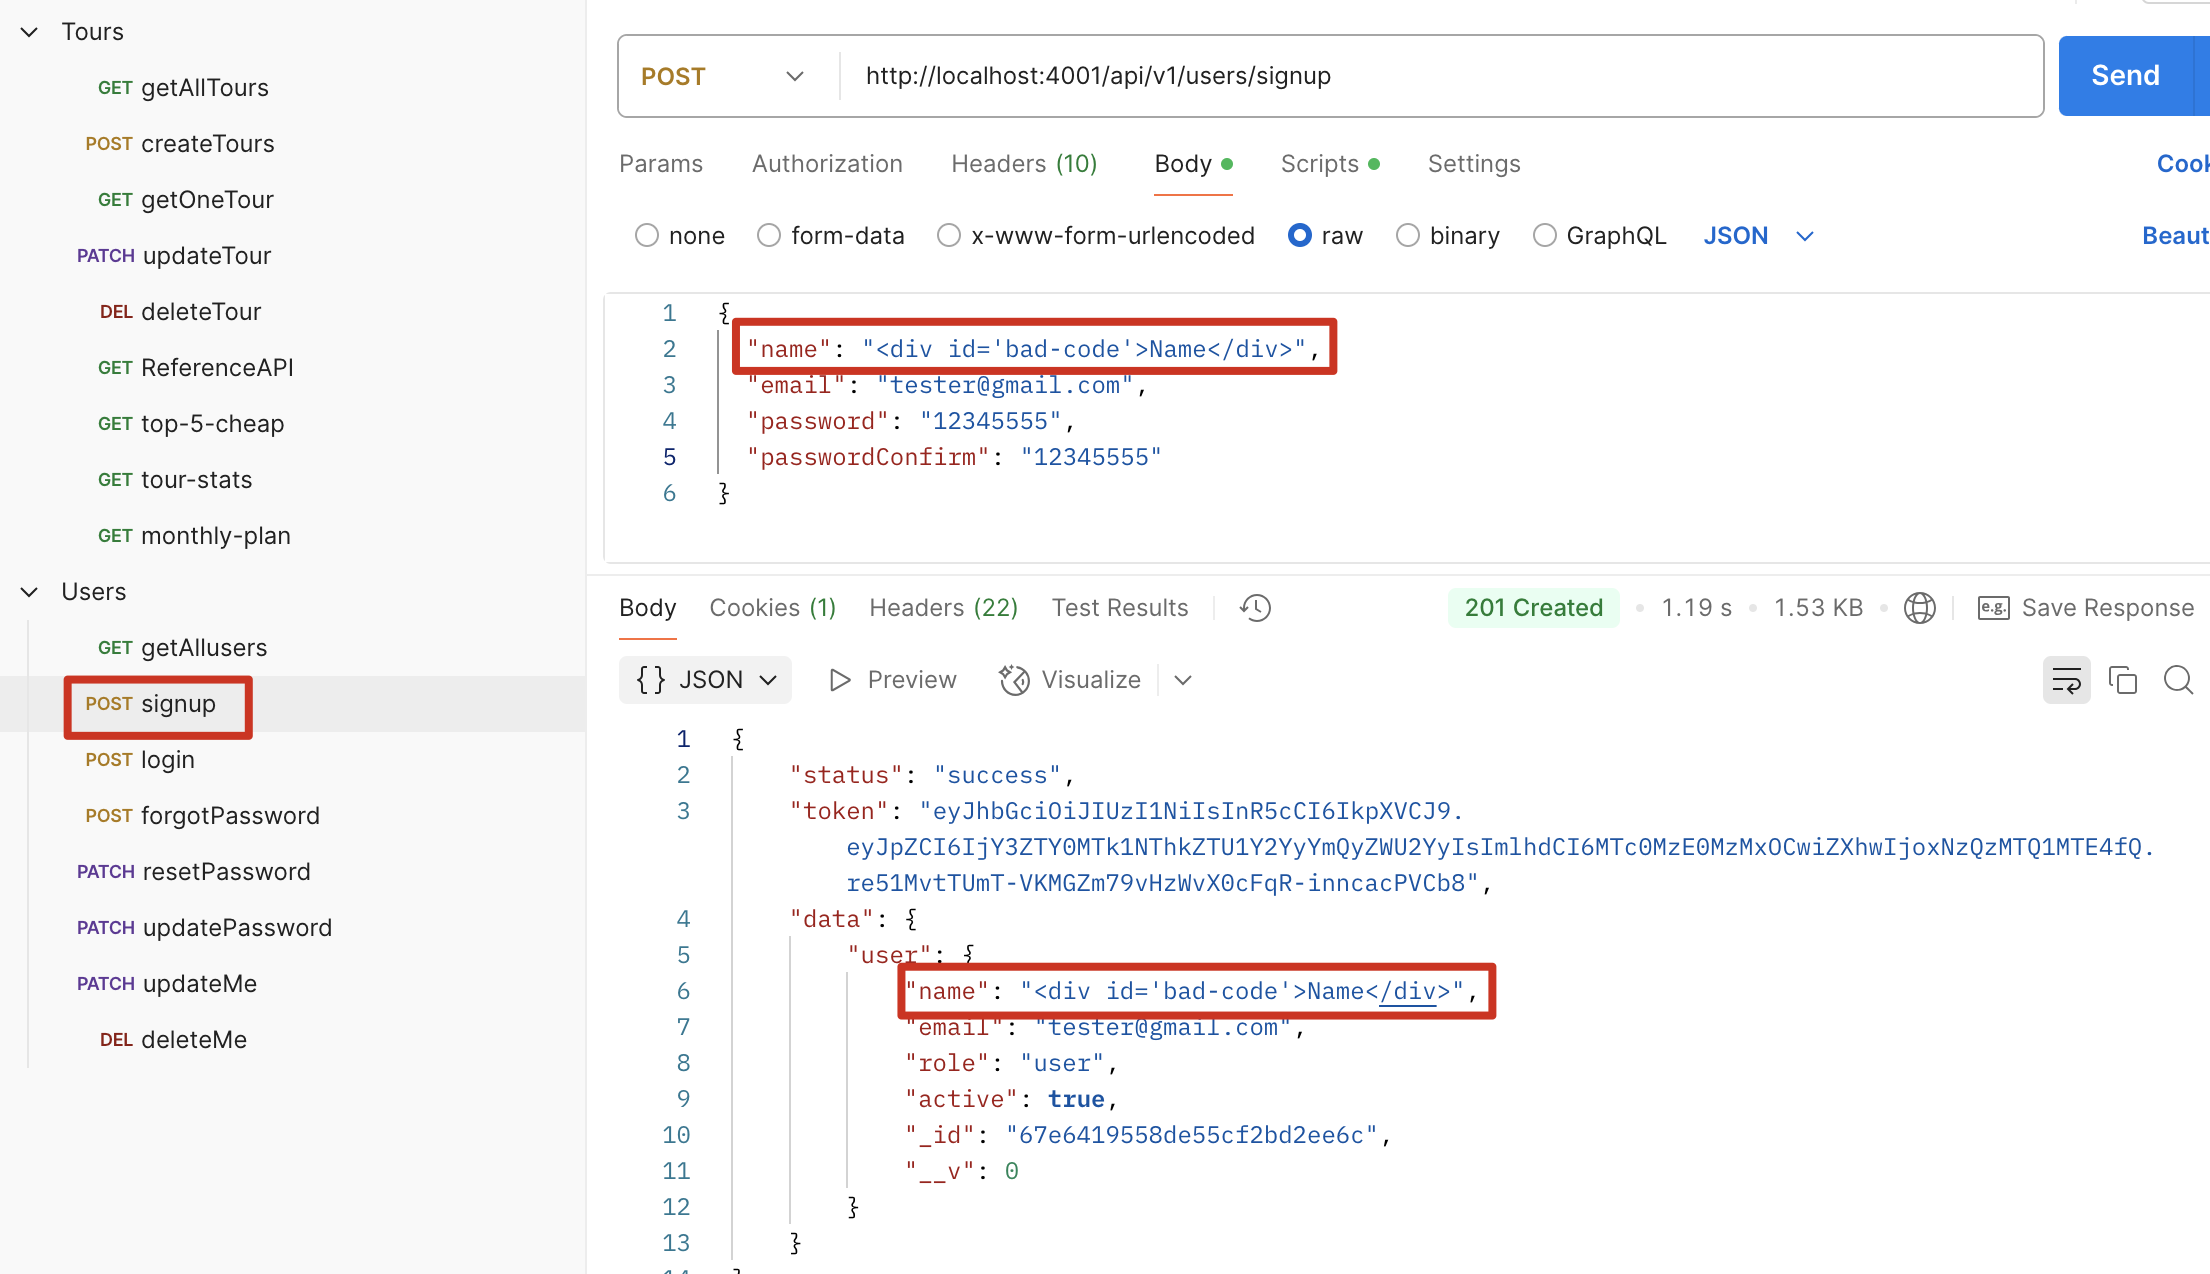
修改后
防止参数污染 HPP (Prevent HTTP parameter pollution)
安装:npm i hpp
Reference Link: HTTP Parameter Pollution (HPP) 同名的 http 變數名稱
用例:http://localhost:4001/api/v1/tours?sort=duration&sort=price
问题点:我们的 feature.sort 函数中,对 sort 是用字符串 split(‘,’),正常使用 sort 应该这样使用?sort=duration,price,如果用用例的方式,会报错,并且会返回[ ‘duration’, ‘price’ ],不是字符串,因此无法解析;使用 hpp 后,会使用后一个也就是price进行排序,丢弃第一个。其他场景见 refer link。
另外,针对这种场景http://localhost:4001/api/v1/tours?difficulty=difficult&difficulty=medium,我们想要获取两种 difficulty 的数据,如果直接使用 hpp() 会过滤掉第一个,只留下第二个,因此针对这种情况设立白名单
1 | const hpp = require("hpp"); |
项目管理 MVC
将 Application logic 写在 controller 中,更多技术逻辑
将 Business logic 写在 model 中,更多业务逻辑

Create tour
1
2
3
4
5
6
7
8
9// 两种方式 create documents
// 第一种:Model.prototype.save(),其中 prototype 代表通过 model 生成的实例
const newTour = new TourSchema({});
newTour.save();
// 第二种:Model.create()
const newTour = new TourSchema.create({});
// 建议使用第二种并配合 async 和 await 使用Catch err 的方式
1
2
3
4
5
6
7
8
9// 目前我见过以下几种
// 第一种,报错后程序不会崩溃,会返回 400 以及对应的 error json 信息
try {
} catch (err) {
res.status(400).json({
status: "fail",
message: err,
});
}
1
2
3
4
5//第二种
if (!name || !email) {
res.status(400);
throw new Error("All fields are mandatory");
}
1
2
3
4
5
6
7//第三种 不太会用
if (!id) {
res.status(500).json("11");
console.log("before return");
return;
console.log("after return");
}第四种:写中间件 errorHandler.js – 最常用,具体看下一章节
调试、错误处理与性能优化
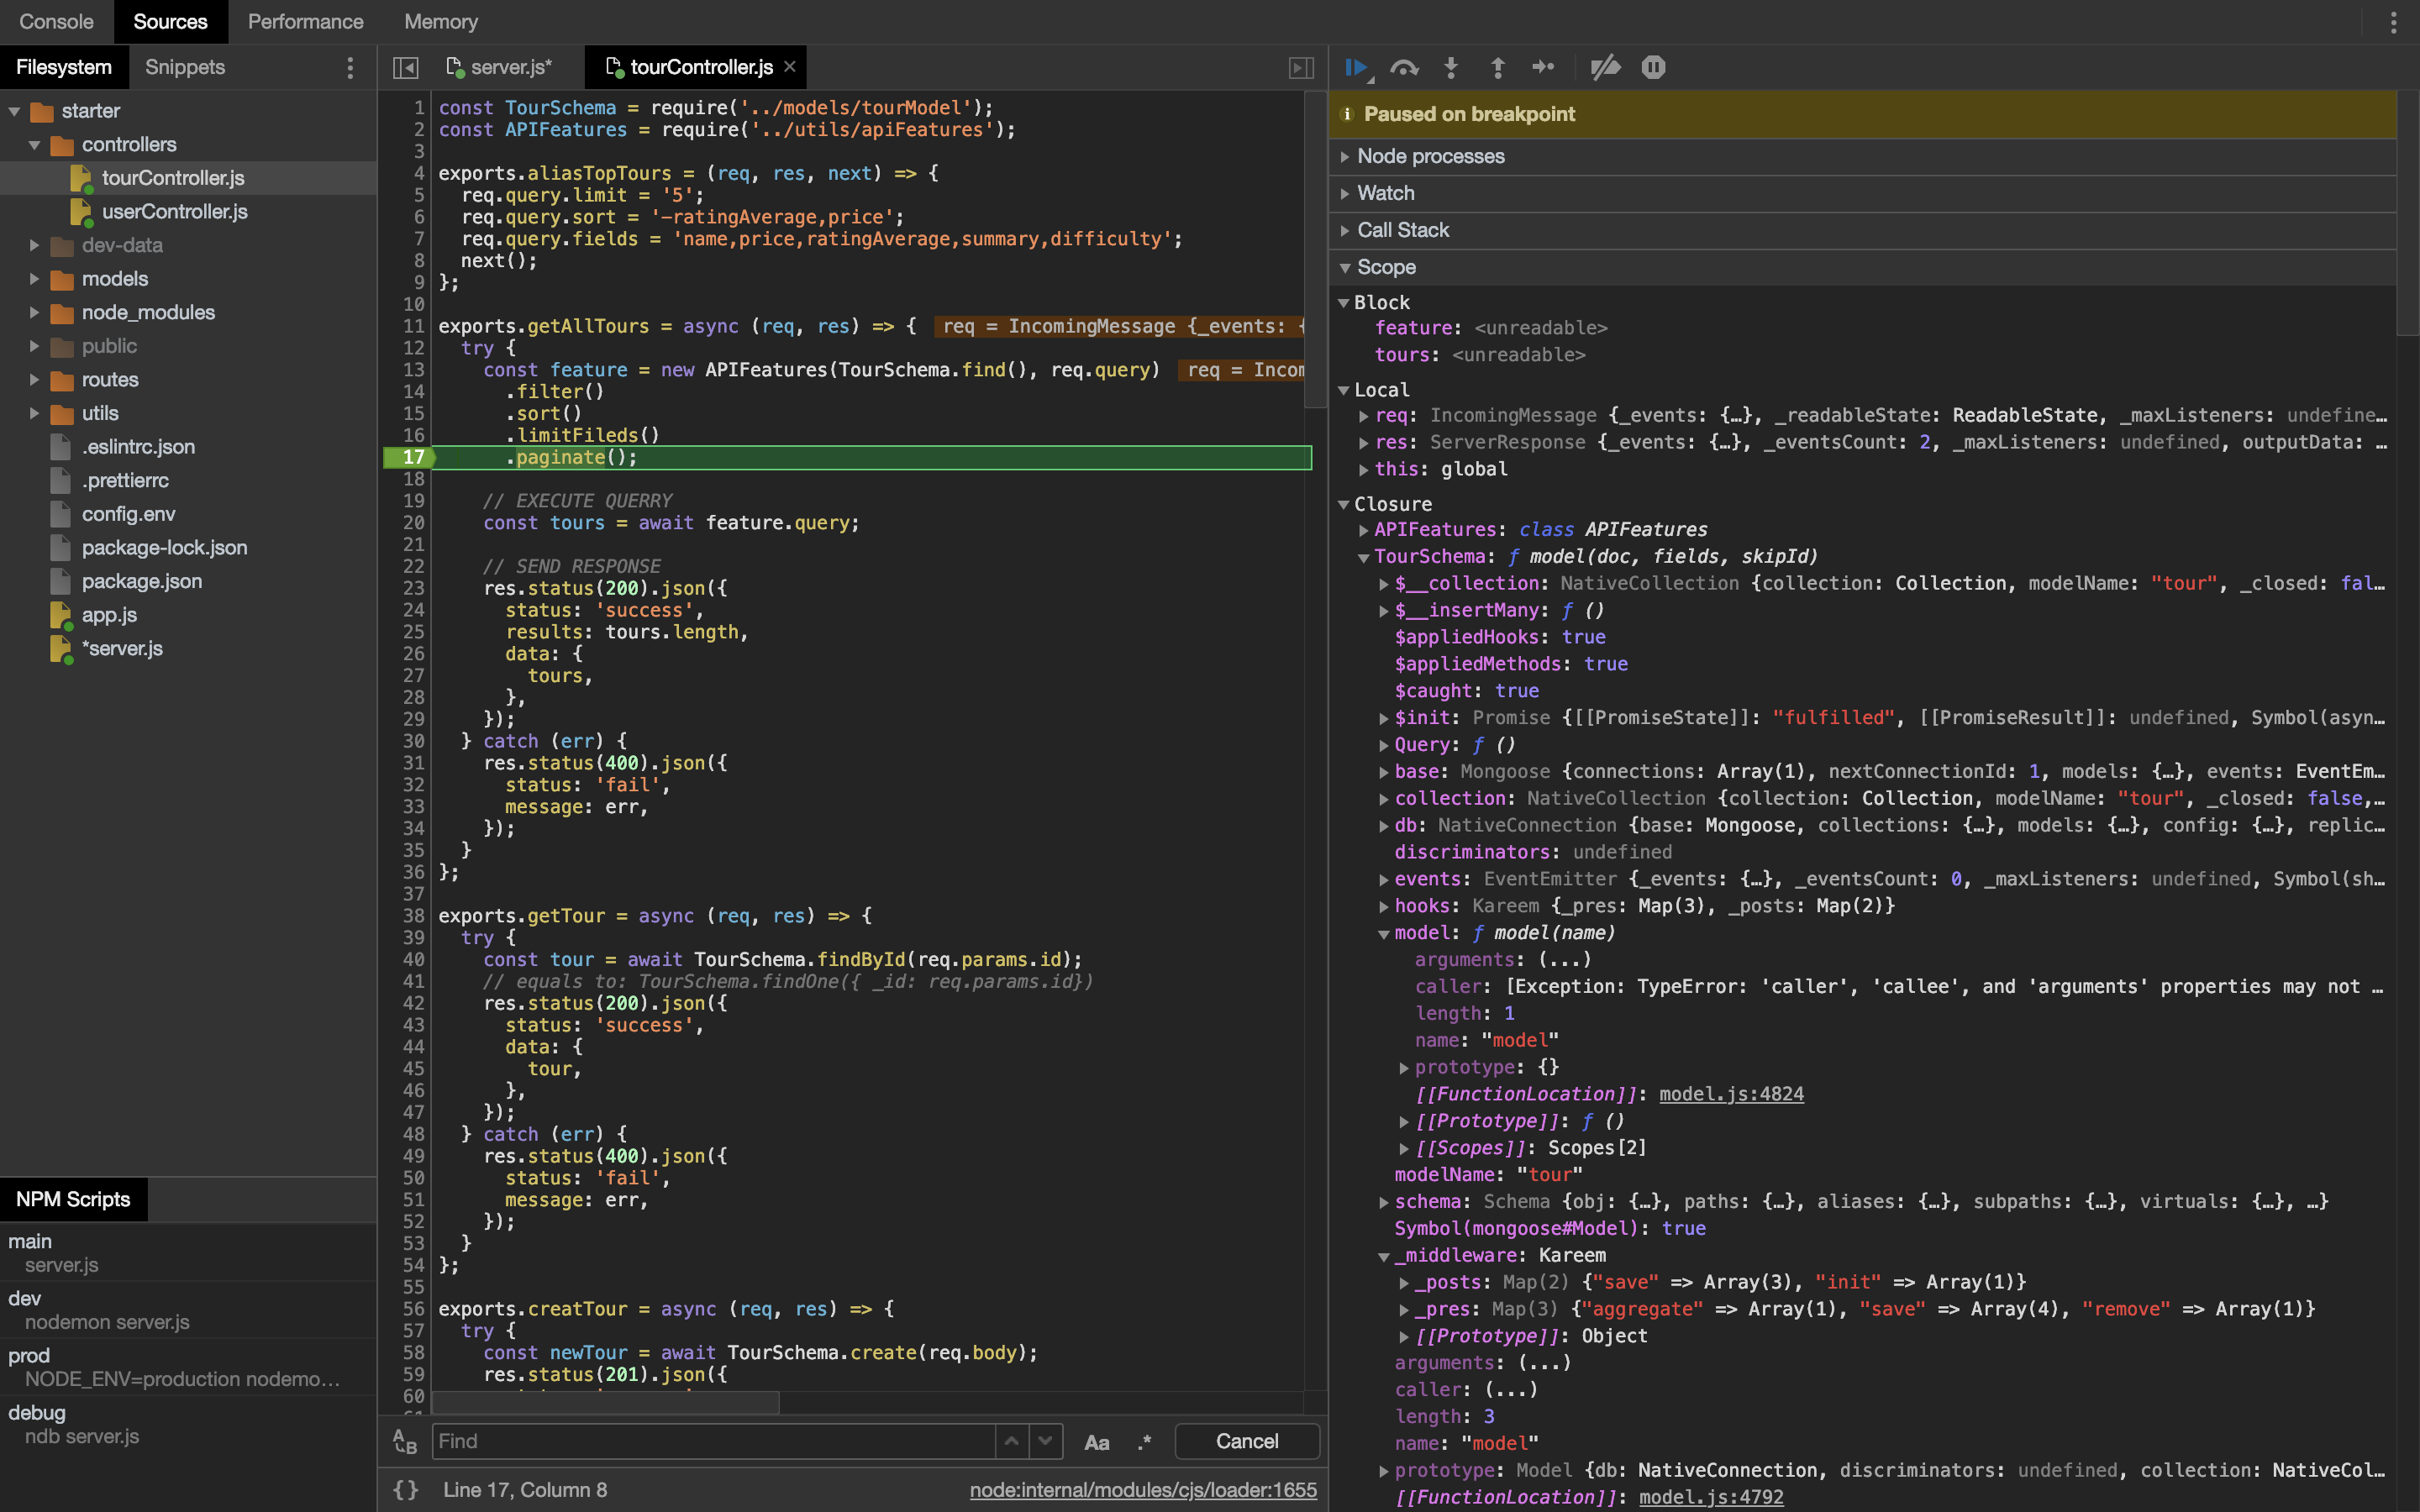
Debug 工具:NDB
Libiary: npm i ndb
npm run ndb server.js
可以用来调试代码,查看所有的变量
Error Handler
Undefined route handler
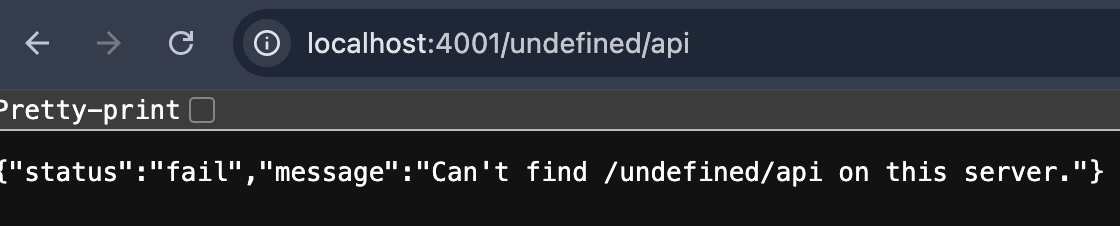
在 app.js,所有 route 中间件之后定义
用途:对于不存在的 route 请求返回对应的 json 信息而不是 HTML 报错
1 | // UNDEFINED ROUTE HANDLER |
用例:http://localhost:4001/undefined/api
前:
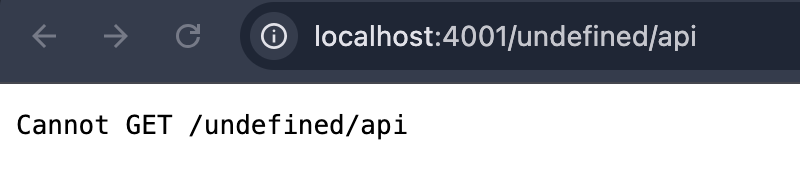
后:
globalErrorHandler
在所有的路由和中间件之后,加入 errHandler 的中间件。只要参数内加入
err,NodeJS 就会知道这是处理错误的中间件。1
2
3
4
5
6
7
8
9
10
11// 中间件,最终返回 err 的地方,它需要获取 err 内容
module.exports = (err, req, res, next) => {
err.statusCode = err.statusCode || 500;
err.status = err.status || "error";
res.status(err.statusCode).json({
status: err.status,
message: err.message,
});
next();
};调用 errHandler 中间件
在 next() 中传递 error object,这样它就不会运行其他中间层,而是直接传递到错误处理中间层。
1
2
3
4
5
6
7
8
9
10
11
12
13
14
15
16
17
18app.all("*", (req, res, next) => {
/* 第一种方式
res.status(404).json({
status: 'fail',
message: `Can't find ${req.originalUrl} on this server.`,
});
*/
/* 第二种方式 优化中
const err = new Error(`Can't find ${req.originalUrl} on this server.);
err.status = 'fail';
err.statusCode = 404;
next(err);
*/
/* 第三种方式 优化后 推荐 */
next(
new AppError(`Can't find ${req.originalUrl} on this server.`, 404)
);
});创建自定义的 Error Class 和重构
Error.captureStackTrace(targetObject[, constructorOpt]) 在 targetObject 中添加一个.stack 属性。对该属性进行访问时,将以字符串的形式返回 Error.captureStackTrace() 语句被调用时的代码位置信息 (即:调用栈历史)。
1
2
3
4
5
6
7
8
9
10
11
12
13
14
15
16// 用于整合 error code 和 message,抽象出来,便于其他 api 方法调用
class AppError extends Error {
constructor(message, statusCode) {
super(message);
this.statusCode = statusCode;
this.status = `${statusCode}`.startsWith("4") ? "fail" : "error";
// 代表是否为可预期的错误,在后面的错误处理中可能会遇到一些非 operational 的错误,这些错误没有这个字段,便于管理
this.isOperational = true;
// 可以将 err.stack 通过这种方式返回给 errHandler
Error.captureStackTrace(this, this.constructor);
}
}
module.exports = AppError;1
2
3
4
5
6
7// 调用定义好的 class,写入 next()中,通过中间件返回错误信息
app.all("*", (req, res, next) => {
// 这里调用 class,并传递 err 到 errhandler 中间件,next(err) 会直接传到处理 err 的中间件
next(
new AppError(`Can't find ${req.originalUrl} on this server.`, 404)
);
});
Catch errors in Async function
现在想要重构 api 代码,之前写的都是 try catch,所有的 catch 内容都大同小异,现在需要一种间接的方式优化代码,并保证 catch 功能不变
原始代码:
1 | exports.getTour = async (req, res) => { |
优化后代码
在 Express 里,如果想让错误自动传递给全局的错误处理中间件(即 app.use((err, req, res, next) => {}) 那种),需要在 getTour 外面包一层,手动捕获异常,然后调用 next(err),这里用了一个catchAsync 高阶函数实现
catchAsync是否能作用于 route 呢?可以,但是这个函数仅适用于异步 api,也就是说如果作用于 route,我需要去记忆哪些 api 是异步,哪些不是,所以不建议
1 | const catchAsync = (fn) => (req, res, next) => { |
返回 404error
上一个例子中,getTour 在使用有效的 mongodb id,但该 id 不存在于数据库时,会返回 200,null,针对这种情况,我们要修改为返回 404,not found
1 | exports.getTour = catchAsync(async (req, res) => { |
修改前
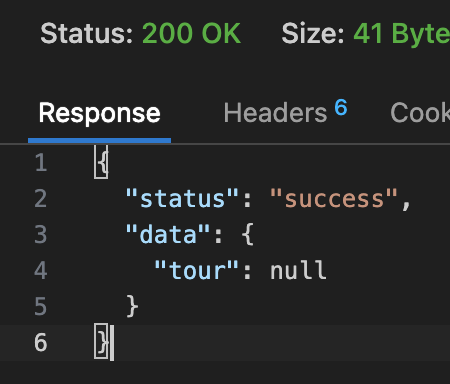
修改后:
开发/生产环境 Error 设定
修改 ErrorController.js
1 | // 开发环境,尽可能返回多的信息,比如这里的 err 和 stack |
MongoDB 导致的不能 catch 的错误(生产环境)
CastError
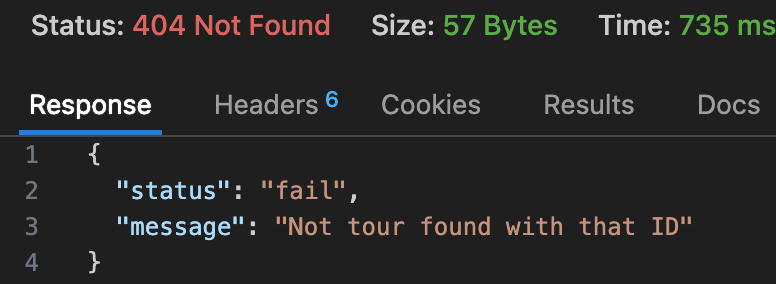
示例:getTour, http://localhost:4001/api/v1/tours/6,6 不是一个合法的 mongodb id,所以这里会发生 CastError
1 | const handleCastErrorDB = (err) => { |
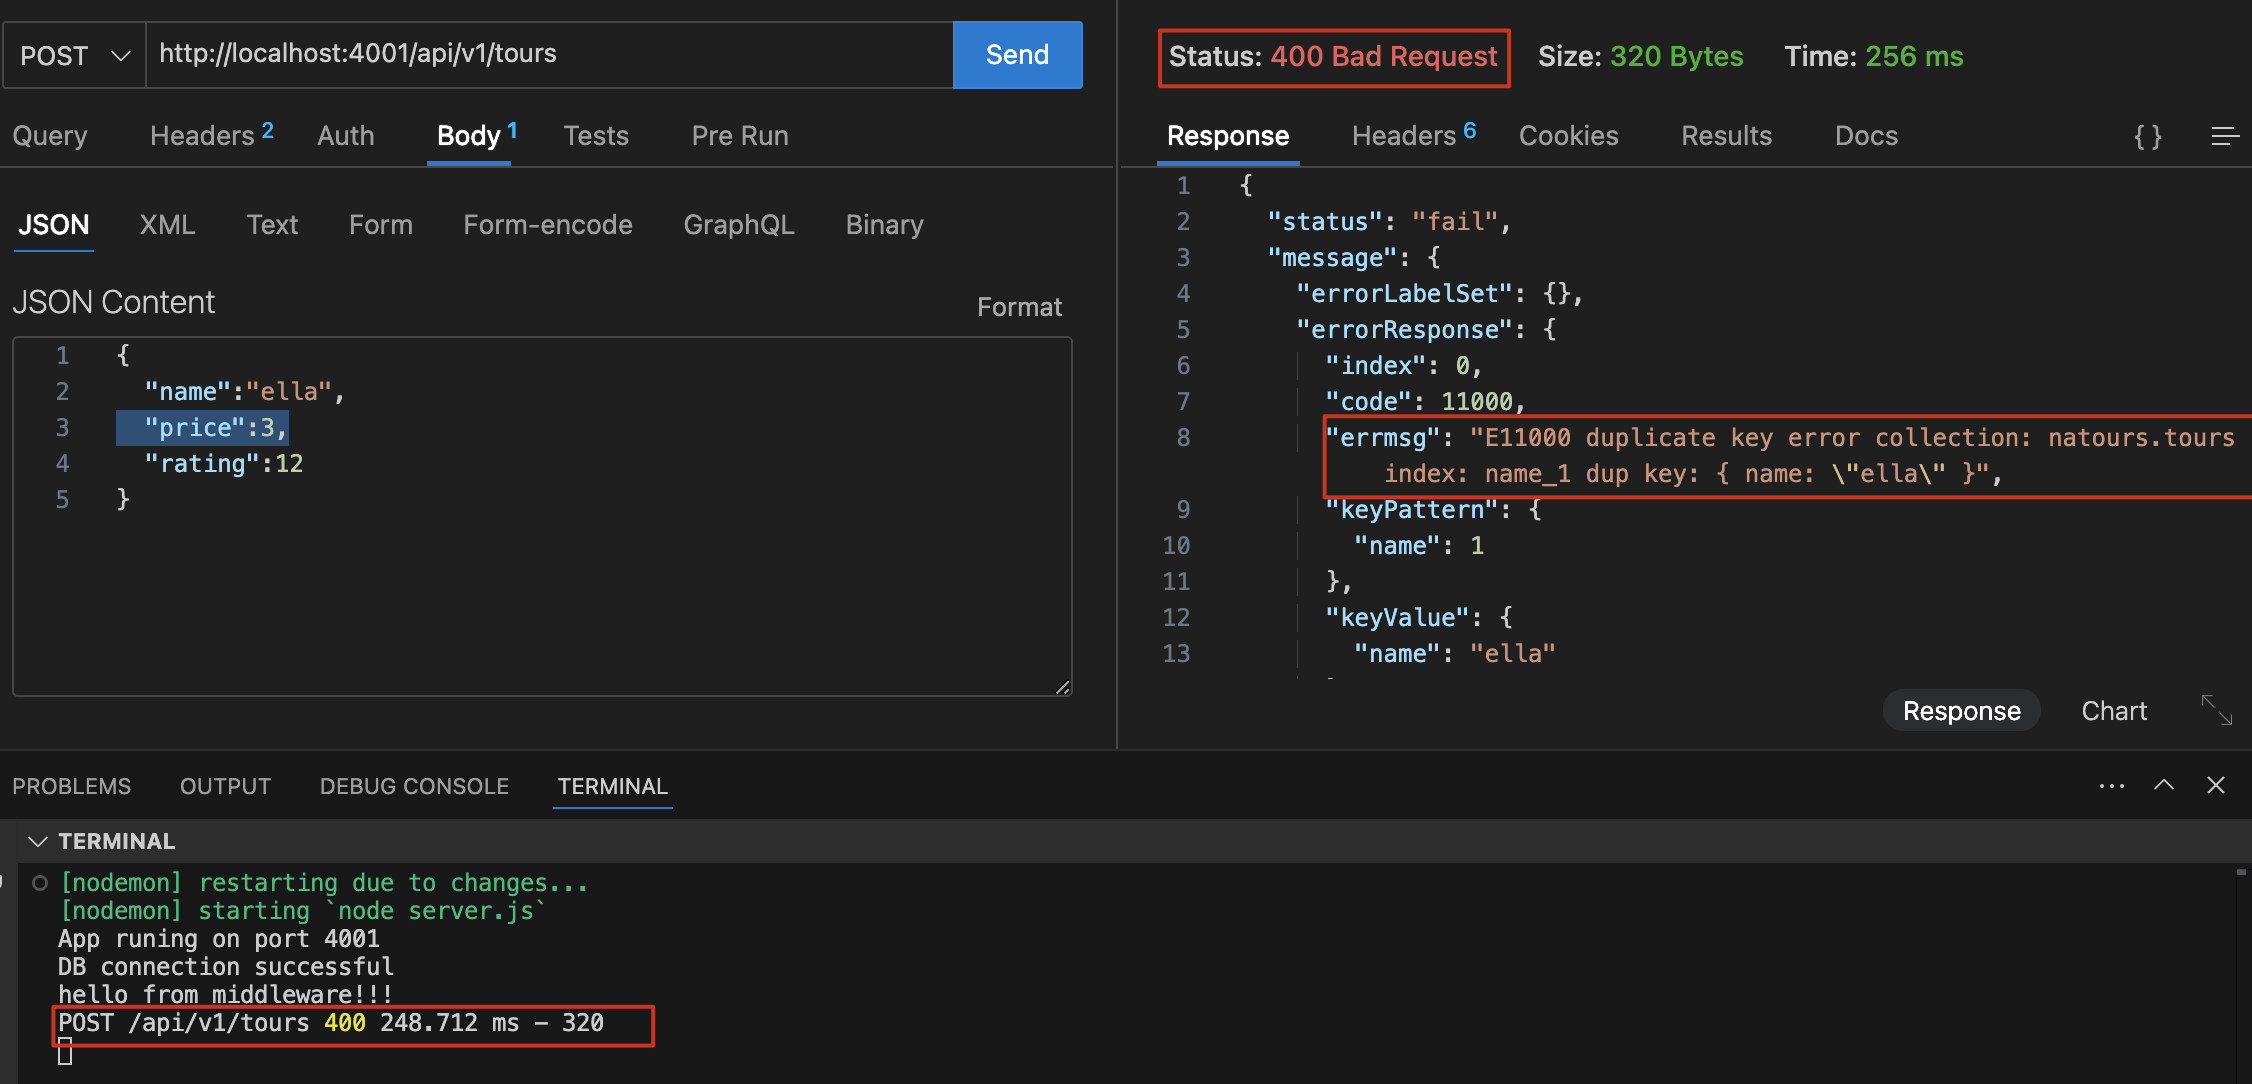
unique shcema 重复报错
示例:createTour,http://localhost:4001/api/v1/tours,body 写重复的 name(因为 schema 中的 name 有 unique 属性)
1 | const handleDuplicateFieldsDB = (err) => { |
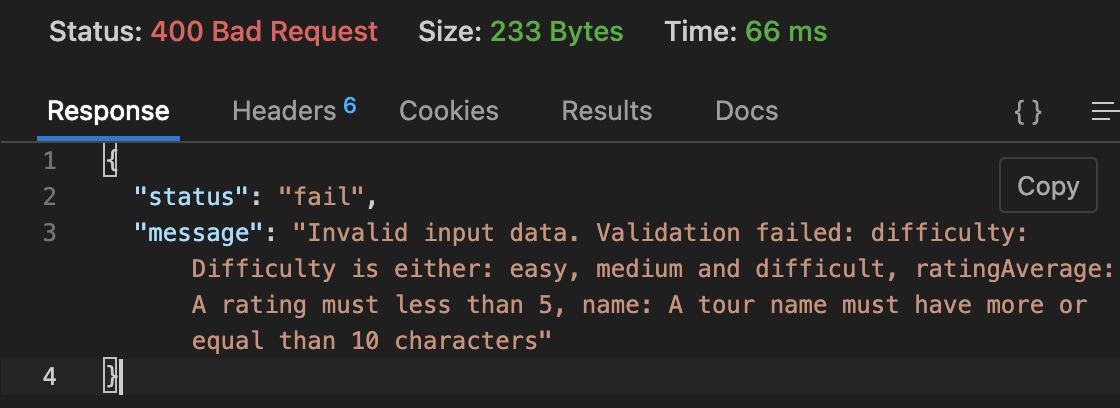
ValidationError
示例:UpdateTour, http://localhost:4001/api/v1/tours/67e192164d84562515941d9b,一个合法的 id,输入错误的 body
1 | { |
1 | // 上面的 body update 会返回三种报错信息,我们做的是将这三种报错信息整合在一起返回给用户 |
修改后
Process Event 事件处理
Unhandled rejections & Uncaught exception
示例:比如 mongodb 数据库连接失败,密码修改或者 ip 变化,打印一个未定义的变量
1 | const server = app.listen(PORT, () => { |
修改前:
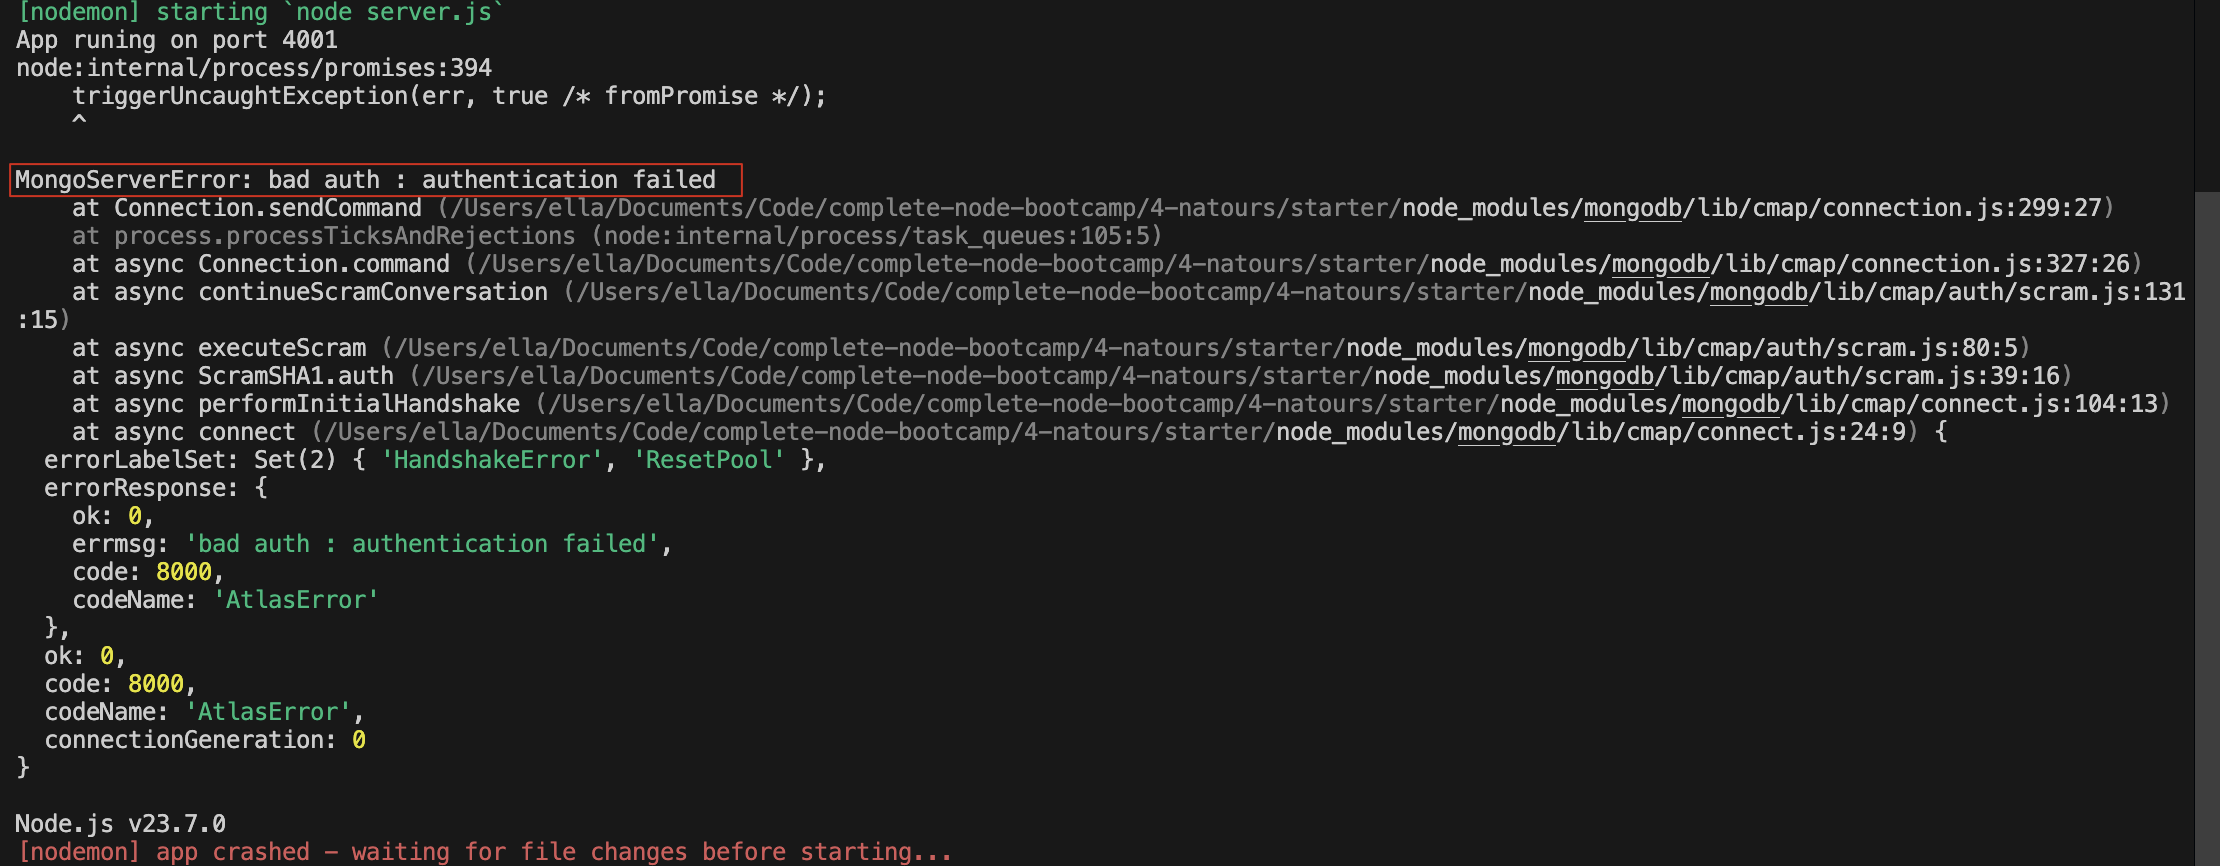
修改后:

catchAsync 和 express-error-handler 区别?
p115 没看懂
关于代码错误该怎么 catch error?比如有一个 async 忘了写 await
常见报错及解决
Cannot GET /
因为看错了 api 路径,需要看 http://localhost:5001/api/contacts 而不是 http://localhost:5001/
process.env.PORT is Undefined
因为没有安装 dotenv 库
Can not read properties from undefined, process.env.DATABASE问题:运行命令
node ./dev-data/data/import-dev-data.js --delete一直报错,process.env 里没有我们配置的环境变量原因:
dotenv.config({ path: '../../config.env' });这句写错了,不应该是../../config.env,应该是./config.env,因为它的路径是相对于process.cwd()而不是__dirname,也就是 config.env 的 path 是相对于程序执行目录(也就是 server.js 所在的目录),而不是当前目录。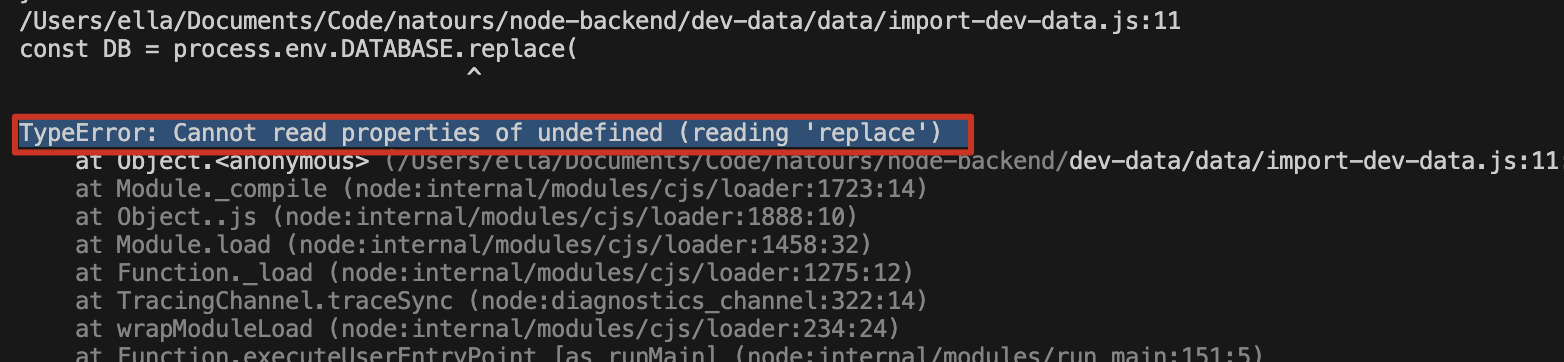
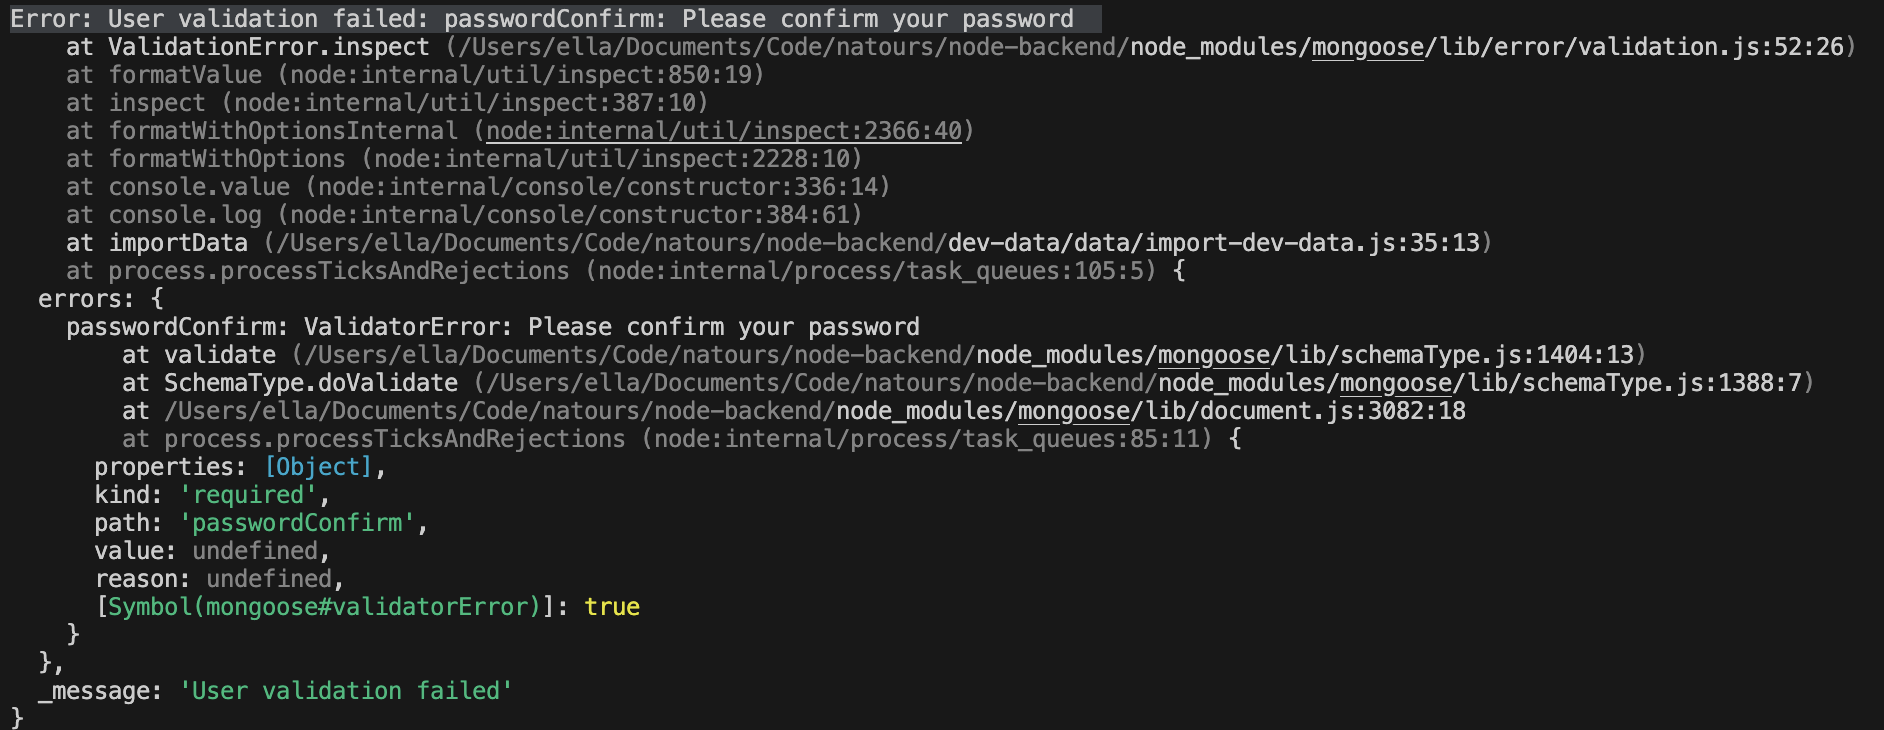
导入 tours, user, reviews 数据到数据库是报错:
Error: User validation failed: passwordConfirm: Please confirm your password因为我们会 create user,之前我们设置了 validator,所以这里我们用
{ validateBeforeSave: false }将它手动关一下还需要将密码验证的 query middleware 先注释一下
1
await User.create(users, { validateBeforeSave: false });
MongoServerError: E11000 duplicate key error collection: natours.tours
解决:先 delete 再 import
想要绕过 query middleware 不能操作 document 限制,使用如下代码,报错
Error is !!!!!!! MongooseError: Query was already executed: Review.findOne({ _id: '5c8a3c7814eb5c17645c9138' })1
2
3
4
5
6reviewSchema.pre(/^findOneAnd/, async function (next) {
// 目标是获取当前 review document 的权限,但目前的 this 是当前的 query 权限
const r = await this.findOne(); // 我们可以先执行一个 query 操作,这会返回给我们一个正在处理的 document
console.log(r);
// next();
});
解决:
findOne(this.getQuery())是独立查询,不会影响findOneAndUpdate本身的执行流程1
this.r = await this.model.findOne(this.getQuery());